5 Tips for Photographing Your Families Vacation | Story Behind my Most Hated Photo + Lessons From My Past Trips

I love to travel, I love travel photography and documenting our travel adventures! With Spring upon us I have been doing a lot of reminiscing over past trips and strategizing for the future because Spring and Summer is when I tend to travel the most.

With all this reminiscing and strategizing I’ve been discovering a lot of things and in todays article I wanted to boil down five lessons that I’ve learned from documenting past trips so hopefully you can learn from my mistakes.

Lesson #1 : Learning to be Flexible

When I’m on vacation I don’t have 2+ hours to be at a location. I’m also not always there at the right time for lighting or without crowds. Thus, learning to be flexible is vital.

I like to have a few tips and tricks in my back pocket to help me work with the current conditions and make the best of the situation.

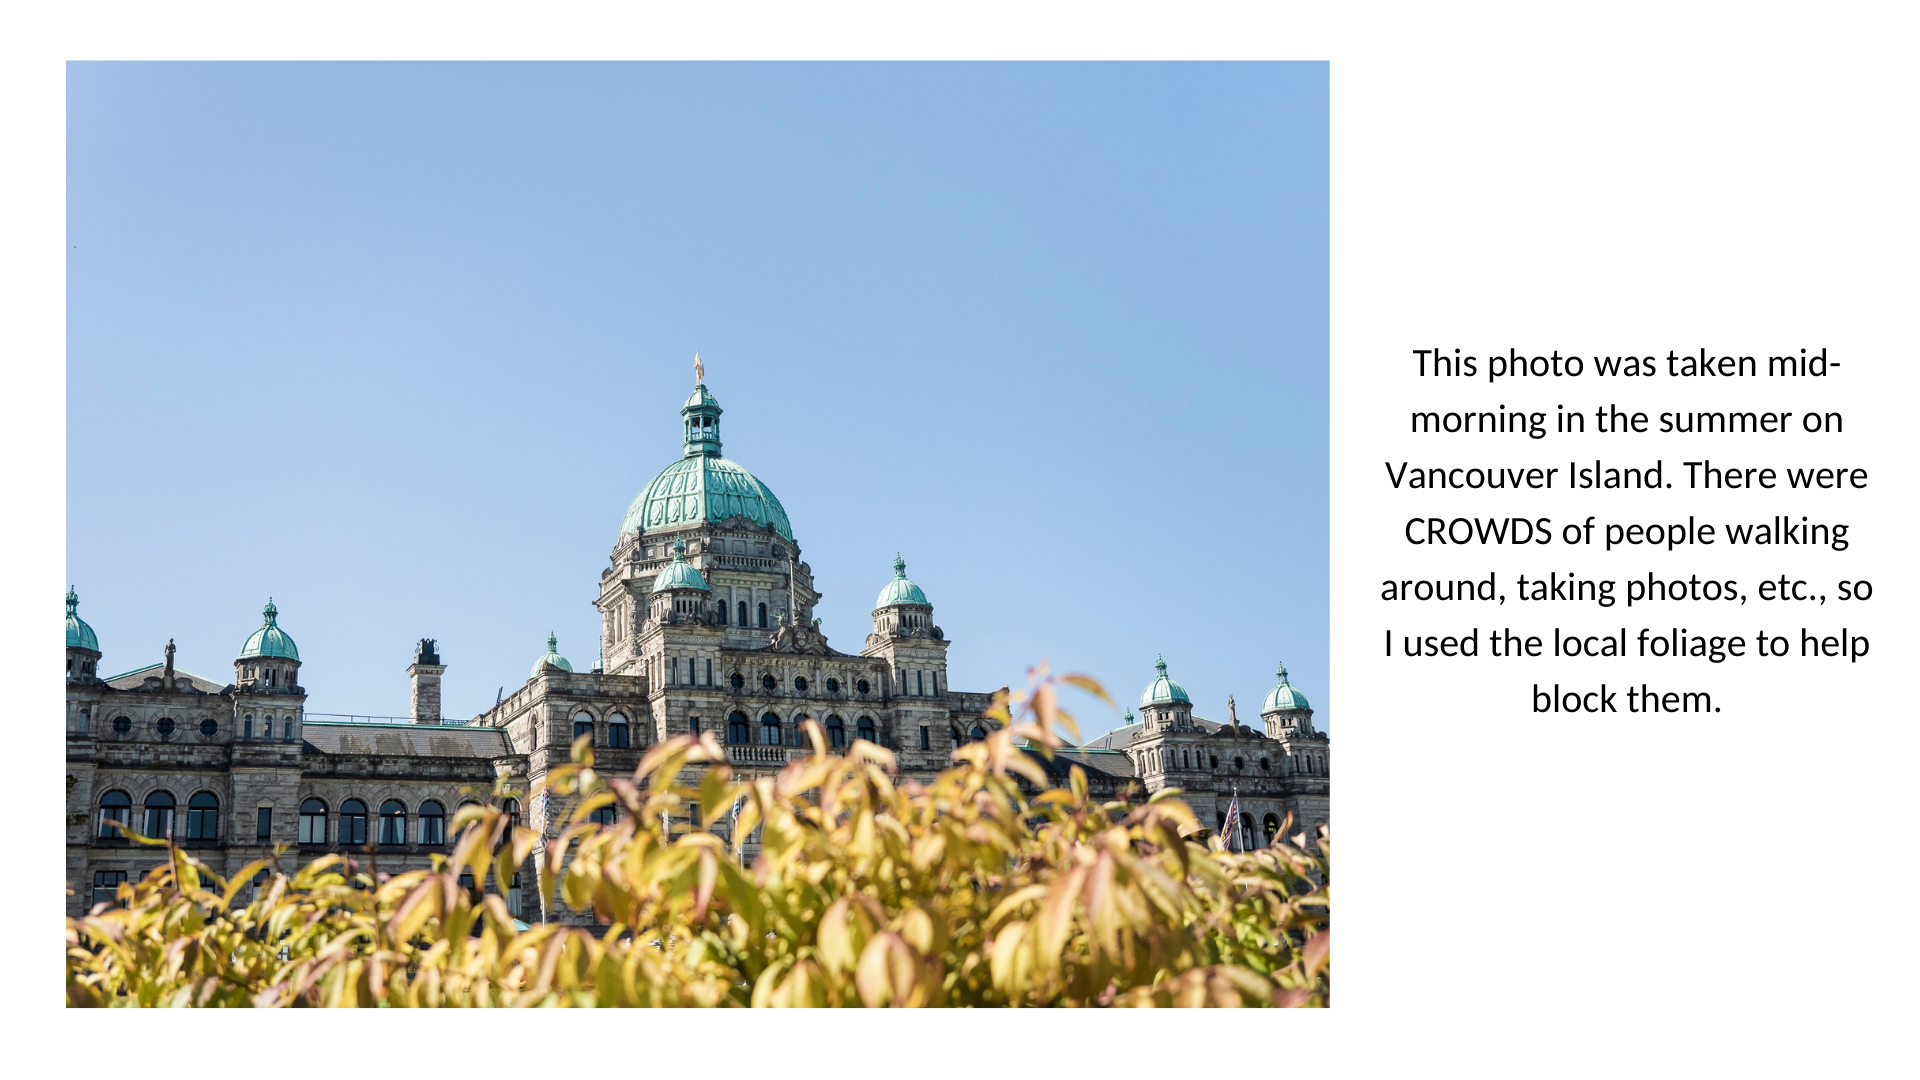
For example, if I’m at a landmark that has tons of crowds around. Learning to be flexible means maybe using some foreground interest to block out the crowds, slowing down the shutter speed to showcase the movement of people, or leaving the crowds as documenting what the scene truly looks like.

Lesson #2 : Understanding What is Important, Why You’re Photographing the Trip and Your Mindset Before the Trip

I have definitely found that understanding what is important, why I’m photographing the trip, and my mindset before the trip influences how I photograph the trip.

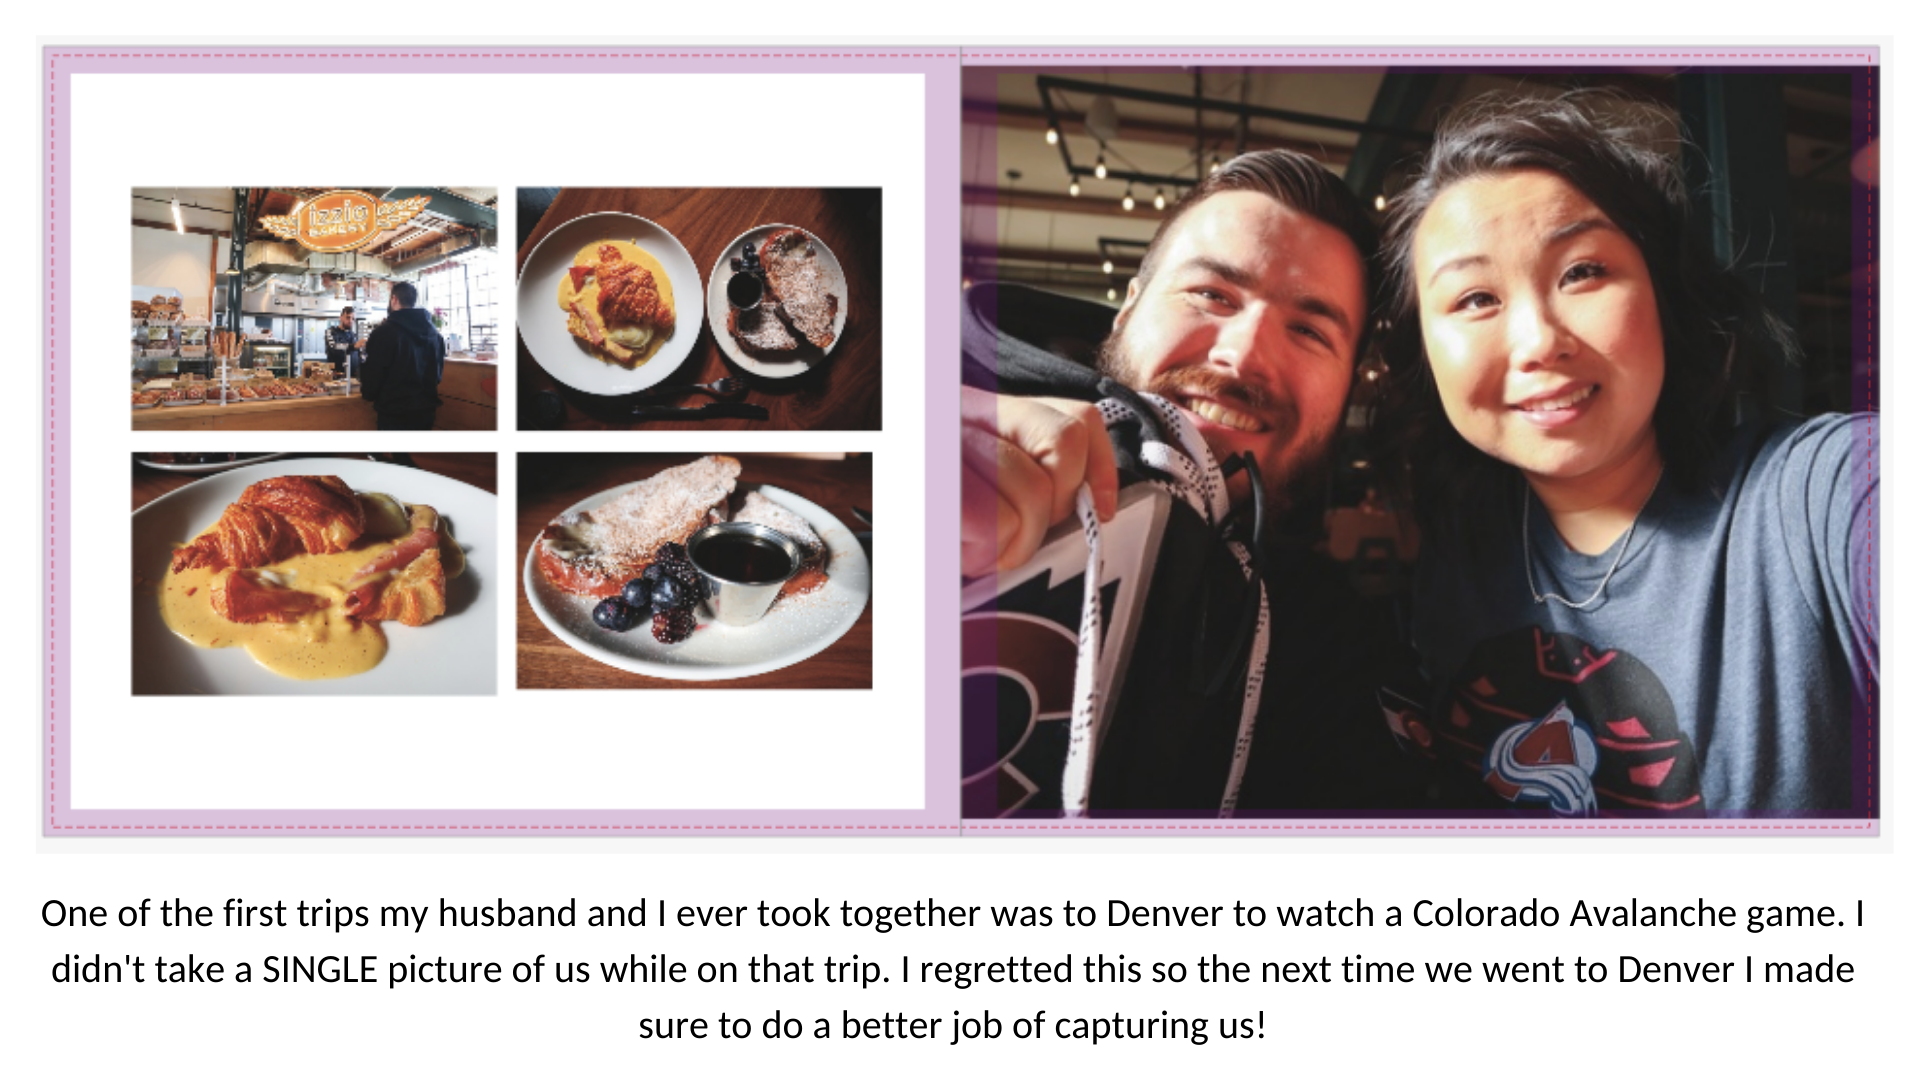
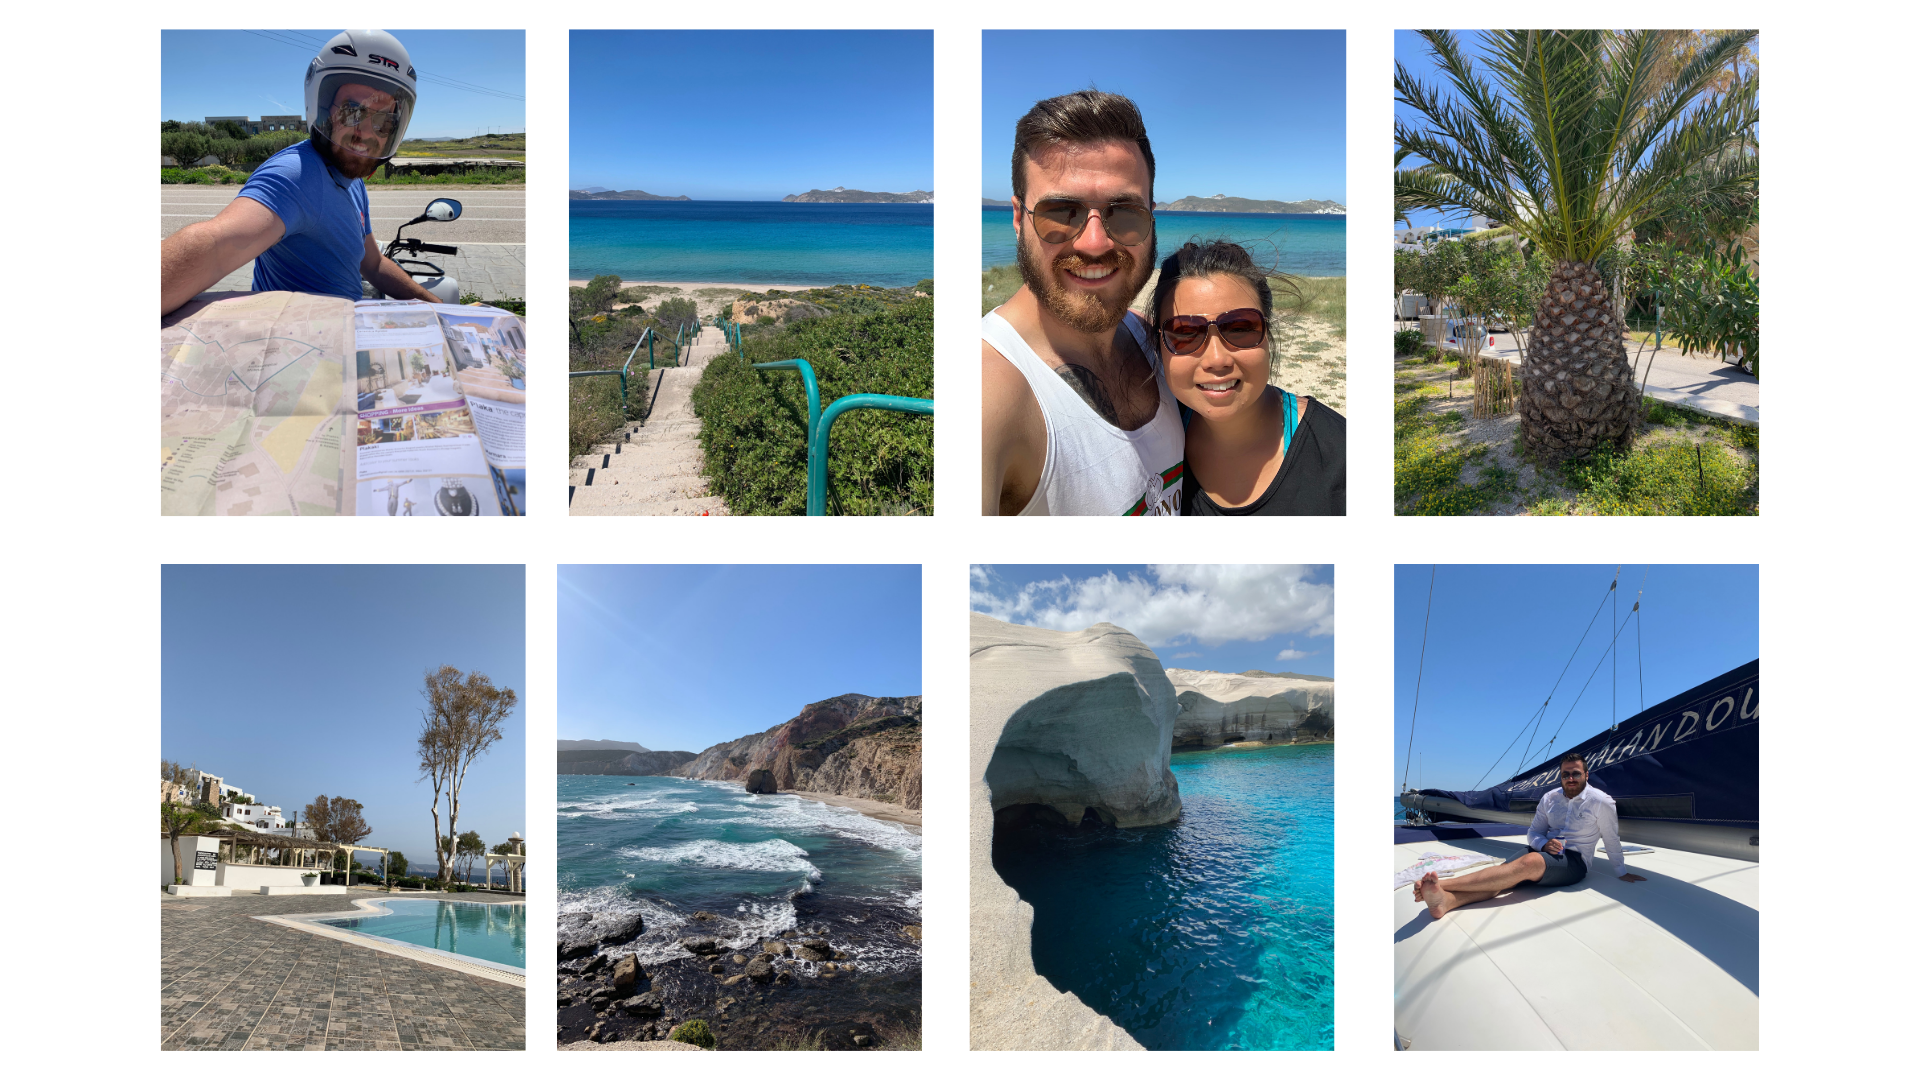
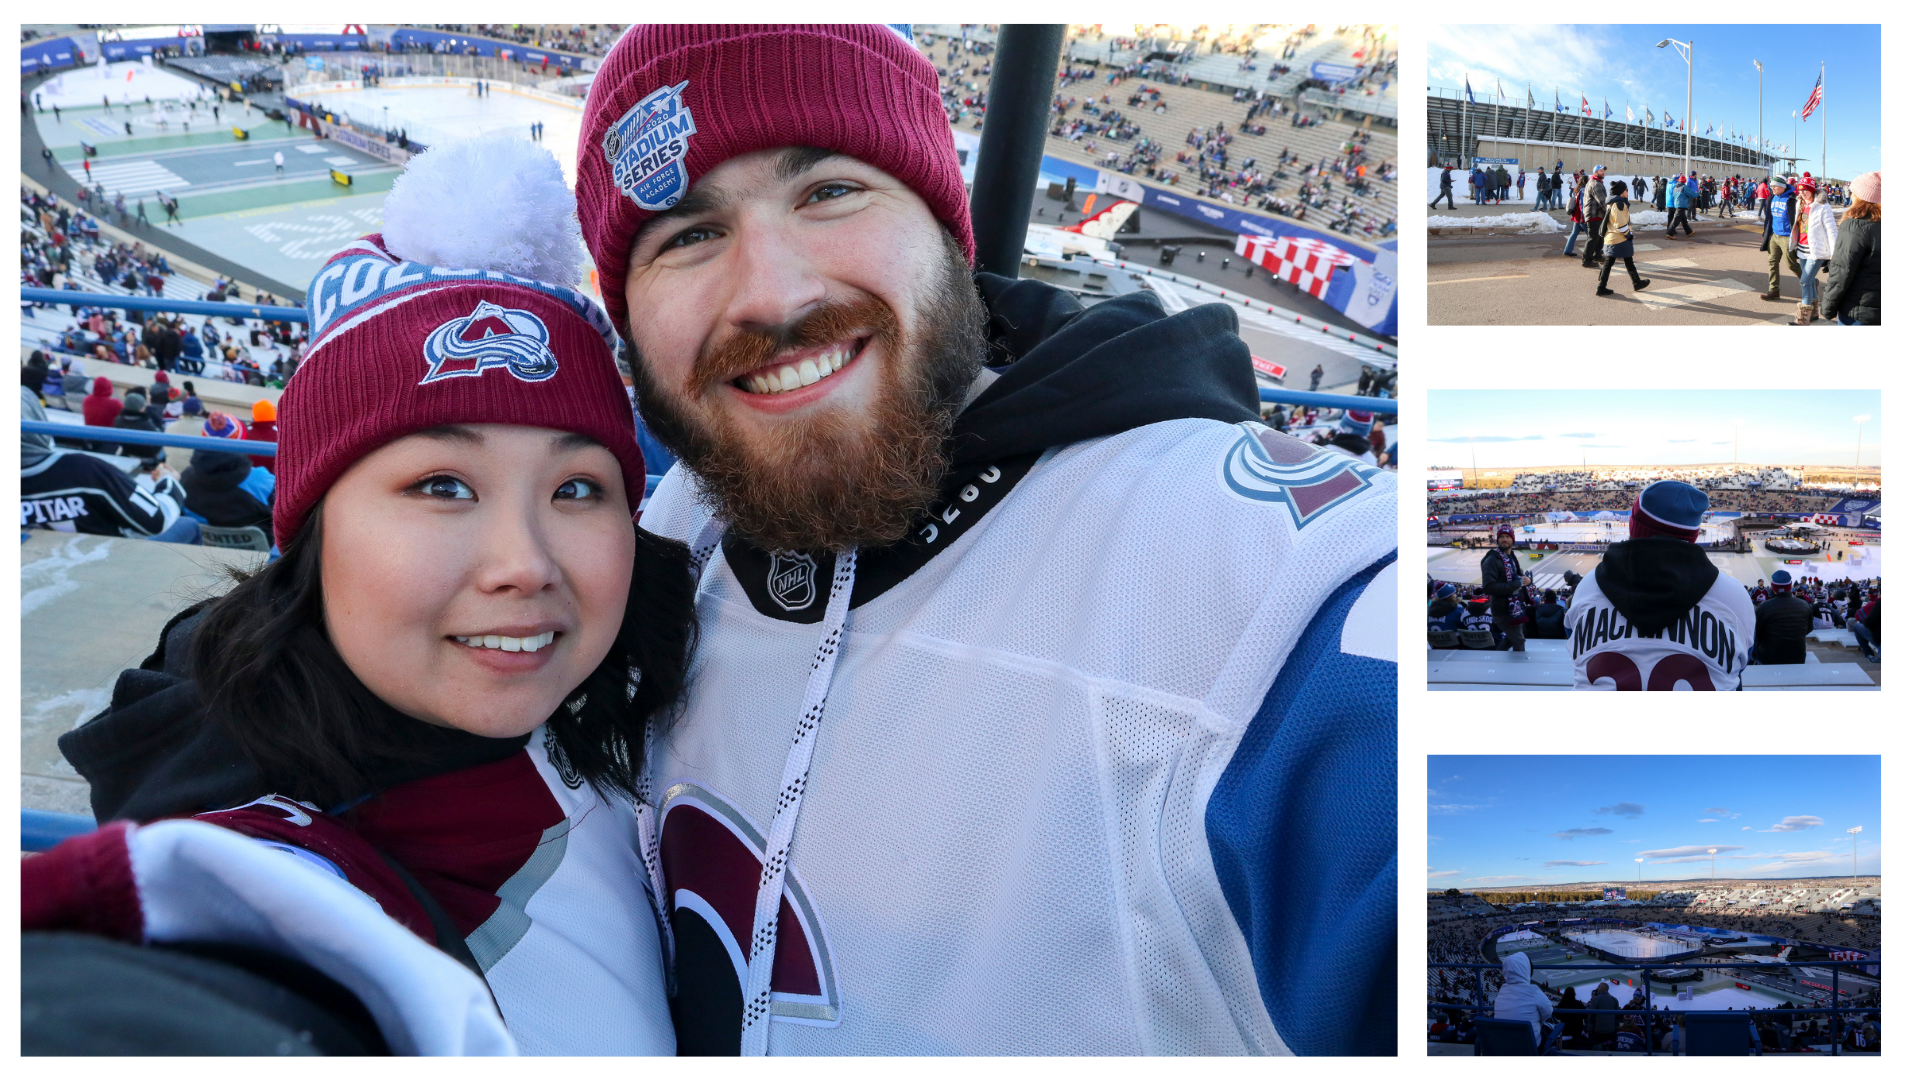
Back when I visited Greece in 2019 and Denver in 2020 I wasn’t super into photography. I of course loved photographing my travels but I didn’t pay close attention to things like composition and settings. So, why I photographed those trips were to have memories, keepsakes for afterwards.

Greece 2019

Denver 2020

As I got more into photography my “why” for photographing trips did change so my “how” changed too.

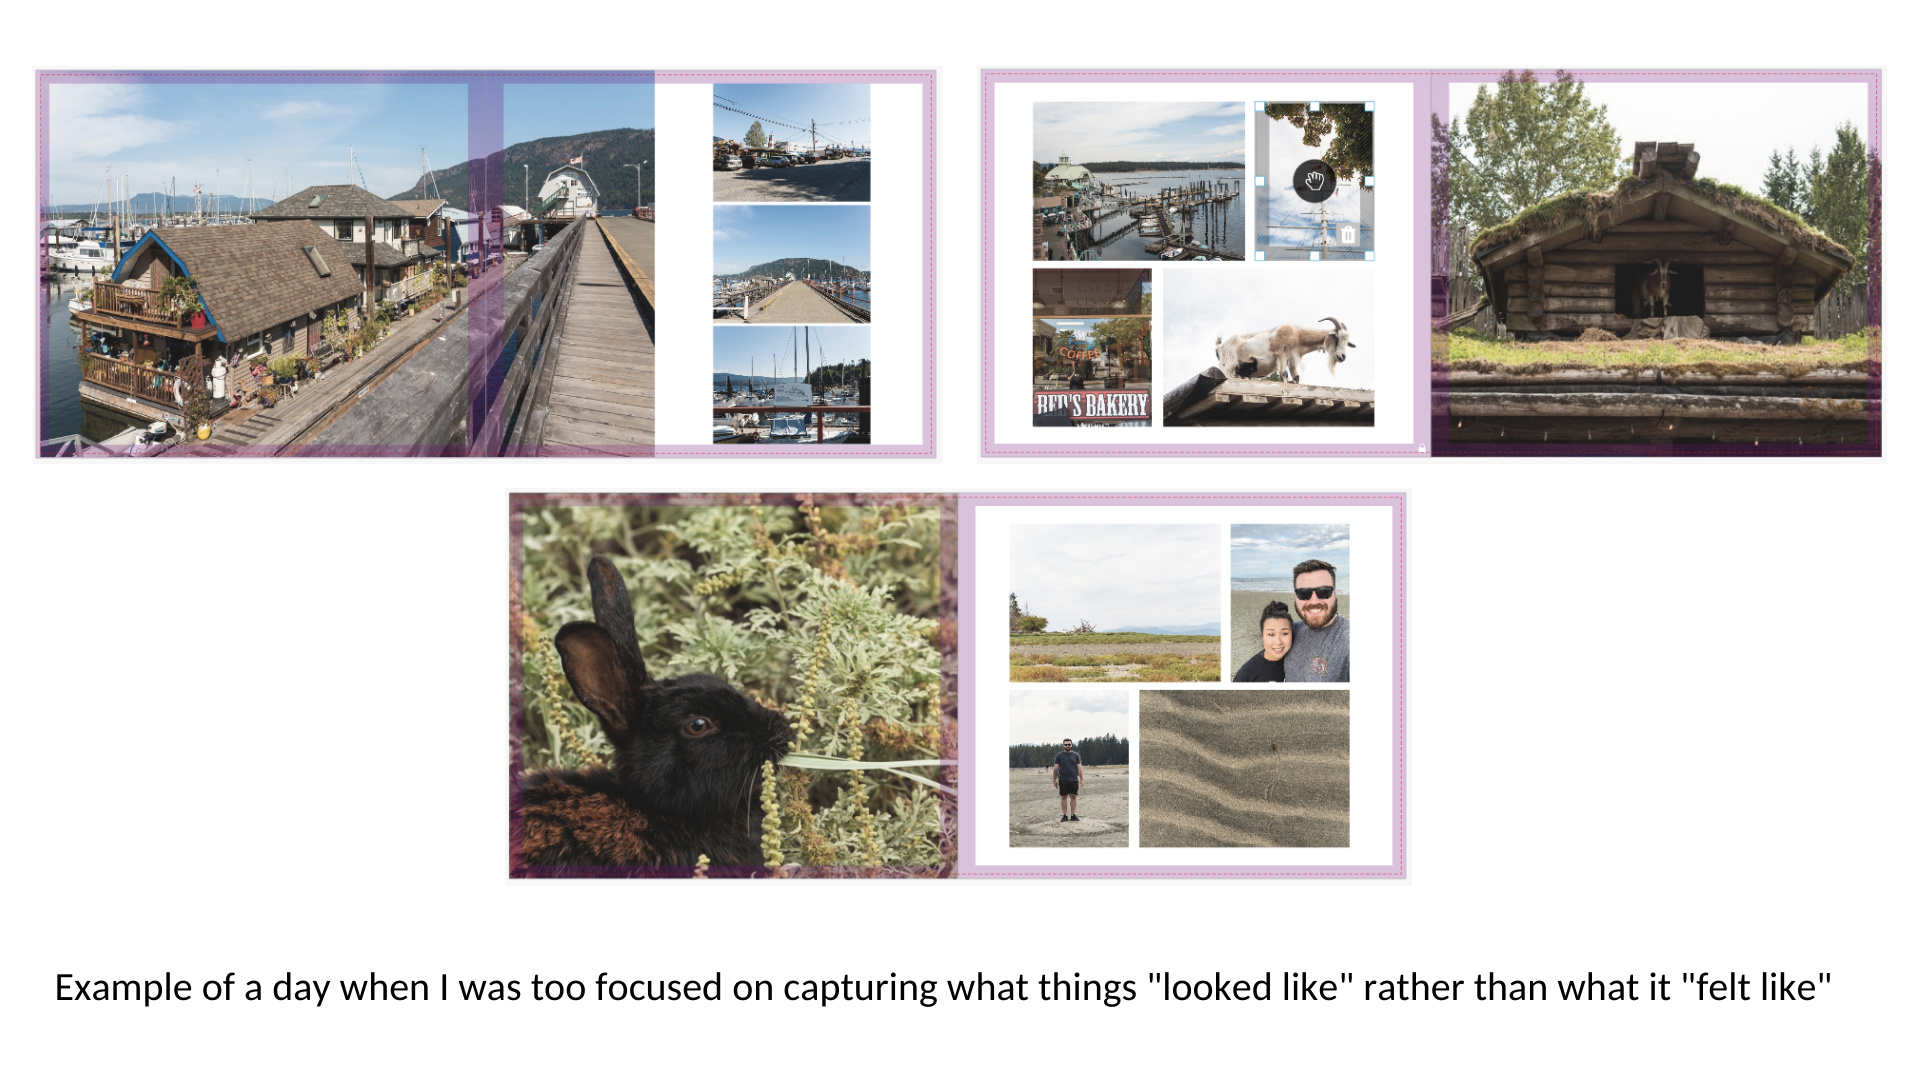
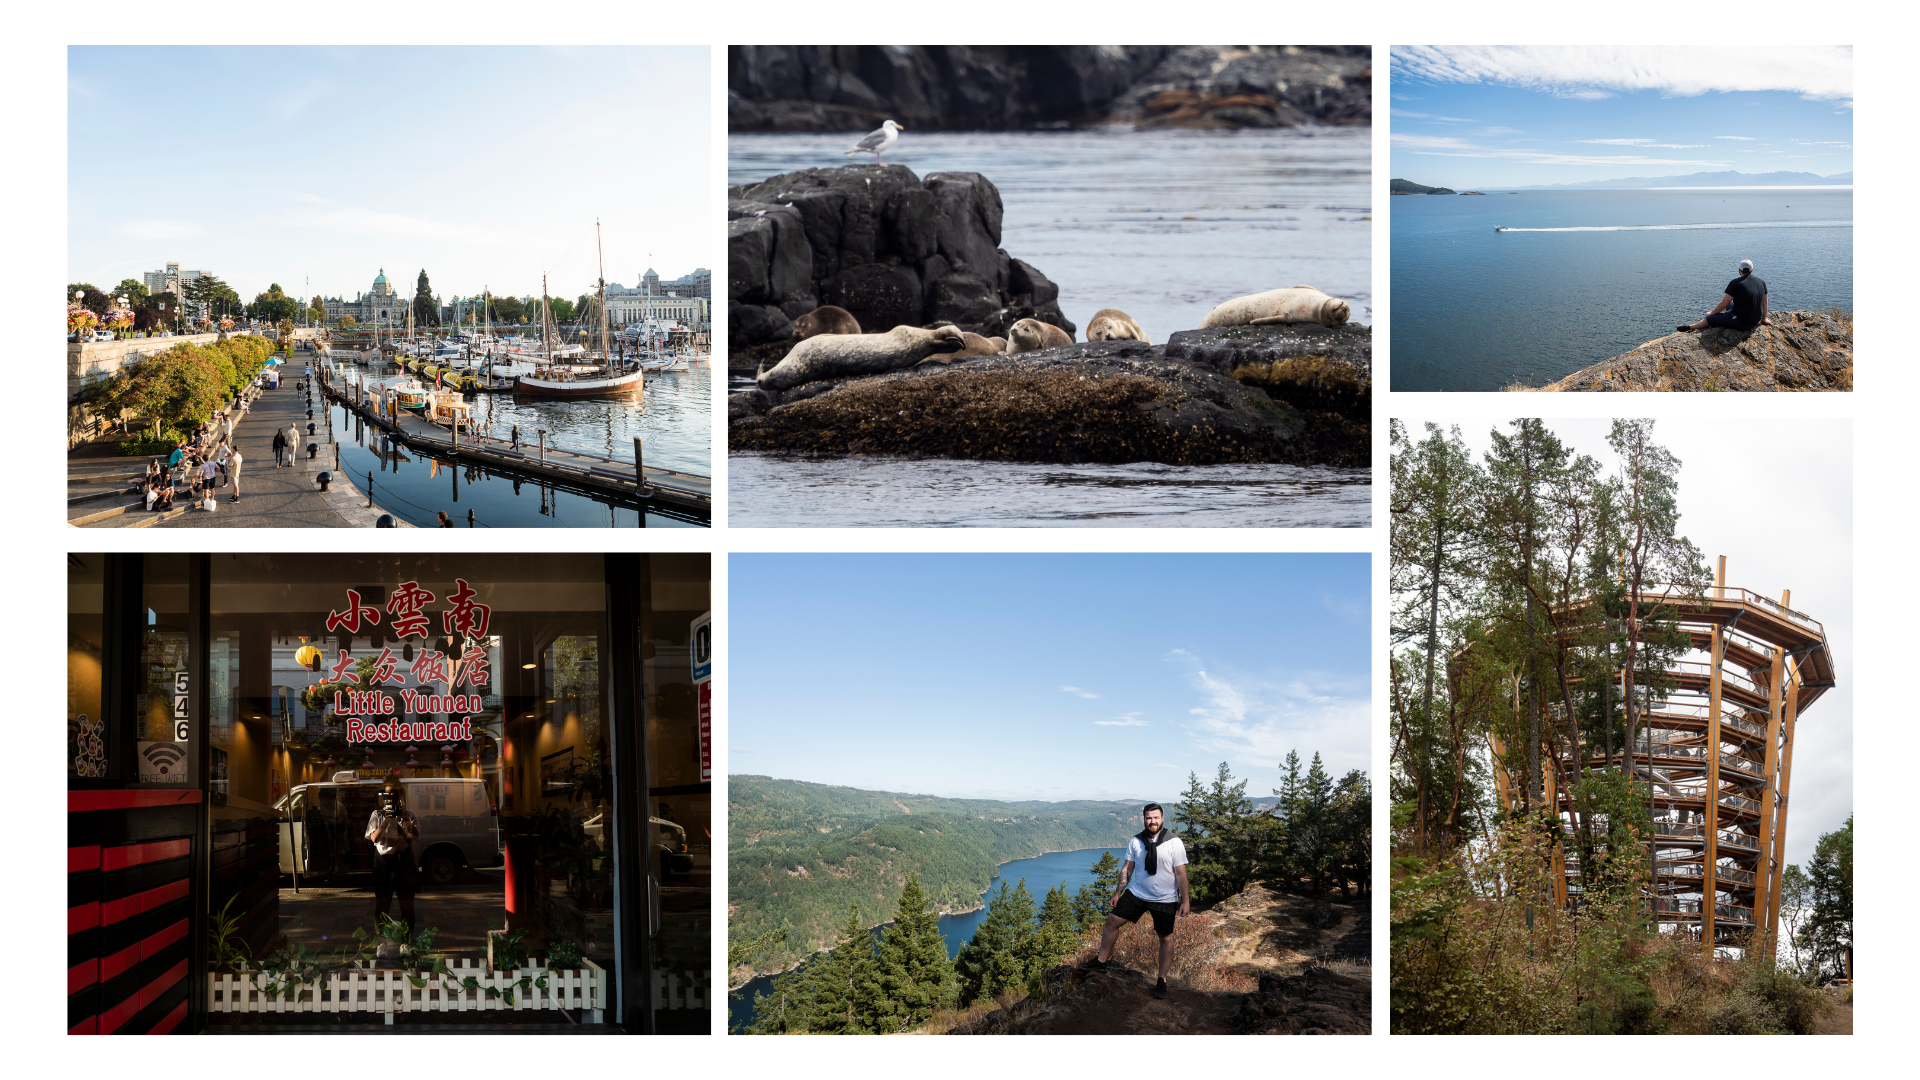
My Vancouver Island trip last summer for my honeymoon was a trip that I found where my “why” and “how” had changed. I loved my trip to the Island, and I love how many of the photos turned out. However, I don’t fully love how the story feels because I don’t think it accurately paints our experience and joy on that trip.

Lesson #3 : Photograph in a Story Format

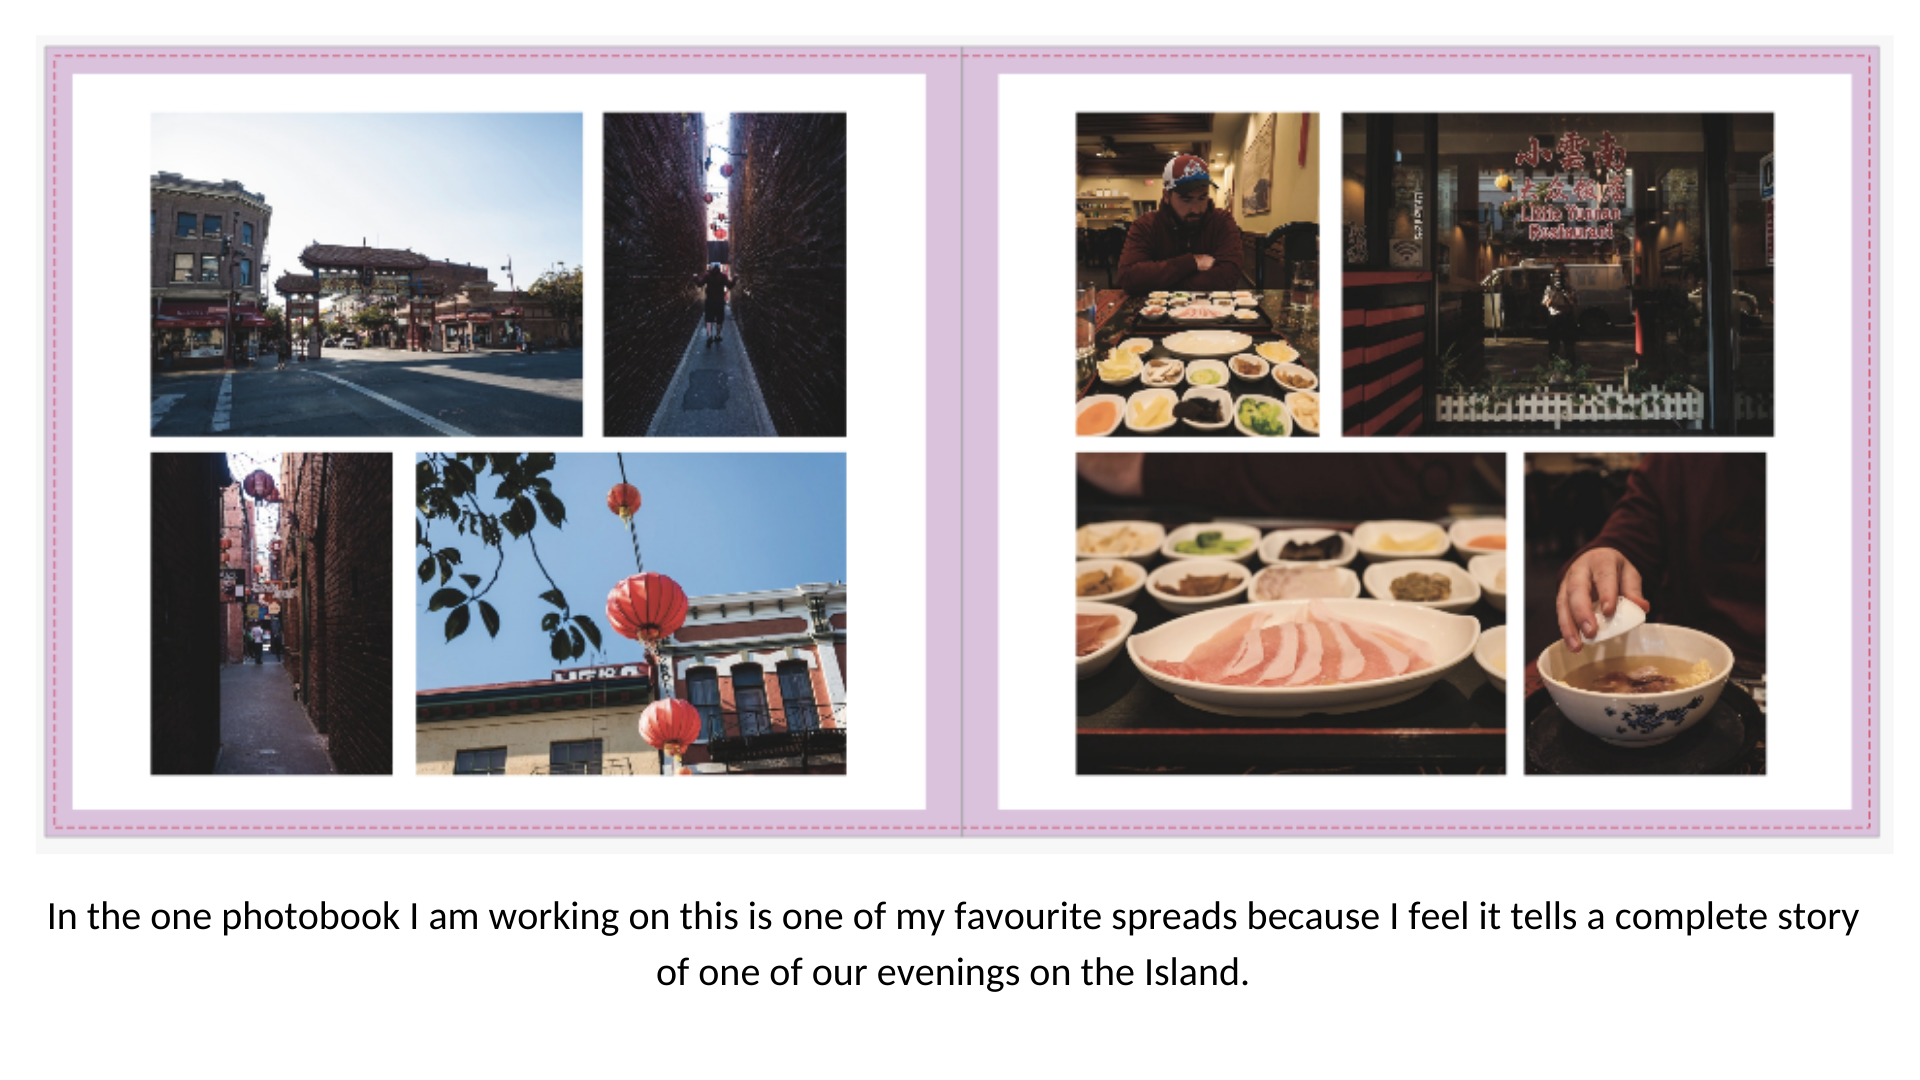
This could come down to personal preference but I love photographing in a story format (having a mix of environmental photos, context photos, details and portraits of us) because I think it tells a more powerful story of our trip - where we were, what we did and our experience there.

Photographing in this way allows me to have front-facing photos that I can post to Instagram and Facebook. But also comes in handy when I try to create a photo book afterwards of our adventure.

Lesson #4 : Get in Front of the Camera

It’s important to get in front of the camera because you were there, this is your story this is your experience.

I know it can be awkward, I don’t always love my photo being taken because I’m self-conscious too of what I look like and what others think. However, I have found that I regret after a trip not getting in front of the camera because I’ll come back with zero photos of us or me there.

It can feel like we weren’t even on the trip because the story is missing the characters.

Lesson #5 : Put the Camera Down

This is the most important lesson that I’ve learned from past trips and might sound counterintuitive to what we’ve been talking about. However, it’s important to put the camera down.

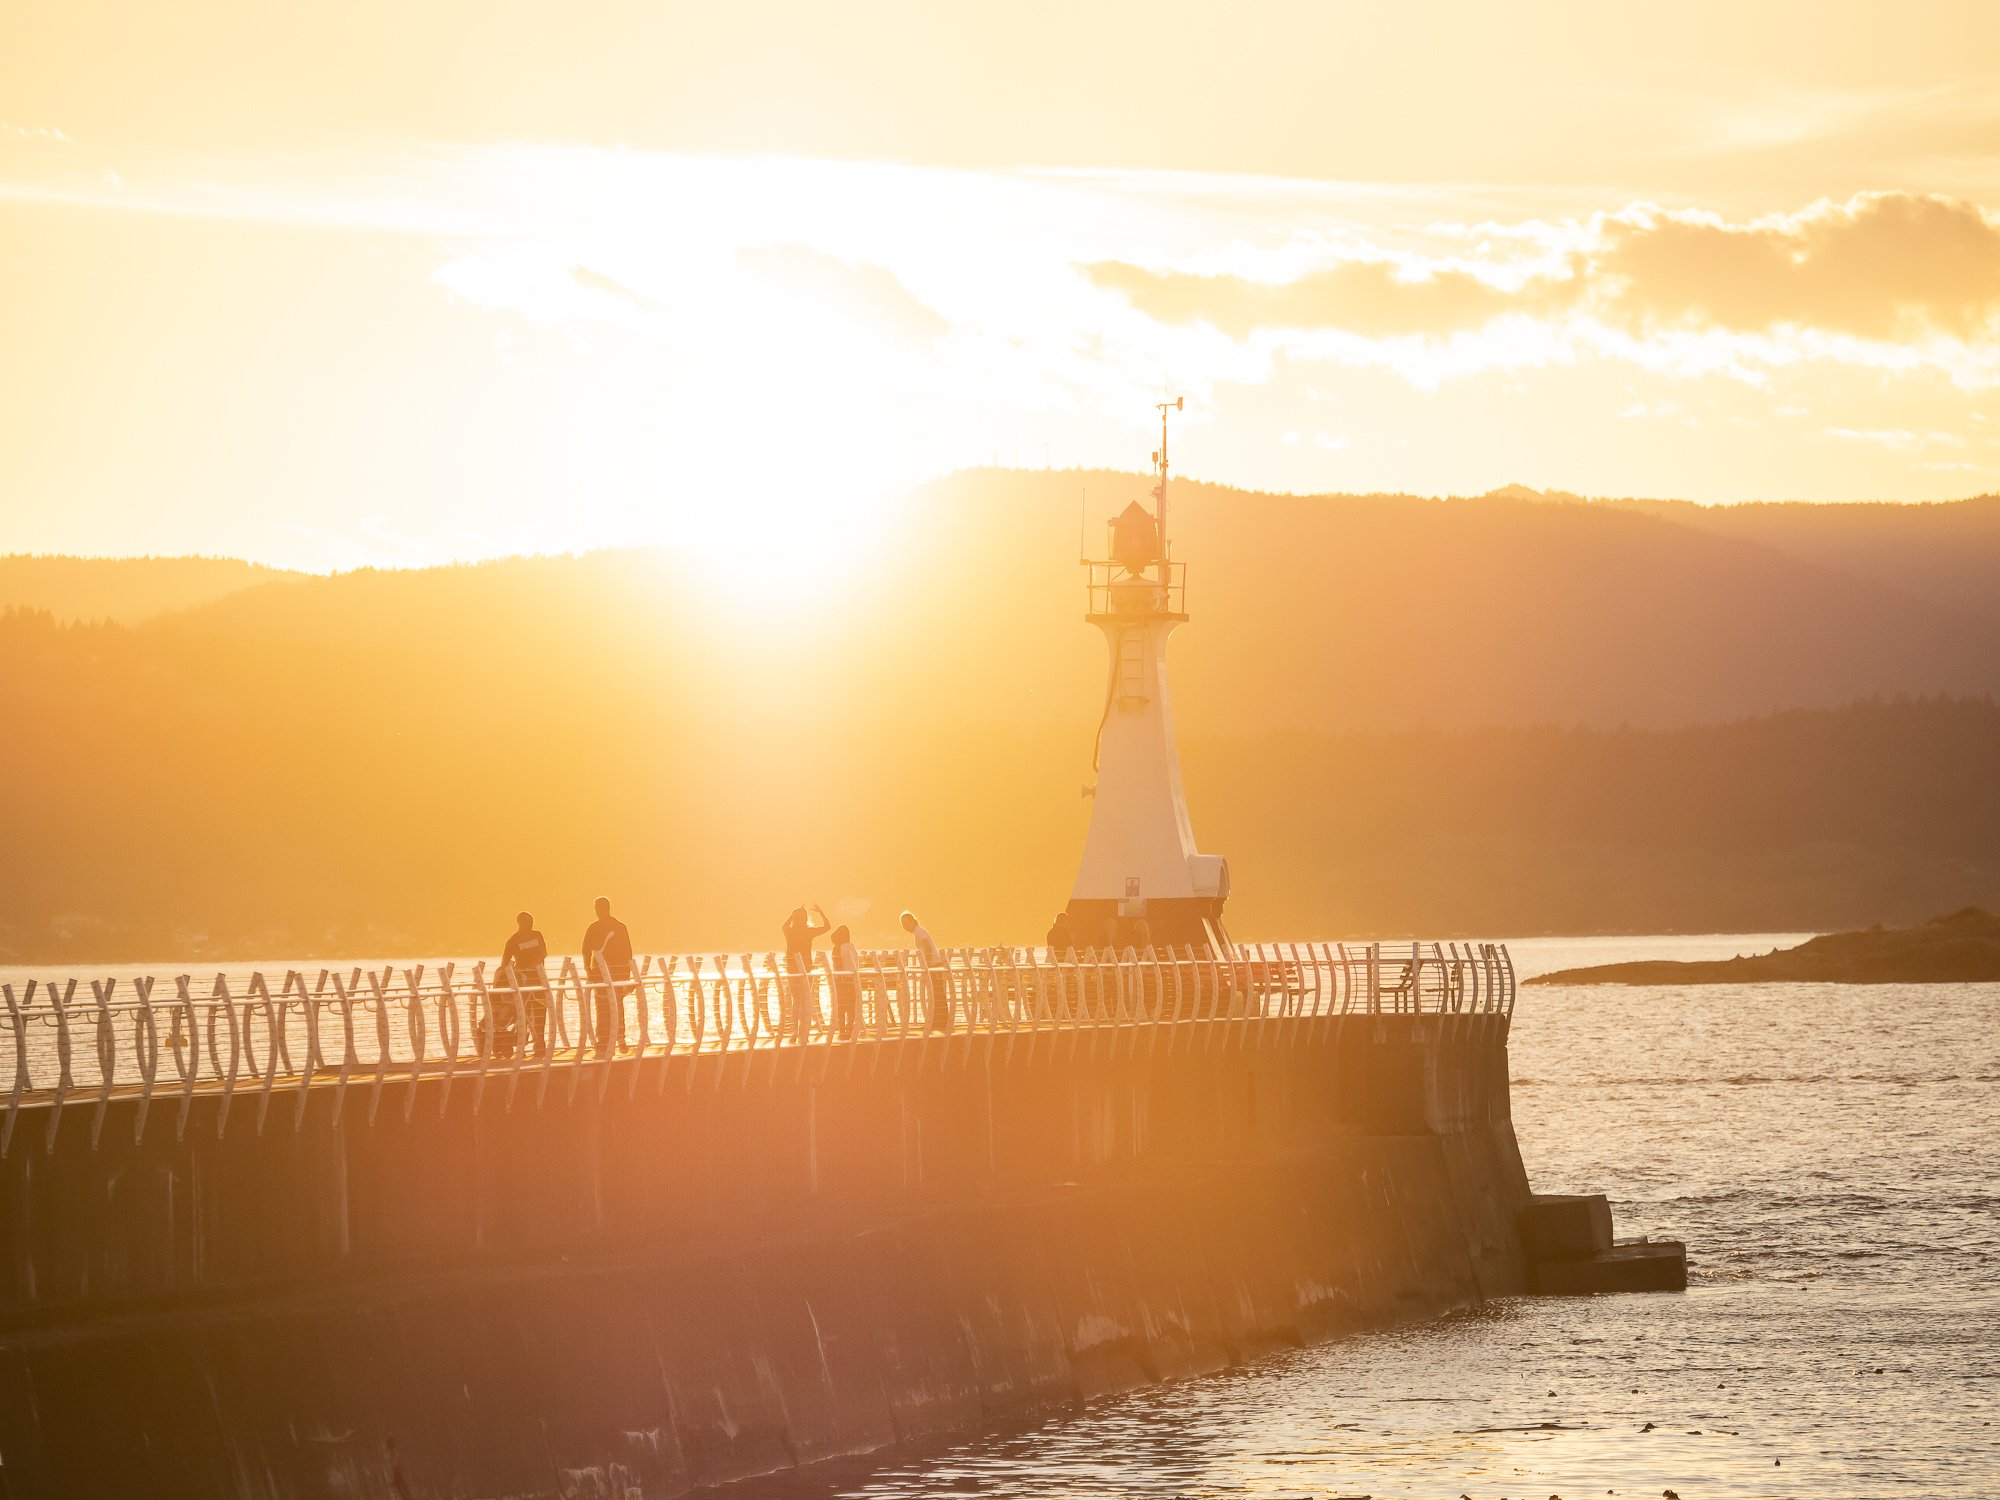
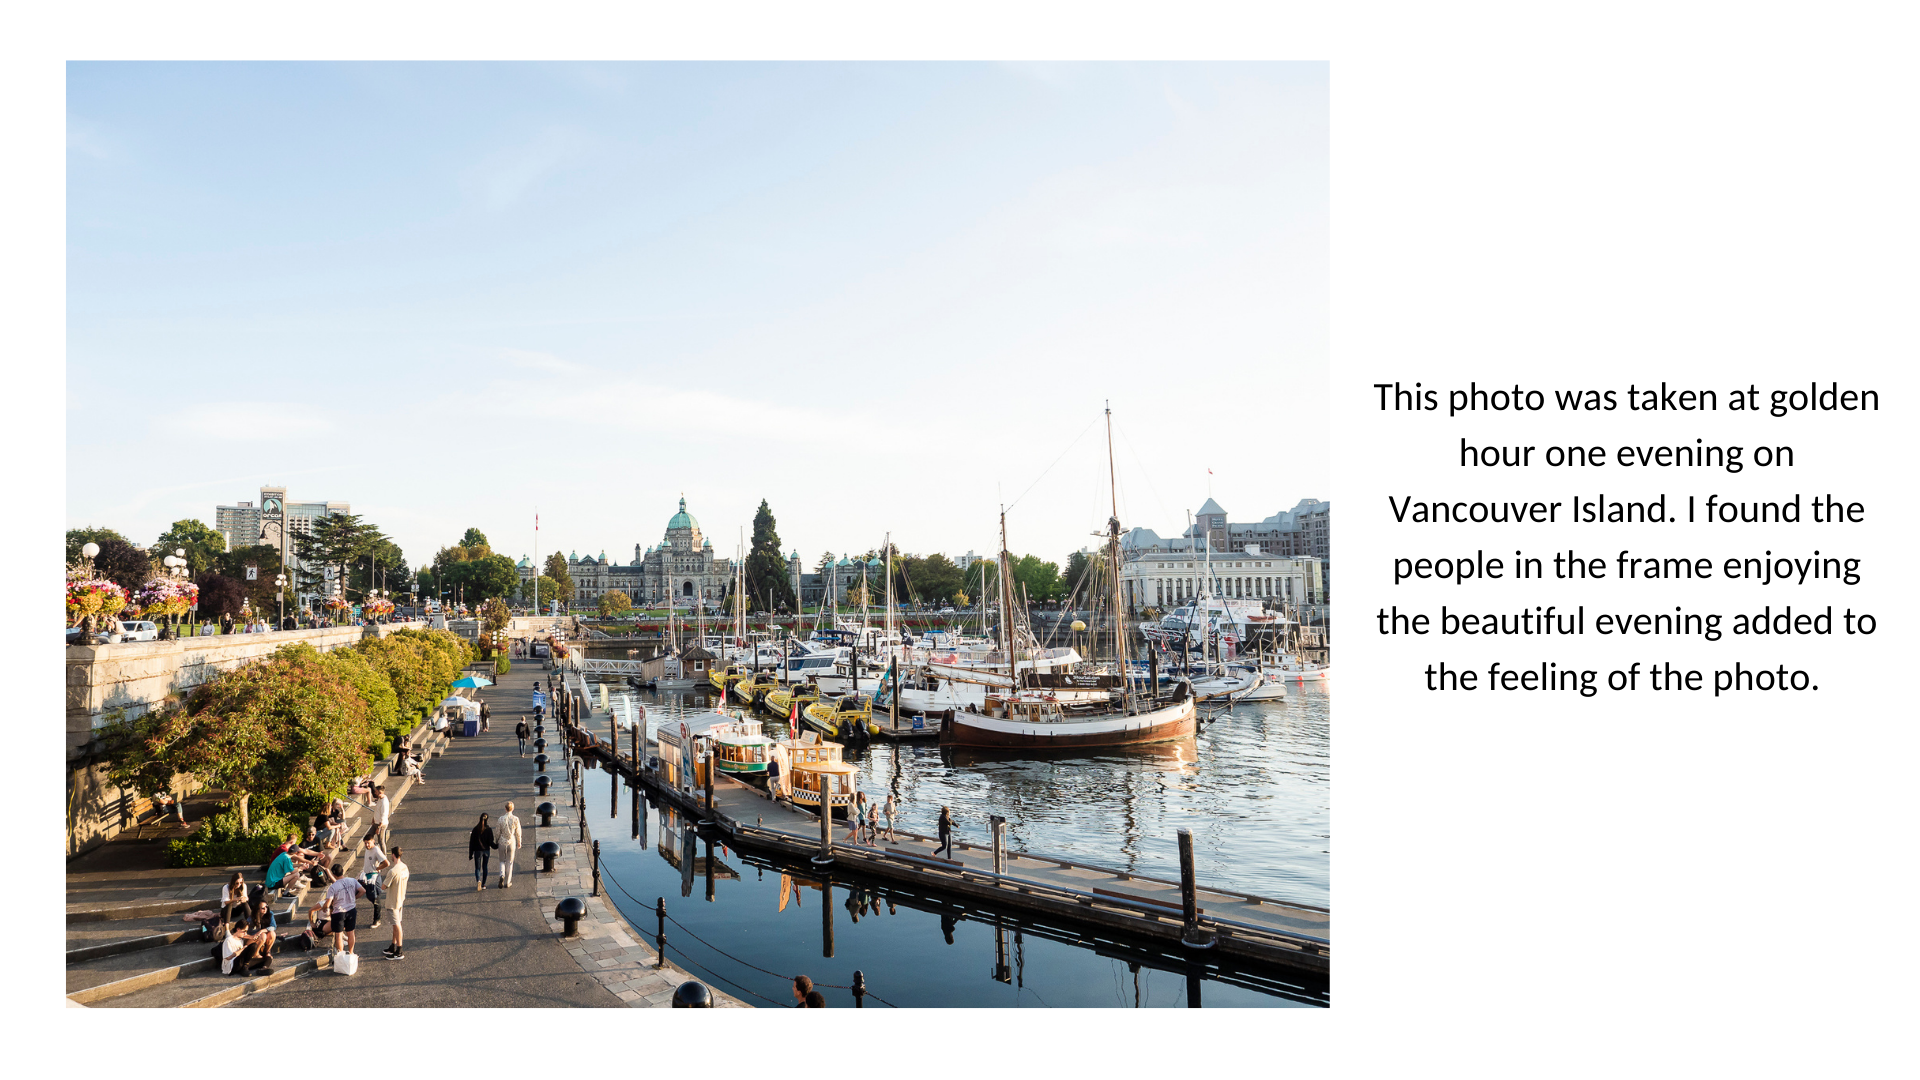
The photo you see below is a photo that I visually love but emotionally hate. It was taken on my trip to Vancouver Island with my husband and I was so consumed with getting the perfect sunset photo that I missed the gorgeous sunset with my husband.

It’s a painful reminder to me on the mistakes I made on that trip, but also a driver for me to be better at putting down the camera, being in the moment, spending time with the one’s I love and finding that balance between documenting moments that matter without taking away from them.


Let me know over on the channel if you found something helpful or meaningful in todays article!


I post weekly to my YouTube Channel so if you found this helpful please consider subscribing to the channel or buying me a coffee.

Beautifully Wander | Robynne MacLeod

What is the Best Camera Bag? Shoulder Bags vs. Backpacks for your Gear & My Hunt for the Perfect Camera Bag

Hello friends!

I’m always on the hunt for the “perfect camera bag”! So today I wanted to chat about what is the best camera bag for you, taking you through shoulders bags, backpacks and hybrids.

As well, share with you what I have found has been the closest to the “perfect bag” for me.

Camera Bags I Own

Amazon BagSmart Camera Backpack : The first camera bag I ever bought was the Amazon BagSmart Camera Backpack for about $100 CAD.

Ona Bowery Bag : My shoulder bag, this was the second camera bag I’ve ever owned. It was more on the expensive side sitting at $300 CAD.

Peak Design Sling 6L : My hybrid bag, I bought this bag last summer for outdoor excursions that didn’t require a large backpack for about $150 CAD.

Pro’s and Con’s of Each

Camera Backpack

Camera Backpack - Con’s

  • Overpacking : The con with camera backpack’s is you tend to overpack, because you have extra room to work with. I do this all the time! I pack more accessories and lenses than I need because I have the room and don’t even end up using them.

  • Not very versatile : Camera backpack’s aren’t the most versatile. They’re great for outdoor excursions like landscape photography, wildlife photography, nature photography, etc., However, I hate bringing my camera backpack into restaurants or nice places. They’re big, bulky and often dirty.

  • More likely to leave the camera behind : If a camera backpack is the only means I have to carry my equipment then sometimes I am more likely to leave my camera behind because it’s big and bulky.

Camera Backpack - Pro’s

  • Weight distribution : With a camera backpack the weight of the bag is distributed between the two shoulder straps (some camera backpacks have a third waist strap to help distribute weight to your hips). This is great for long durations or if you’re carrying a heavier load.

  • You can carry a lot more : Having a camera backpack means you can pack not only your camera gear but other necessities you might need. In the Spring and Summer my husband and I love hiking. Having a backpack is great because I can carry my camera gear, our water bottles, towels, snacks, and anything else we might need.

  • Hands-free (with a few accessories) : The other pro with using a camera backpack is with a few accessories you can easily go hands-free. One option is to use a camera strap and sling it over your neck. I don’t love this option for long durations because it just puts weight on my neck. I prefer to use the Peak Design Capture Clip - with this accessory attached to your backpack strap you can hook your camera onto it and quickly release when you want to take a photo.

Overall, I find camera backpacks are best if you want to carry lots of gear (or all of your gear) or for outdoor excursions.

Shoulder Bags

Shoulder Bag - Con’s

  • A lot of weight on one shoulder : Unfortunately, with shoulder bags it can be a lot of weight on your one shoulder (no matter how you wear it).

  • Difficult to carry extra’s : Due to the nature of a shoulder bag it’s more difficult to carry extra’s like a water bottle or tripod.

  • Get in the way more : Lastly, I find shoulder bags get in the way more based off of how they hang off your body.

Shoulder Bag - Pro’s

  • Packing less : There are a variety of size shoulder bags that are on the market. The Ona Bowery I own can comfortably fit one camera body and a maximum of two lenses. The best part of shoulder bags is you pack less (because you have to). So this is a great option if you want to go minimal with your gear.

  • More Discreet : Shoulder bags are more discreet. You can keep it on your lap, tuck it under the table, hang it off a chair. In the Summer of 2020 I went on a wine tasting trip to Osoyoos, BC and this bag was perfect for what I needed.

  • Allowed More : If you’re spending time outdoors this isn’t a big problem but when you’re travelling certain restaurants, shops, arena’s, etc., might have a “no backpack” rule. Thus, having a shoulder bag is perfect for these situations.

Overall, I find shoulder bags are best for day trips, shorter excursions into the city or nice places.

Hybrid

Hybrid - Con’s

  • Limited on what you can carry : Hybrid’s aren’t full size backpack’s so you still have to be selective on what gear you are bringing.

  • Difficult to carry extra’s : With hybrid’s it’s still difficult to carry extra’s. It’s not as difficult because some hybrid’s have additional features like the Peak Design Sling with straps on the bottom so you can carry a water bottle, jacket, tripod on the bottom.

  • Weight on one shoulder : You are also still putting weight on one shoulder, unlike you wear it like a waist bag.

Hybrid - Pro’s

  • Multi-wear : With hybrid’s like the Peak Design 6L Sling you can wear it as a backpack, shoulder bag or waist bag.

  • Fit quite a bit : Depending on the brand and size you can fit quite a bit of stuff. In this video I show you exactly how much you can fit!

  • Fairly discreet/versatile : The low-profile nature of a hybrid is more discreet than a backpack (similar to a shoulder bag). I personally feel more comfortable walking into a restaurant or nice place using this.

  • Allowed More : Due to the multi-wear ability of a hybrid, if the location doesn’t allow backpacks you can simply wear it as a shoulder bag!

Perfect Camera Bag

Out of my camera backpack, shoulder bag, and hybrid I find the closest to the “perfect camera bag” is my 6L Peak Design Sling. It can fit what it needs to, it’s comfortable and it’s versatile. When we went to Vancouver Island last summer we were hiking, in and out of restaurants, on boats, and in museums and the bag was perfect for everything we were doing.

Things to Consider

So if you’re looking for a new camera bag, here are some things to consider:

  • Budget? Camera bags can be expensive! The most expensive one I own is $300 CAD but they can easily climb to $600 CAD.

  • What are you going to be doing? How do you see yourself using this bag? What are you likely photographing? These questions help me figure out what gear I actually need on the trip and thus, what the bag needs to be able to fit.


Let me know over on the channel if you have found your perfect camera bag!


I post weekly to my YouTube Channel so if you found this helpful please consider subscribing to the channel or buying me a coffee.

Beautifully Wander | Robynne MacLeod
How I CREATED my Cinematic Gender Reveal Film | Planning, Equipment, Filming, and Editing

A few weeks ago we found out the gender of our baby and I shared online my cinematic gender reveal video that I created to remember the moment!

I received a lot of comments from friends and family afterward that liked the video. So today I wanted to show you how I created it taking you all the way through planning to editing.

I specifically talk about how I created my recent video but a lot of the info can be applied to other types of films!

I hope you find it useful or interesting!

Beautifully Wander | Robynne MacLeod
Gender Reveal Vlog | setup, how we're doing it, camera equipment and setup

Last weekend we celebrated our babies gender reveal! I don't know when "gender reveals" became a thing but I knew long before we decided to have a child that I wanted to do a gender reveal because they looked like fun...and it was!

We didn't have a preference on boy or girl. We are going to love our baby so much! We purely wanted to know for planning purposes - painting the second room, buying clothes, etc.,

My husband makes a special appearance in todays video because it's a memory that we will get to cherish forever and I wanted him to be a part of it! :)

My Creative and Personal Focuses for This Year | 2022

In todays video I'm revealing my two creative focuses for 2022! When I was brainstorming what I wanted my 2022 to look like I had two thoughts that wouldn't leave my mind and I knew these two thoughts would guide what I wanted my year to look like. Normally, I have tons of professional and personal goals but this year it's different.

Comment over on the channel if you have any creative goals or focuses for this year?!

2021 Recap | My Year in 100 Photos

Happy New Year!! In todays video I wanted to do a 2021 in 100 photos (credit goes to Julia Trotti for the idea!). Many people like to do their top 10 photos of the year but I found looking at my year this way (the good photos and the bad) I got to see my entire journey, how my photography changed, what my interests were depending on the season, and personal milestones.

I wish everyone a happy and healthy 2022!

Holiday Inspired Photography Ideas to Try | Getting into the Festive Spirit

In todays episode we cover some holiday inspired photography ideas to try this season! Tag @beautifullywander on Instagram if you try any of them!


Mentioned in the Video


Happy Festive Photography!

Beautifully Wander | Robynne MacLeod
Holiday Gift Ideas for Photographers | Holiday Gift Guide 2021

Happy Holidays! With the season upon us I was excited to film my first holiday gift for photographers! In this video we cover some small, medium and larger gifts that would be perfect for your photographer friend or family member!

Items Mentioned in the Video

Cleaning Kit: https://www.amazon.ca/Professional-Camera-Cleaning-Kit-Cameras/dp/B00MHGOGUK/ref=sr_1_5?keywords=cleaning+kit+camera&qid=1638323605&sr=8-5

SD Card Holder: https://www.amazon.ca/Skoloo-Waterproof-Memory-Holder-Storage/dp/B07MLH88DY/ref=sr_1_2_sspa?keywords=sd%2Bcard%2Bholder&qid=1638323618&sr=8-2-spons&spLa=ZW5jcnlwdGVkUXVhbGlmaWVyPUFaODI3TkQwRlZBRUUmZW5jcnlwdGVkSWQ9QTAxMTQzOTExRU8xWFlMUzY1WlA4JmVuY3J5cHRlZEFkSWQ9QTA4ODg5NTYzRE4xSENRNEowVzdKJndpZGdldE5hbWU9c3BfYXRmJmFjdGlvbj1jbGlja1JlZGlyZWN0JmRvTm90TG9nQ2xpY2s9dHJ1ZQ&th=1

Extra Camera Battery: https://www.getolympus.com/ca/en/e-m1-mark-ii.html

The Heart of the Photograph by David Duchemin: https://www.amazon.ca/Heart-Photograph-Questions-Expressive-Photographs/dp/1681985454/ref=sr_1_1?keywords=the+heart+of+the+photograph&qid=1638323717&sr=8-1

Winter Gloves: https://www.bhphotovideo.com/c/product/811770-REG/Freehands_11121LM_Women_s_Stretch_Gloves_Medium.html

Peak Design Capture Clip: https://www.amazon.ca/Peak-Design-Capture-Camera-Black/dp/B07818Z4Q5/ref=sr_1_1_sspa?keywords=peak+design+capture+clip&qid=1638323766&sr=8-1-spons&psc=1&spLa=ZW5jcnlwdGVkUXVhbGlmaWVyPUEzQUZKMUxOV1ZDMlRWJmVuY3J5cHRlZElkPUEwNDg5ODUxMzY5UkoyTFEzN05CTCZlbmNyeXB0ZWRBZElkPUEwMDYwNzY1MzlHMkM5TjdJMlgxRiZ3aWRnZXROYW1lPXNwX2F0ZiZhY3Rpb249Y2xpY2tSZWRpcmVjdCZkb05vdExvZ0NsaWNrPXRydWU=

External Hard Drive: https://www.amazon.ca/LaCie-Rugged-External-Drive-9000298/dp/B00IRV005E/ref=sxts_rp_s1_0?cv_ct_cx=lacie+hard+drive&keywords=lacie+hard+drive&pd_rd_i=B00IRV005E&pd_rd_r=bf2de6cc-b255-4f8d-a551-f758ef58dbe6&pd_rd_w=58j5T&pd_rd_wg=waJZD&pf_rd_p=372505a5-6a58-475a-86d4-6ef2cad8c79f&pf_rd_r=93EBQ30CRT3MPRS5V80G&psc=1&qid=1638323831&sr=1-1-f0029781-b79b-4b60-9cb0-eeda4dea34d6

Winter Boots: https://www.toms.com/ca/women/shoes/boots-and-booties/black-smooth-waxy-leather-womens-reese-booties/10015796.html

Winter Jacket: https://www.patagonia.ca/product/womens-down-sweater-hoody/84711.html?dwvar_84711_color=BCW&cgid=root

Ona Bowery Bag: https://onabags.com/products/the-bowery

Olympus EM1 Mark II Body: https://www.getolympus.com/ca/en/e-m1-mark-ii.html

Olympus 12-40mm F2.8 PRO: https://www.getolympus.com/ca/en/m-zuiko-digital-ed-12-40mm-f2-8-pro.html

Olympus 40-150mm F2.8 PRO: https://www.getolympus.com/ca/en/m-zuiko-ed-40-150mm-f2-8-pro.html


I hope you found a gift idea in todays video!

Beautifully Wander | Robynne MacLeod
Capturing Autumns End | Photography Vlog, Nature Photography, Olympus 40-150 and 25mm

Fall might be coming to an end! The days continue to get darker, the nights are cooler, the leaves are falling from the trees and soon we'll get our first snowfall. Today, I take you to one of my favourite parks to capture what's left of autumn!

Captured on Our Trip

ISO 200 | F2.8 | 1/100

ISO 200 | F2.8 | 1/100

ISO 200 | F2.8 | 1/125

ISO 200 | F2.8 | 1/125

ISO 200 | F2.8 | 1/20

ISO 200 | F2.8 | 1/100

ISO 200 | F2.8 | 1/40

ISO 200 | F2.8 | 1/80

ISO 200 | F2.8 | 1/25

ISO 200 | F2.8 | 1/125

ISO 200 | F2.8 | 1/20

Autumn Photography Vlog | Getting Outdoors, Fall Photography with Olympus 40-150, Create with Me

Welcome to WEEK FOUR of our Autumn/Halloween Create with Me Series! In todays episode we’re getting outside to do some autumn photography at one of my favourite local beaches in Kelowna.

Captured on our Trip

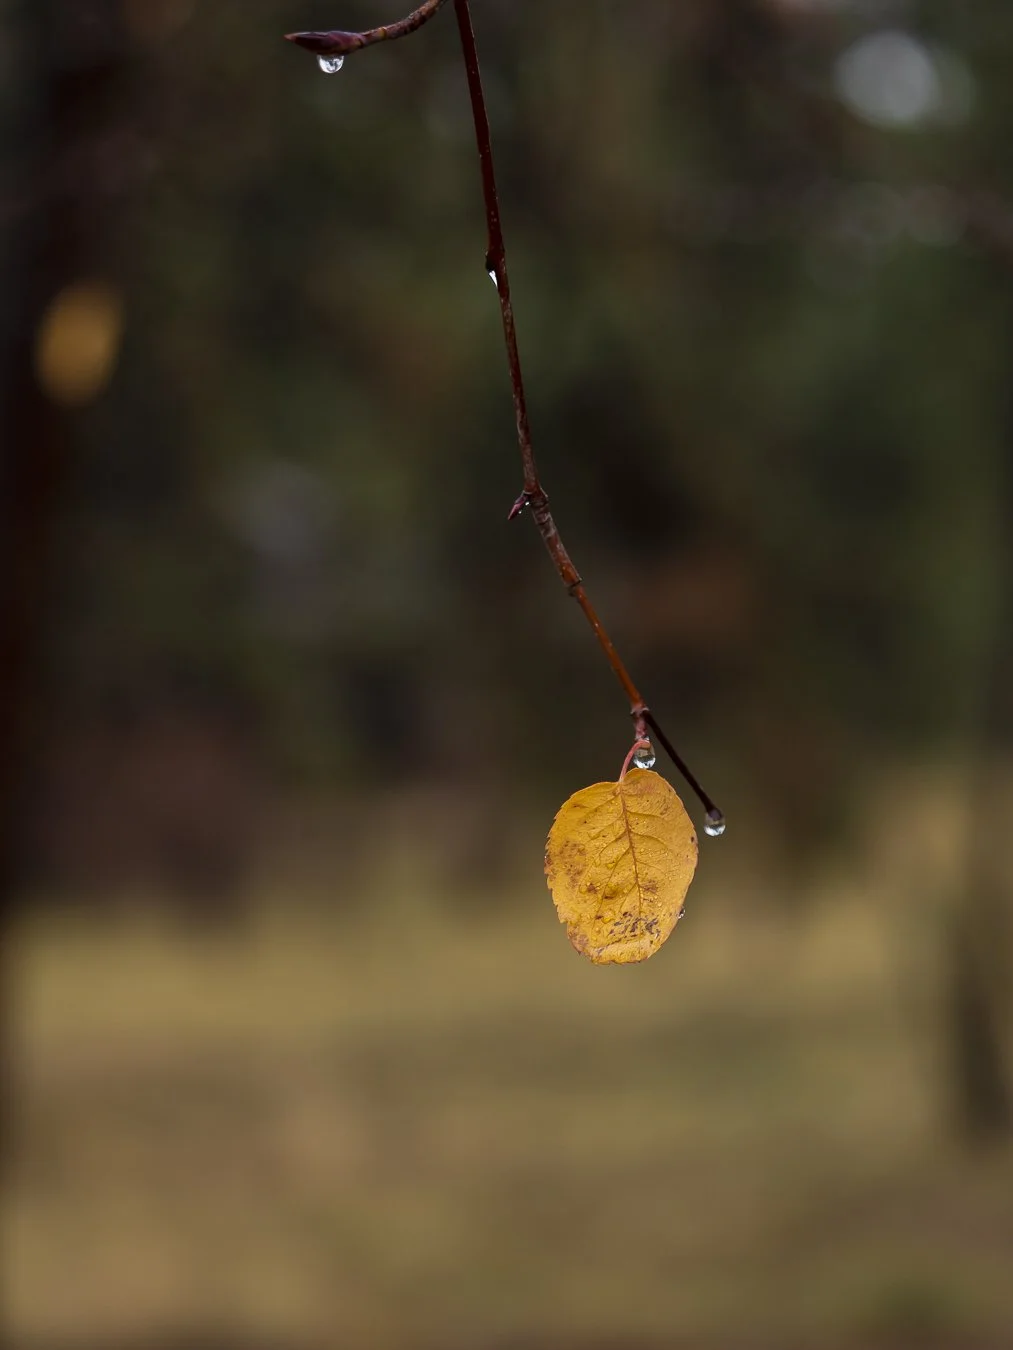
For this photo I tried to find a single leaf in the gap of autumn leaves on a tree at Gyro Beach.

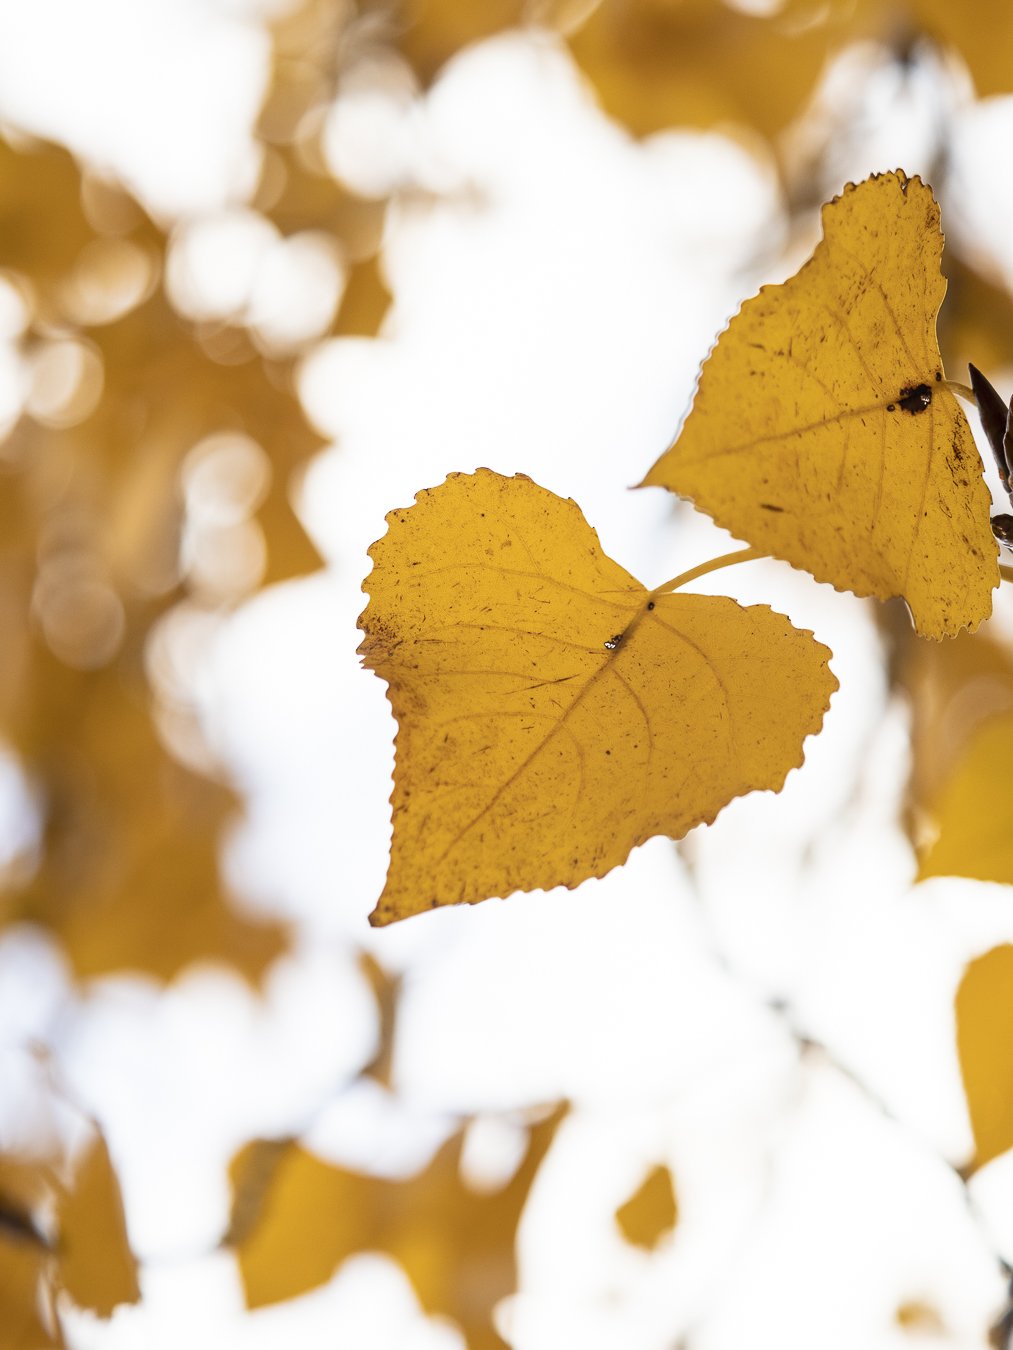
One of my favourite parts of Gyro Beach is the beach rental hut. In this particular photo I picked up a brand full of autumn leaves off the ground, held it up to my camera and shot through the leaves to create this beautiful foreground blur.

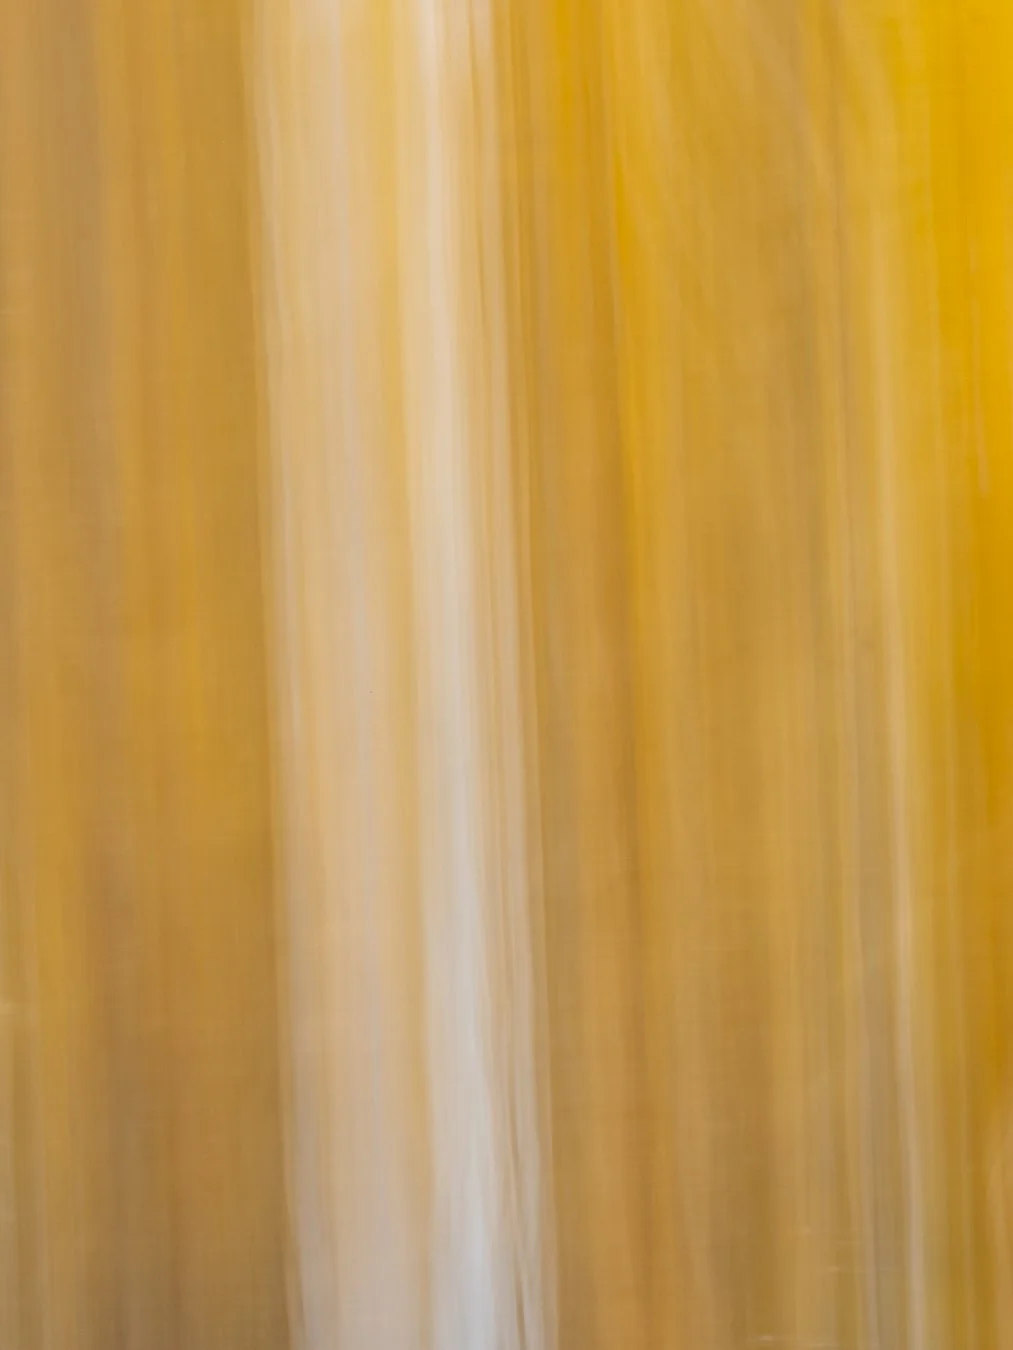
To given your autumn photography a twist you could try some panning or Intentional Camera Movement. For this I slowed my shutter speed, and panned vertical with the grain of the wood tree and autumn leaves to create this vertical pan.

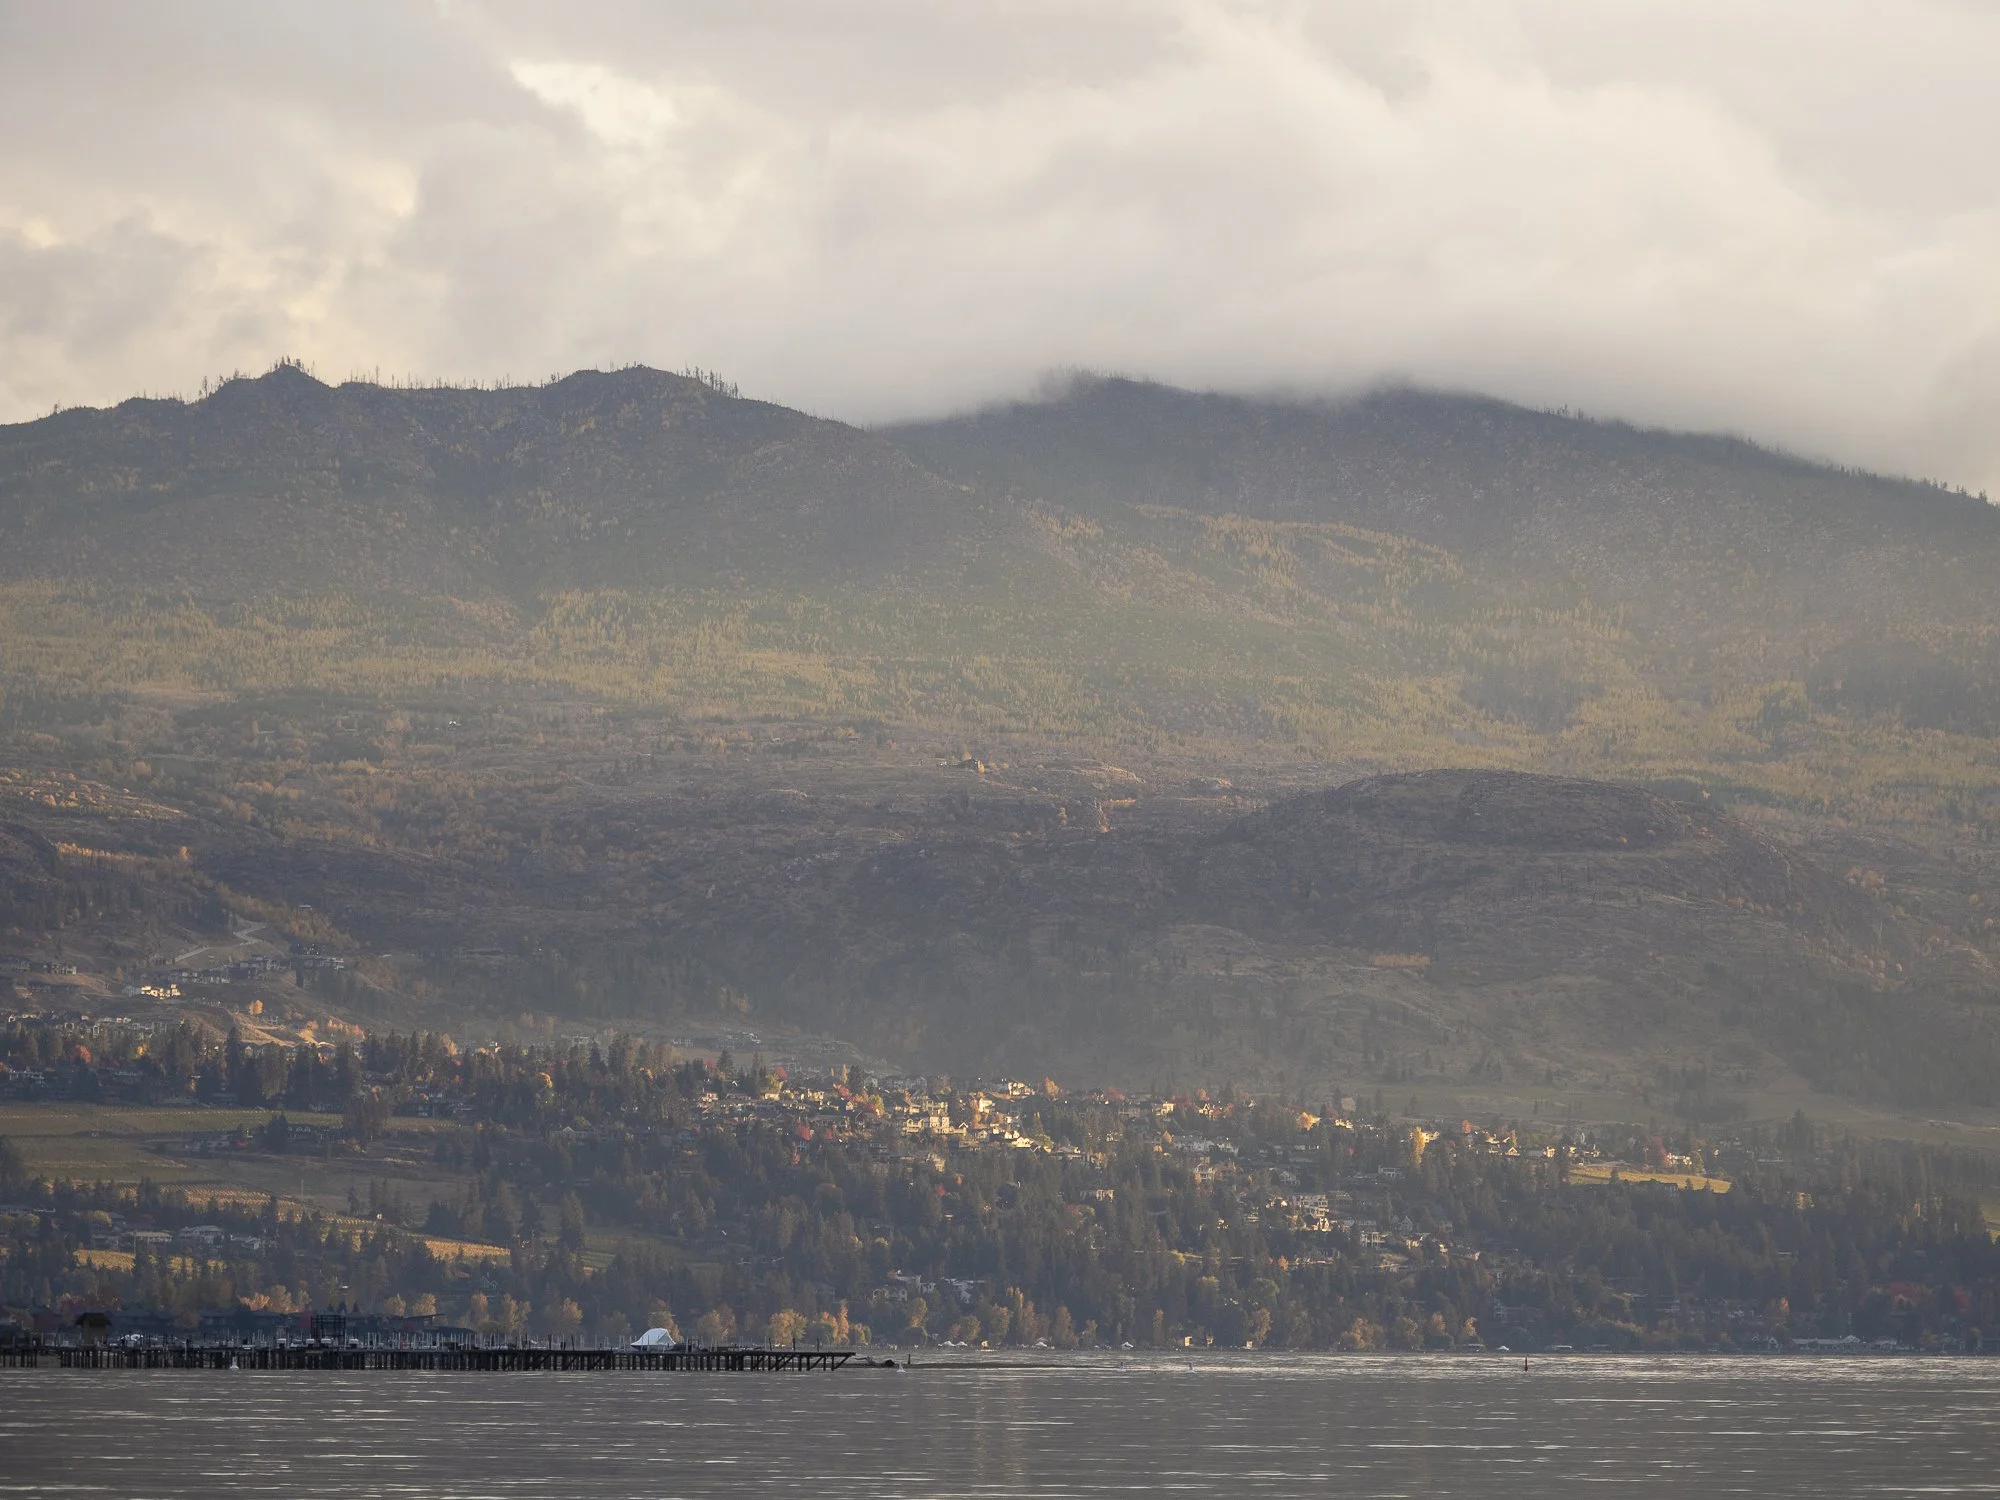
The beautiful part of autumn that I always find interesting is when the sun peaks from behind the clouds and spotlights a part of the landscape in a beautiful glow. I loved the hints of red and orange in the landscape when this happened.

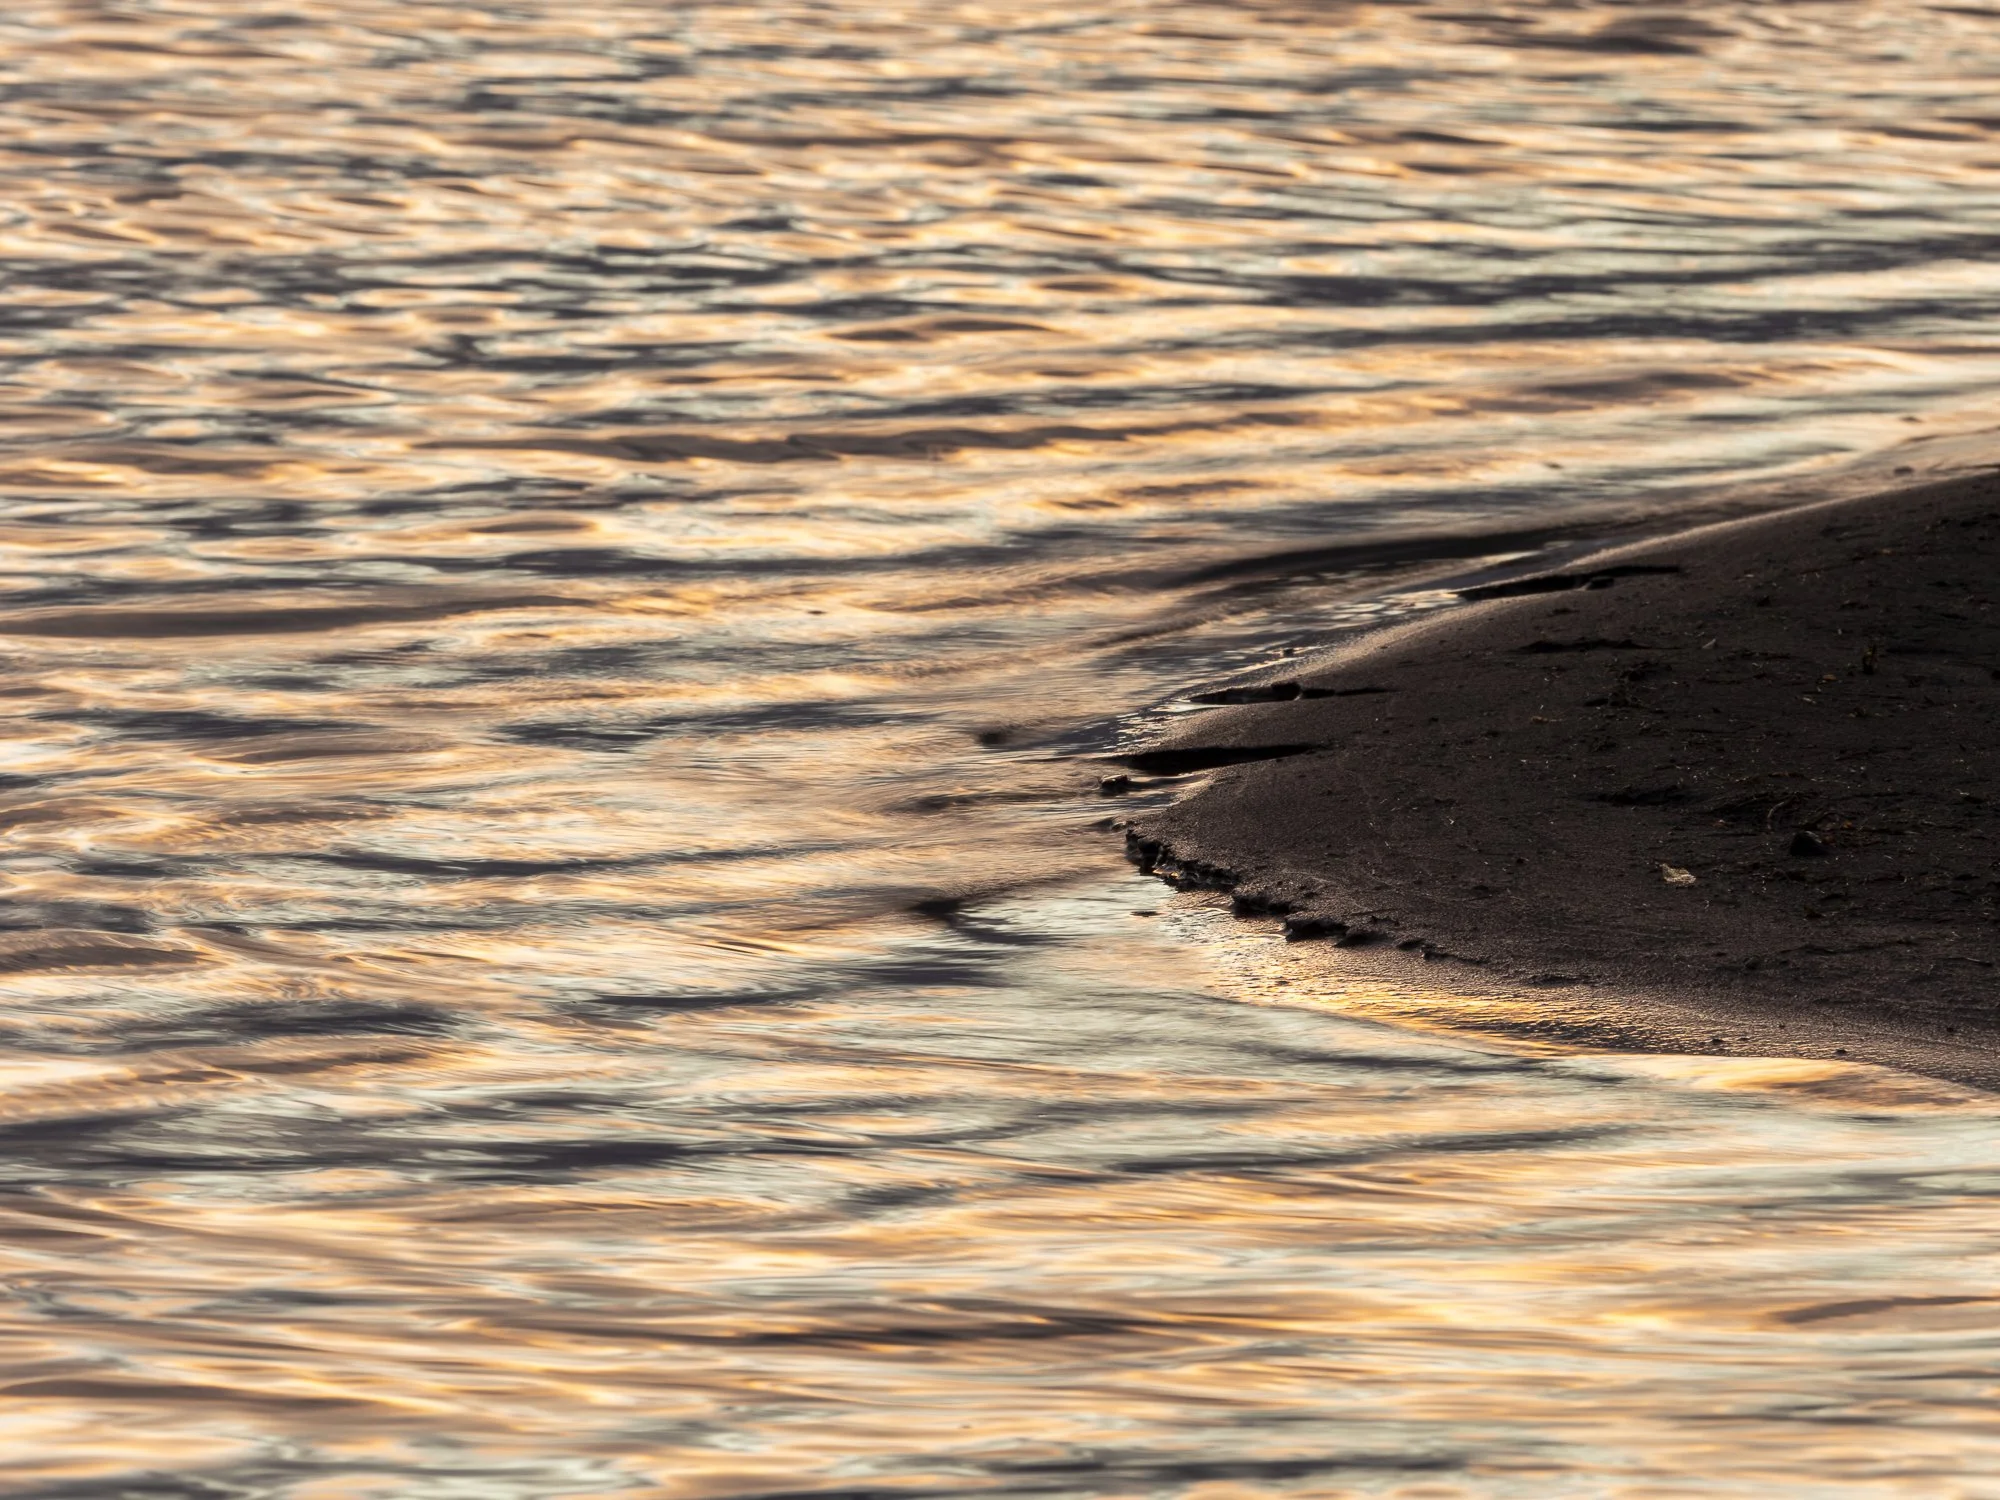
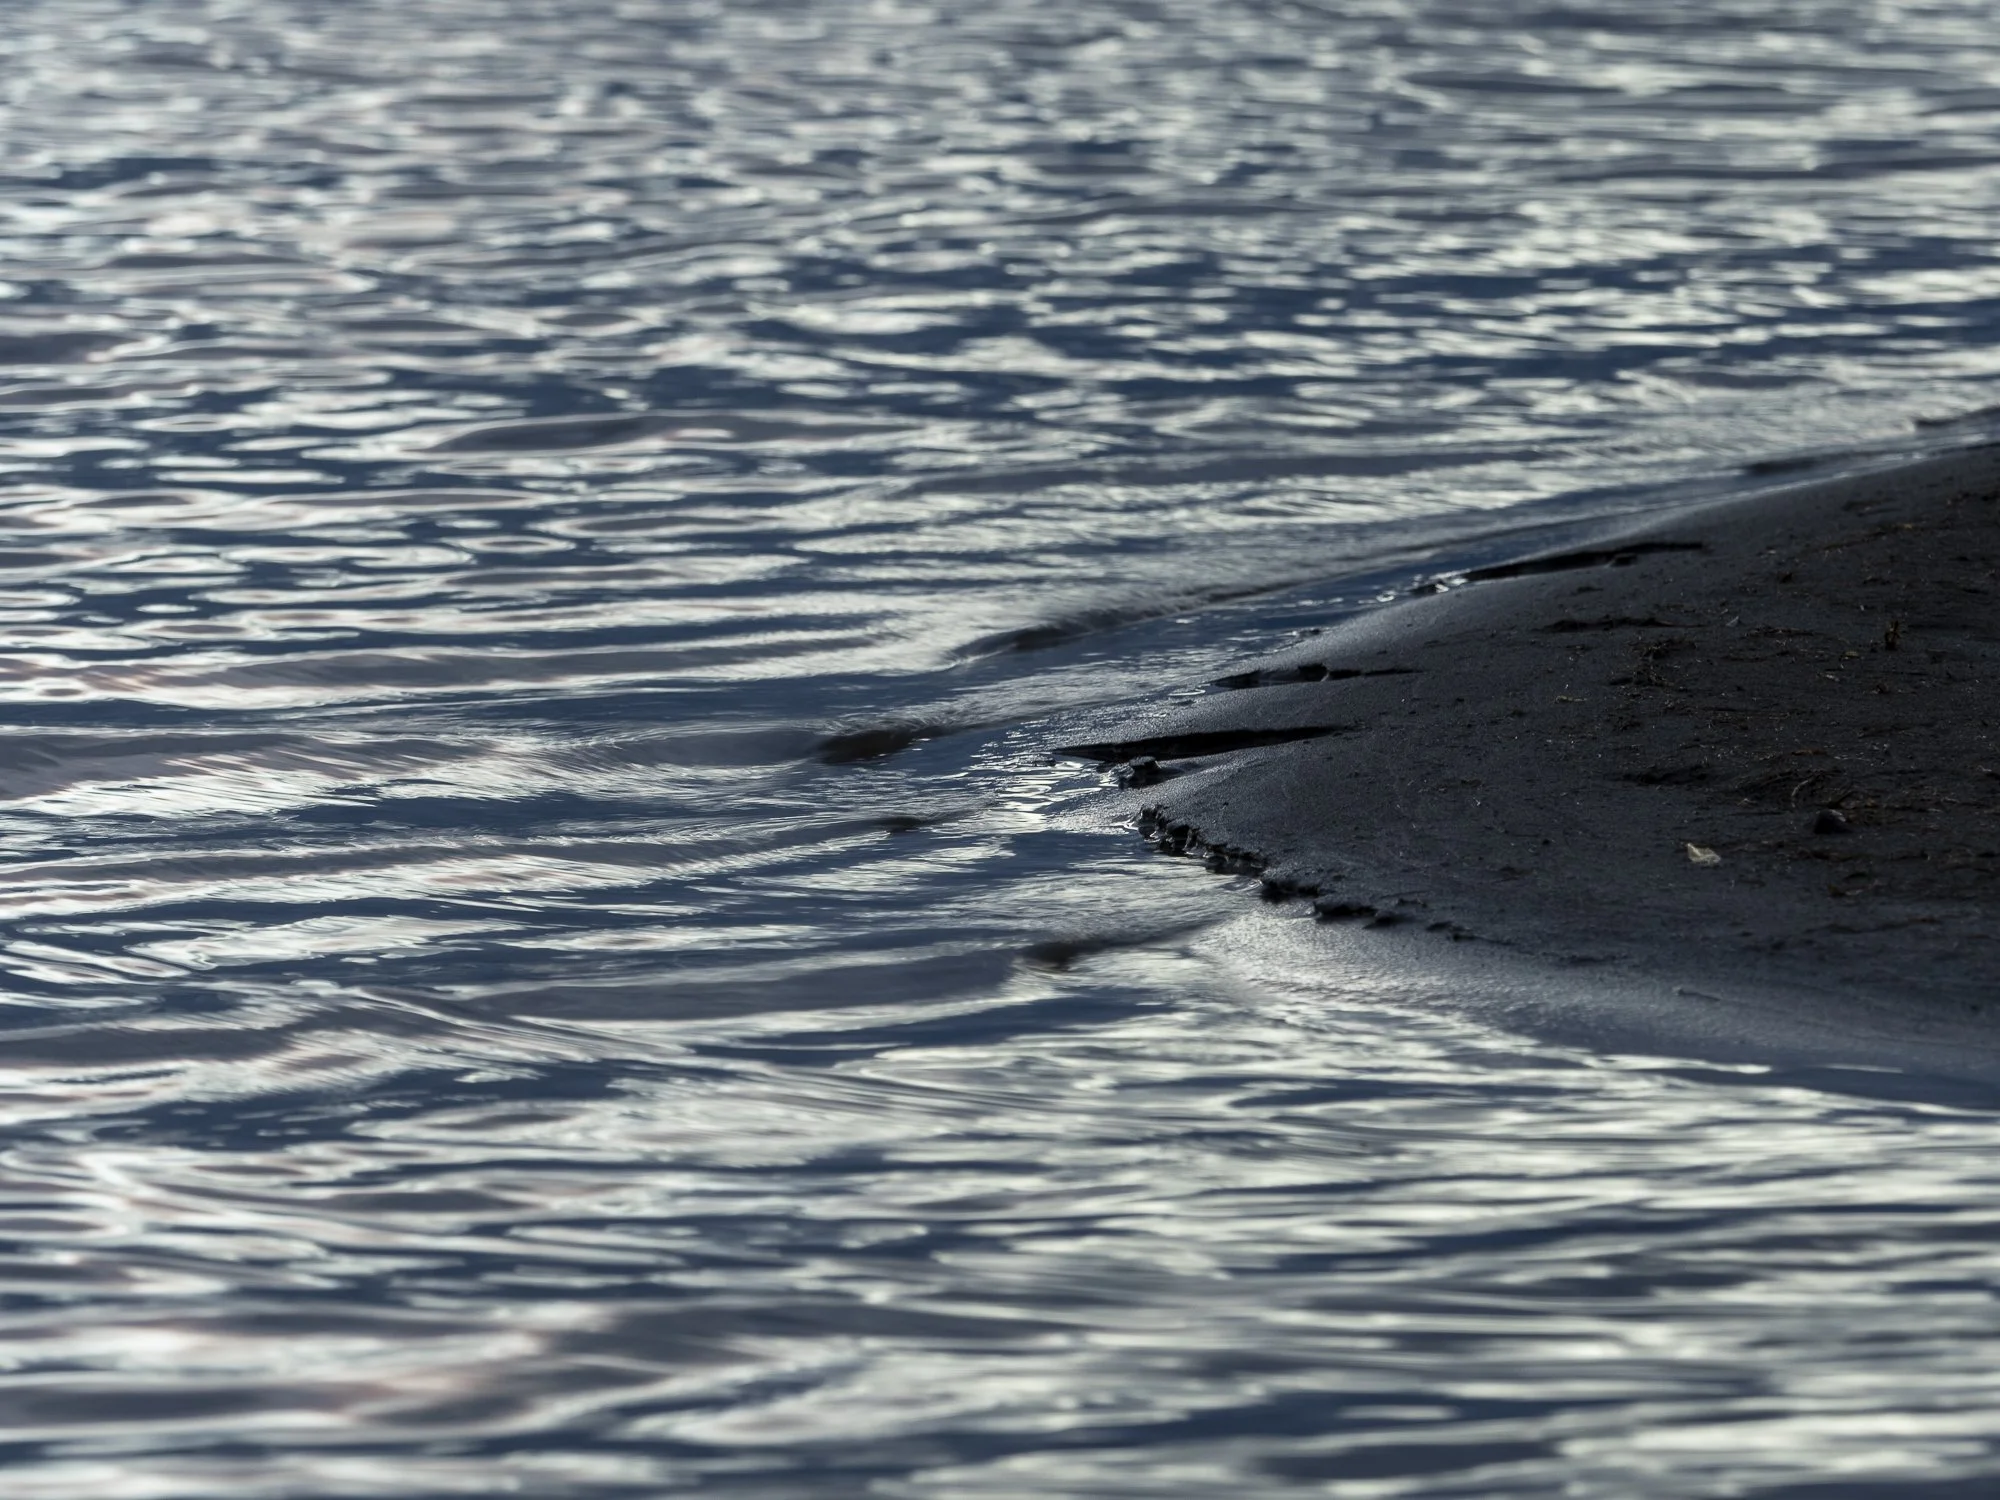
I found these sand bars at Rotary Beach interesting. Both Rotary and Gyro are fairly low beaches in that in the summer you can walk for a long time before it gets deep. I loved how the sunset radiated against the lake. For this photo I slowed my shutter speed to create a more buttery lake vibe.

This is the exact same sand bar at Rotary Beach. However, this photo was taken shortly after the sun had set and we were entering into blue hour.


I hope you’re out enjoying some autumn photography!

Beautifully Wander | Robynne Ikesaka

Adding Motion to Your Photograph ft. Cinemagraphs | Autumn/Halloween Inspired Create with Me

Welcome to WEEK THREE of the Autumn/Halloween Create with Me Series! Today we are creating a cinemagraph for the first time!

What is a Cinemagraph?

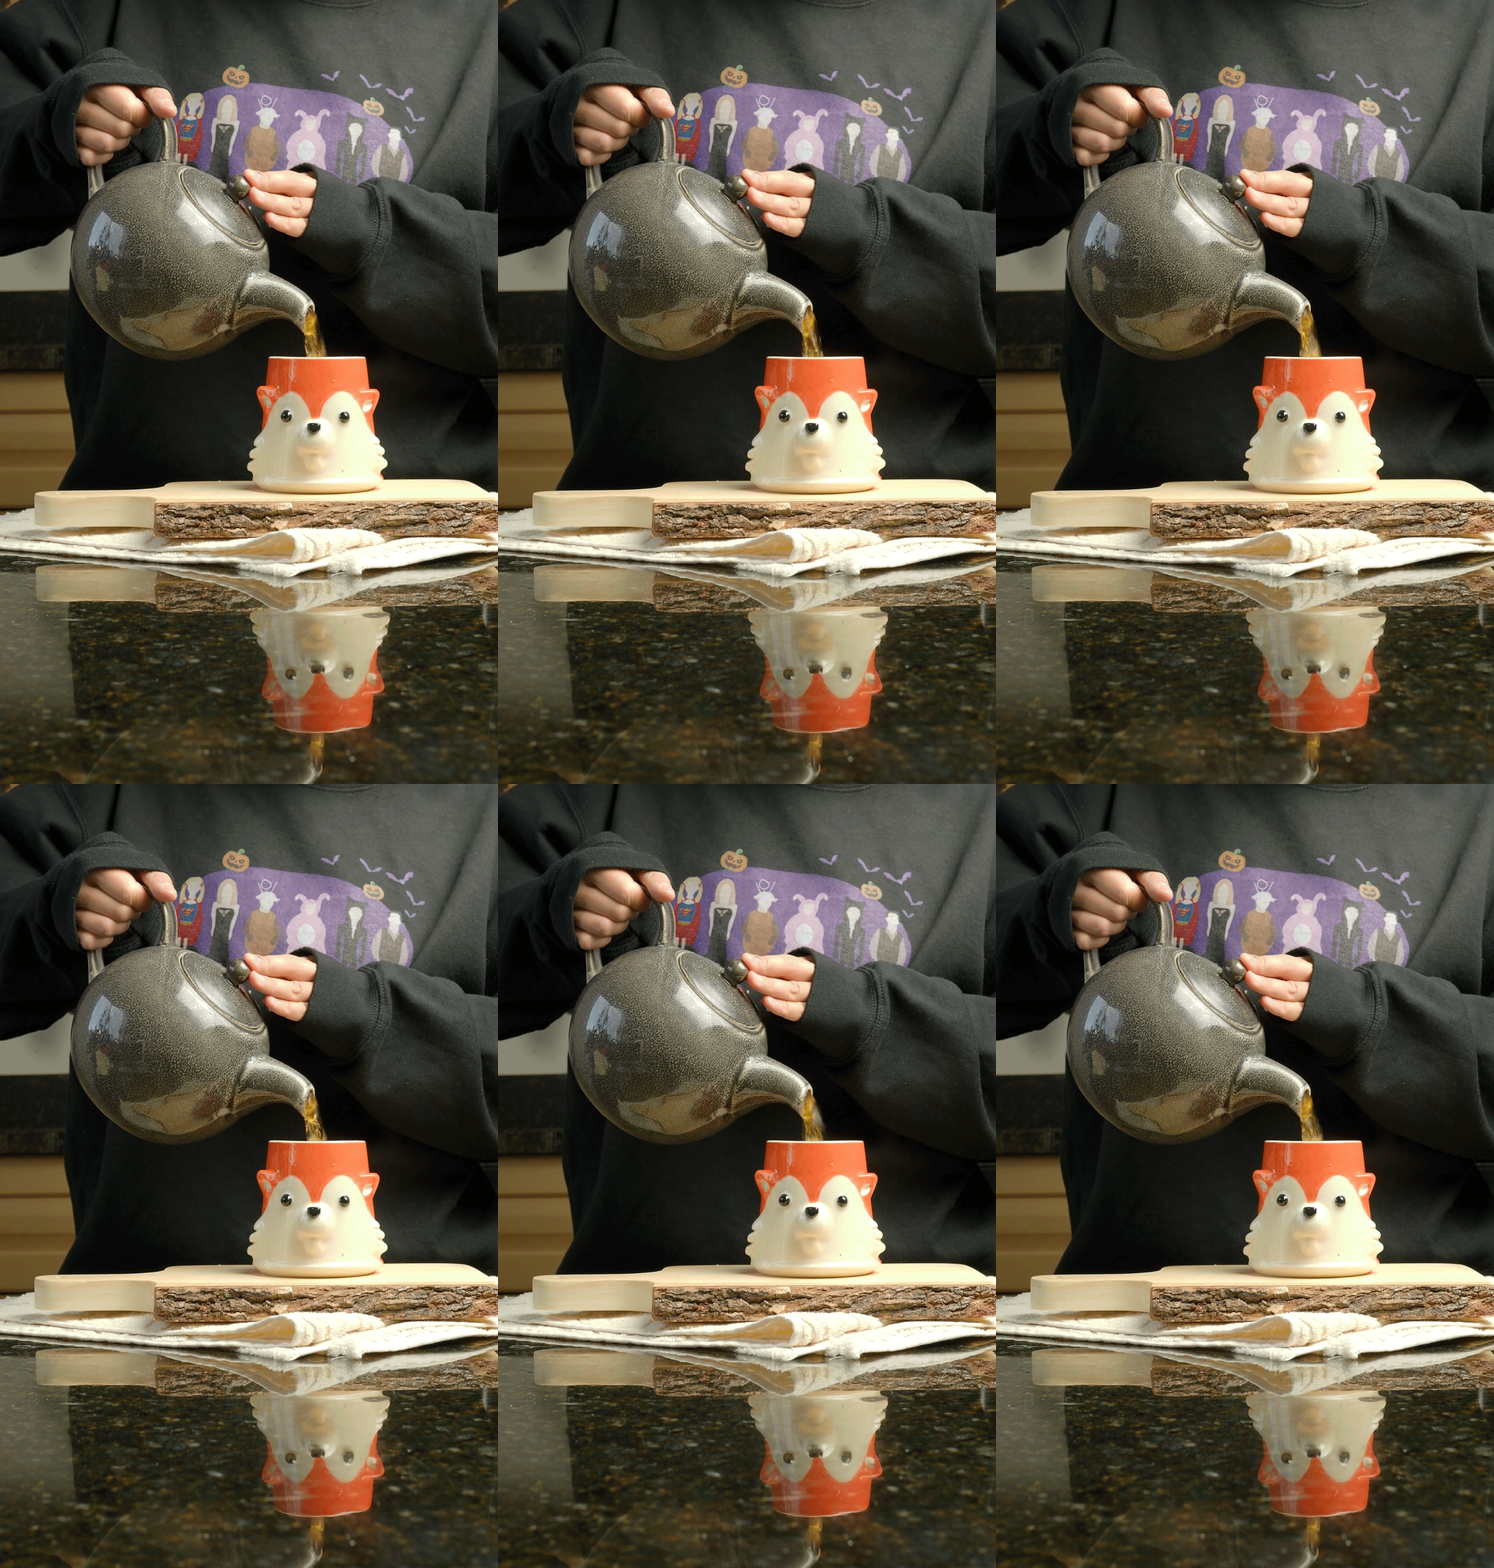
A cinemagraph is a still photograph where a minor and repeated movement occurs. It’s a wonderful way to add a little movement to your still photos!

What Interested Me About Cinemagraphs

What initially interested me about cinemagraphs was the creativity behind it - cinemagraph makes a still image more interesting and eye catching and it was a photography technique that I hadn’t tried yet!

Taking the Video

To create a cinemagraph you need to first take a short video clip. For my first cinemagraph I did a simple tea pouring one. I knew beforehand that getting a consistent tea pour would make the post-processing easier so I made sure to keep the tea pour consistent at one point and to hold the kettle as still but as natural as I could.

Once I was happy with a clip I brought the clips onto my computer and did the next step - video post processing in Lightroom.

Video Post-Processing in Lightroom

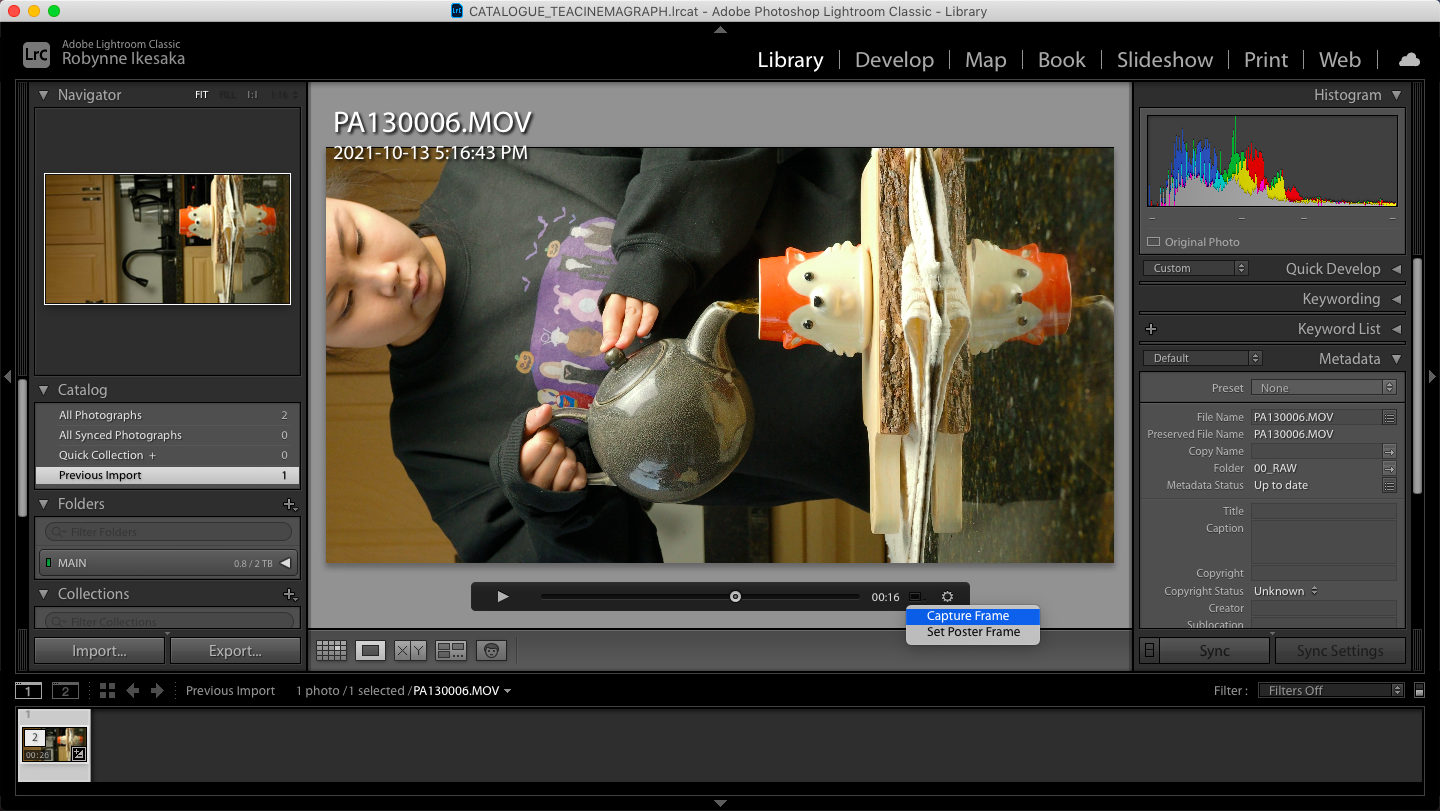
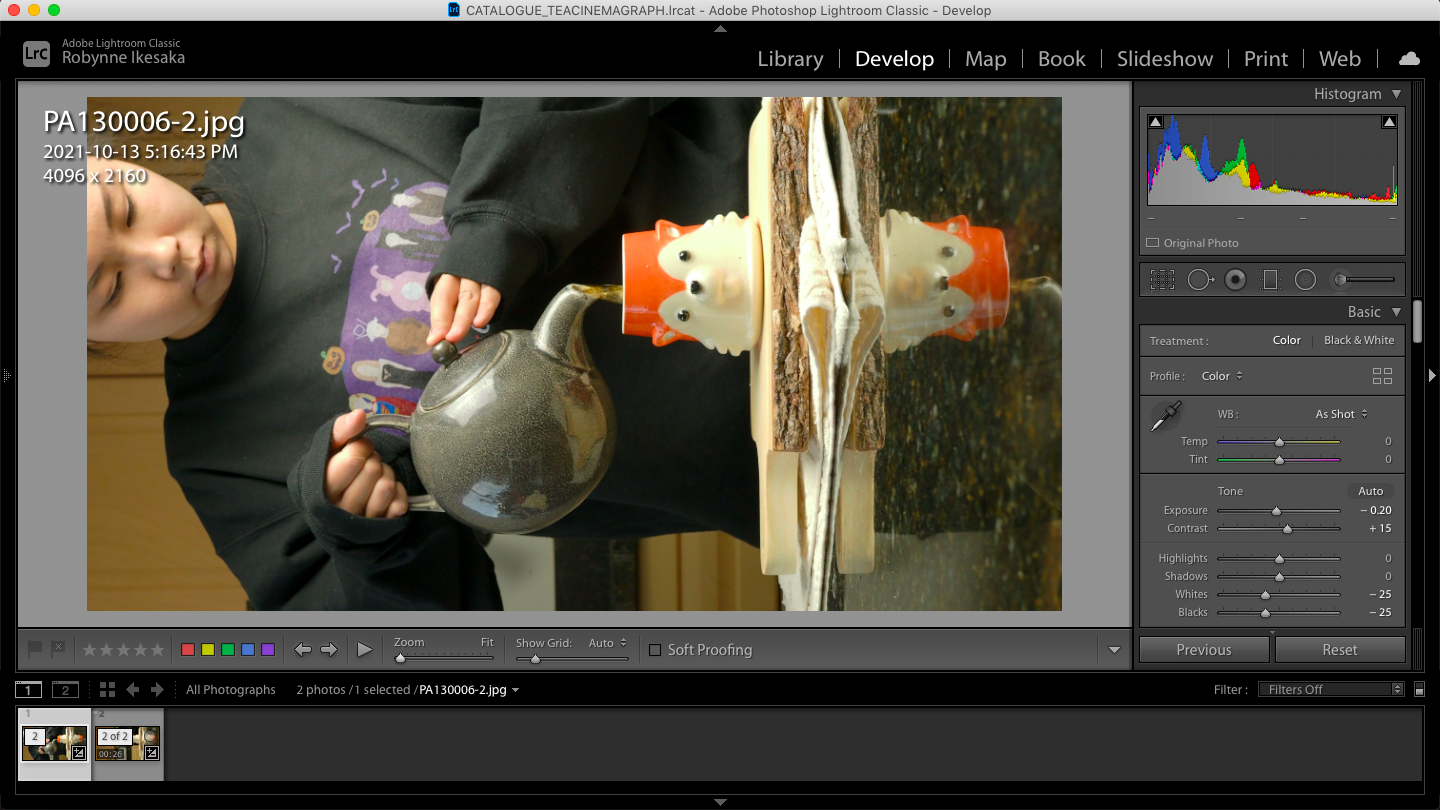
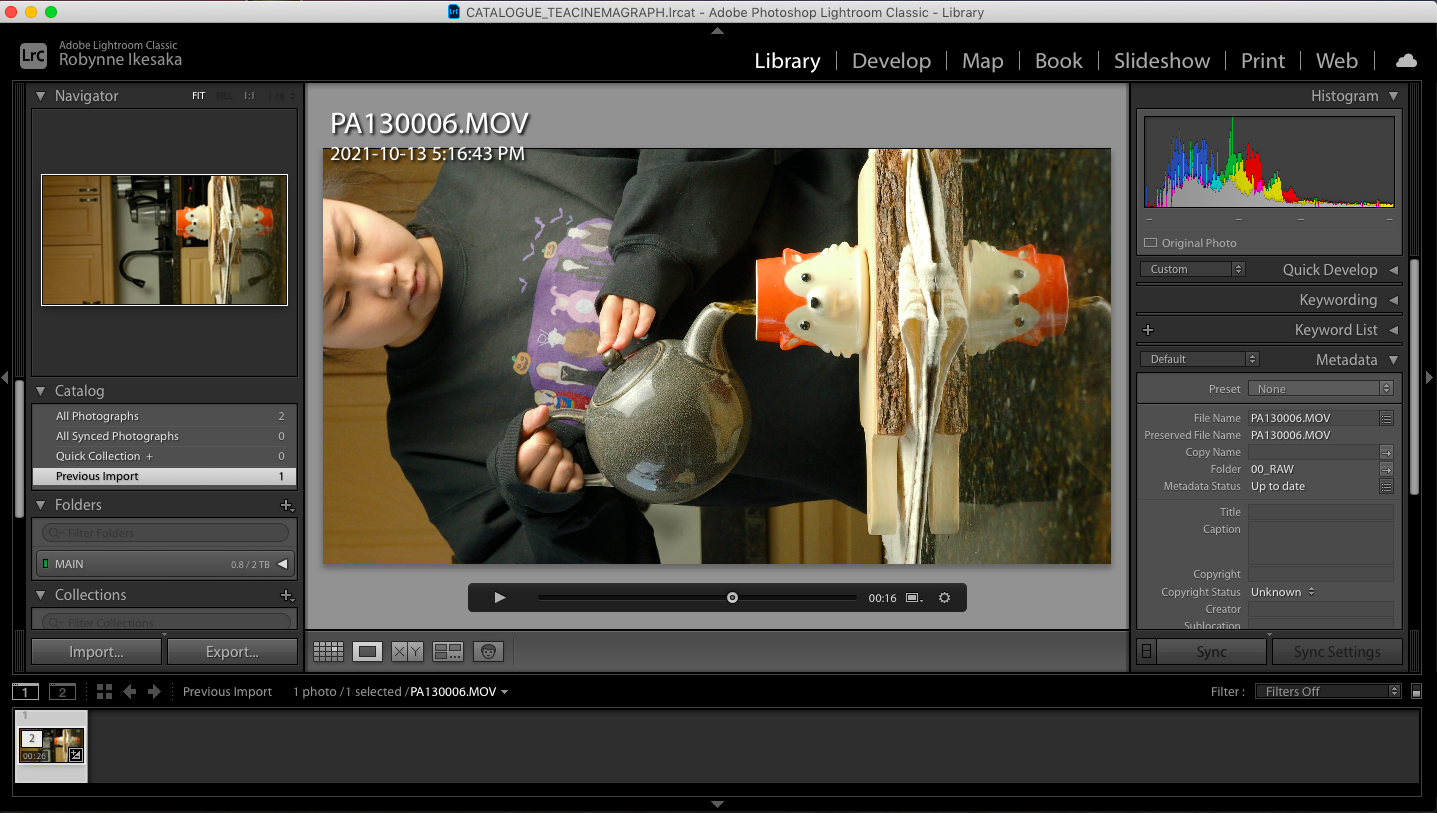
This step of post-processing in Lightroom is optional after you have filmed your clips but I prefer to give a few adjustments to my clip. However, within Lightroom Classic you can’t edit a video but there’s a hack that I’ve used in the past:

  1. Load your video clip into Lightroom

  2. Scrub through the video and find a frame that captures majority of what you’re looking to edit (for me it was a frame that had me pouring the tea)

Screen Shot 2021-10-15 at 6.06.13 PM.png

4. Hit the ‘Capture Frame’ button at the bottom (this will create a screenshot of your video that you can edit in Lightroom)

Screen Shot 2021-10-15 at 6.06.27 PM.png

5. Edit your screenshot photo

Screen Shot 2021-10-15 at 6.06.57 PM.png

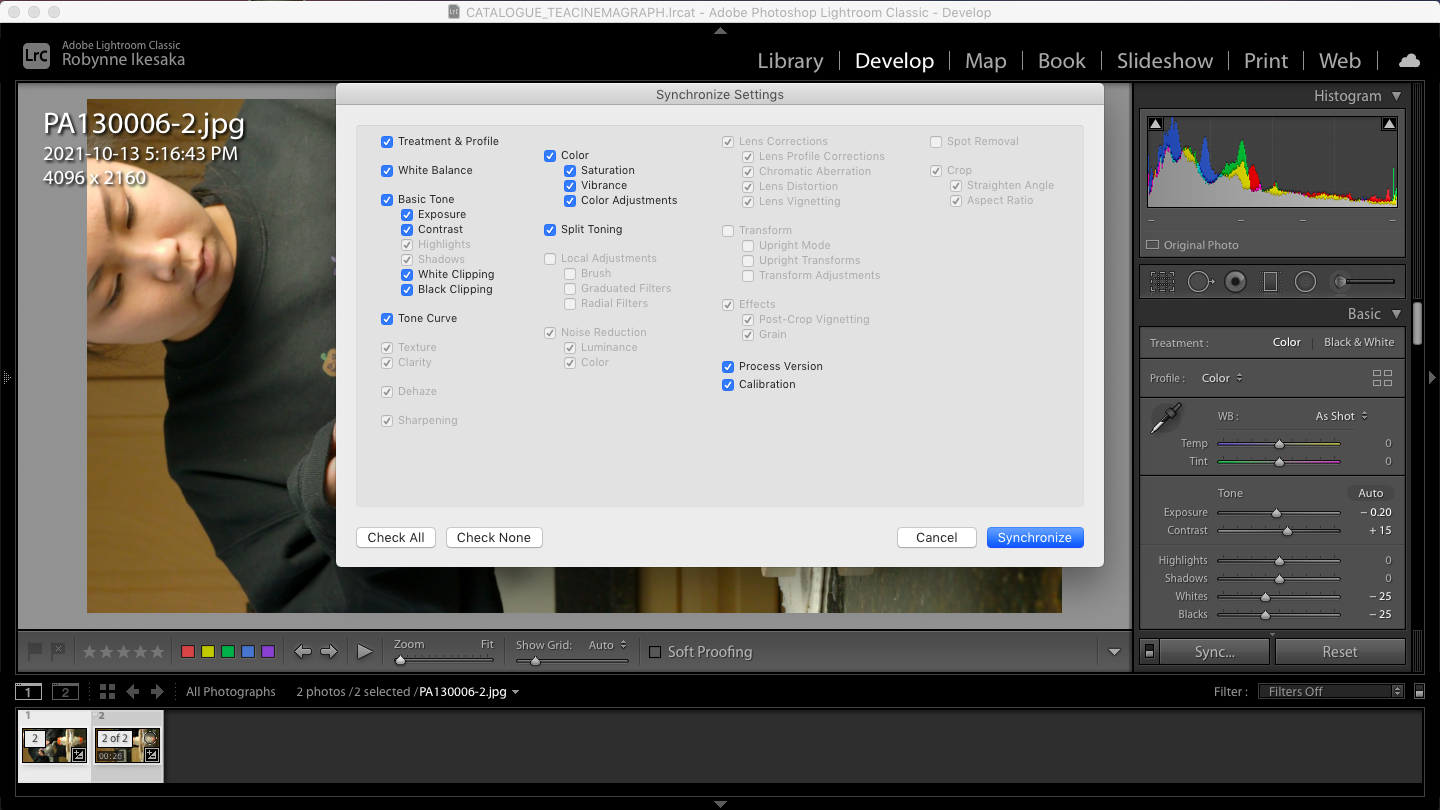
6. Sync your photo to the video file (note: not all your edits will sync only a few minor adjustments)

Screen Shot 2021-10-15 at 6.07.14 PM.png

7. Export to your desired location

Pulling Together in Photoshop

The final step is pulling your cinemagraph together in Photoshop:

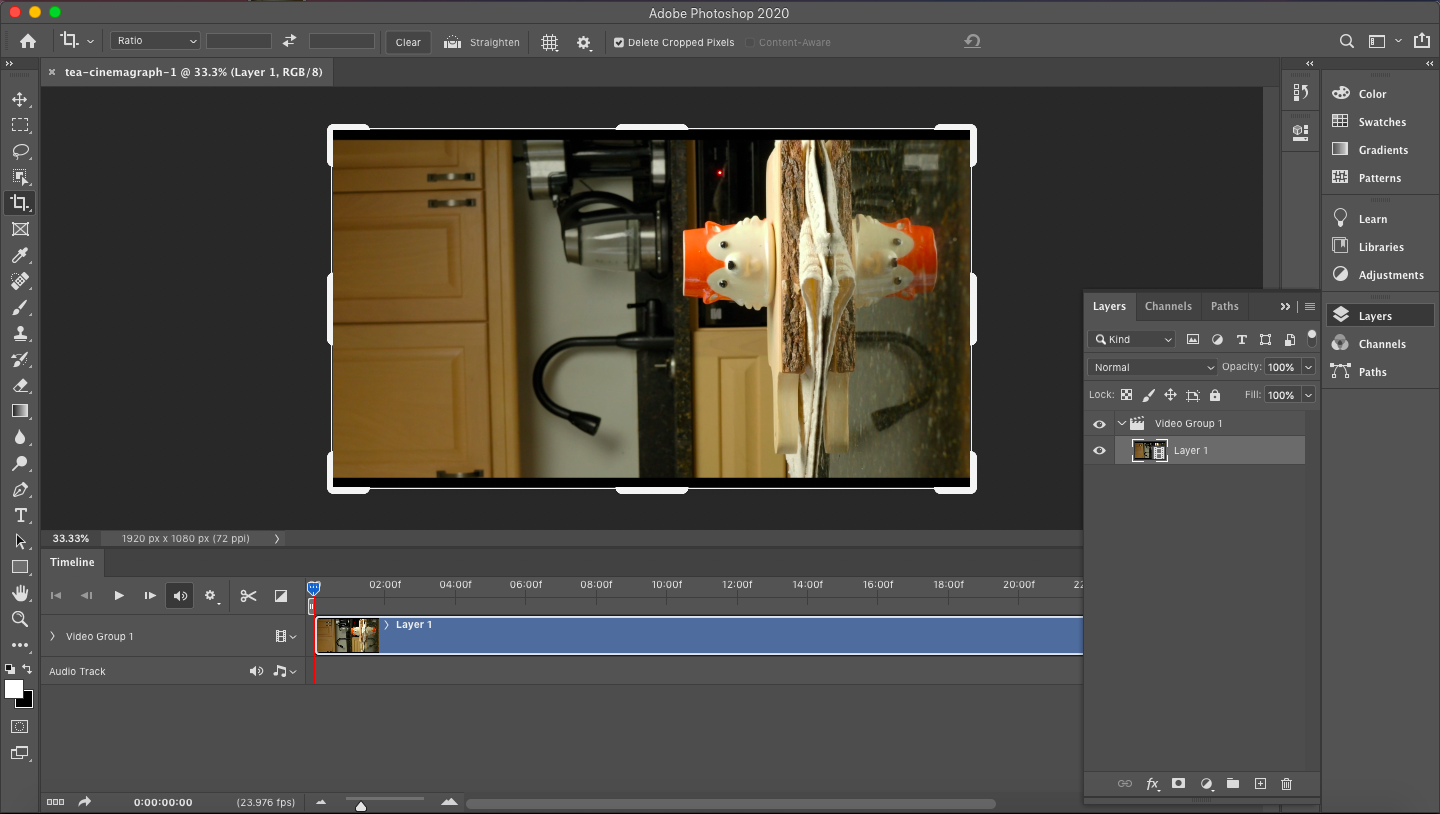
  1. Pull your edited video clip into Photoshop

Screen Shot 2021-10-15 at 6.13.20 PM.png

2. Cut your clip down to make it more manageable to work with

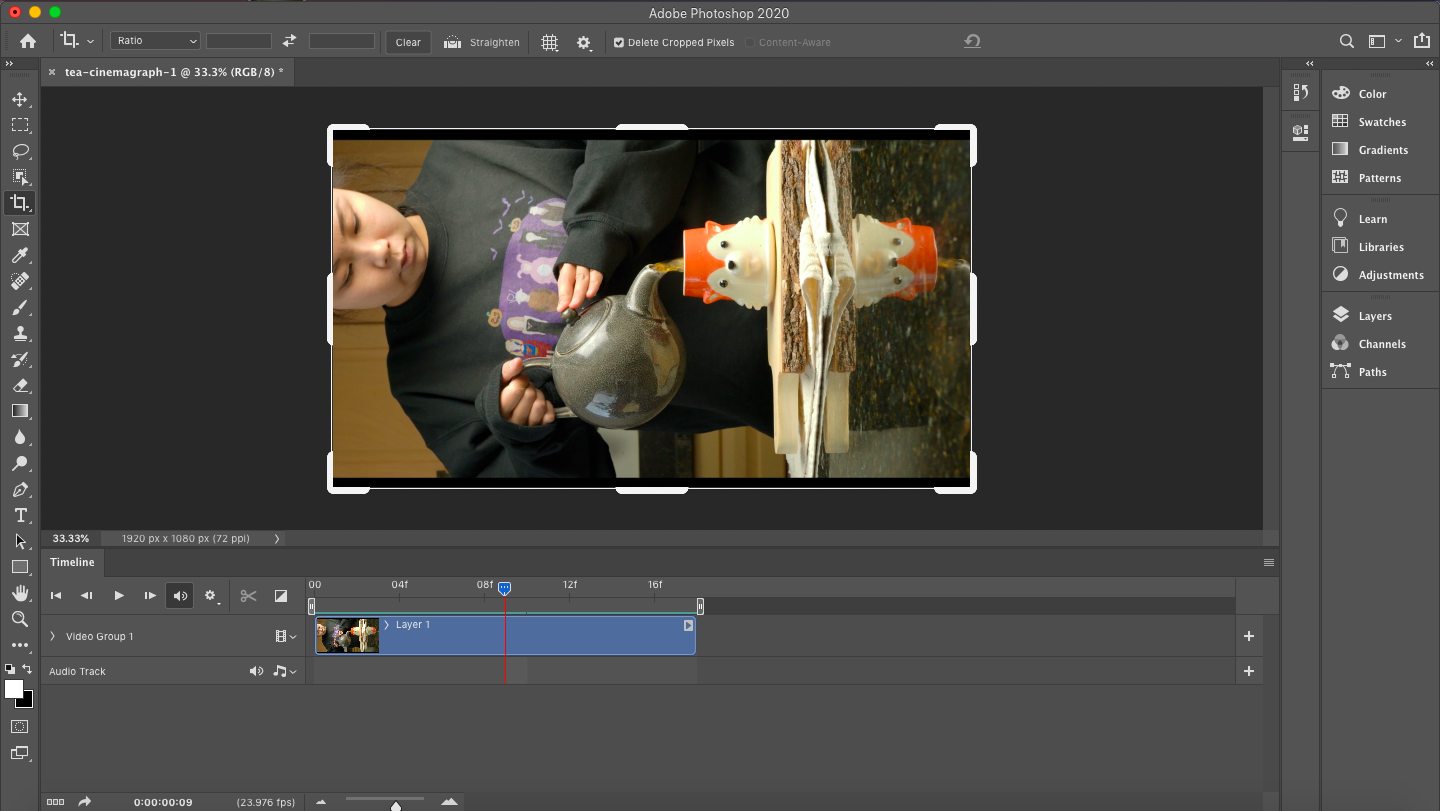
3. Scrub through the video to find a short area of the clip that is consistent and cut it down (for me it was part of the clip where my tea spout wasn’t rising or lowering and my tea stream was consistent)

Screen Shot 2021-10-15 at 6.14.59 PM.png

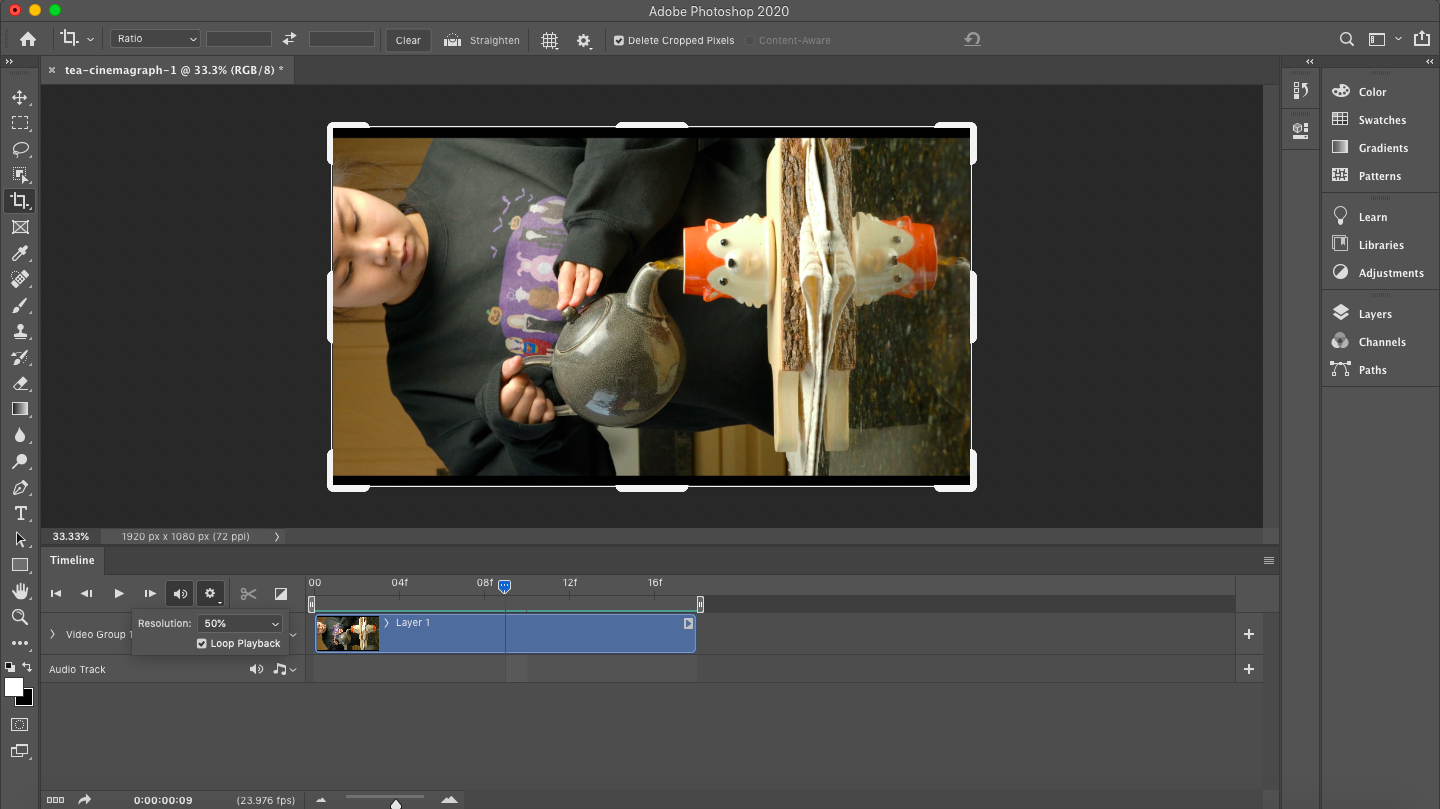
4. Hit the gear icon and make sure that “Loop Playback” is on

Screen Shot 2021-10-15 at 6.15.16 PM.png

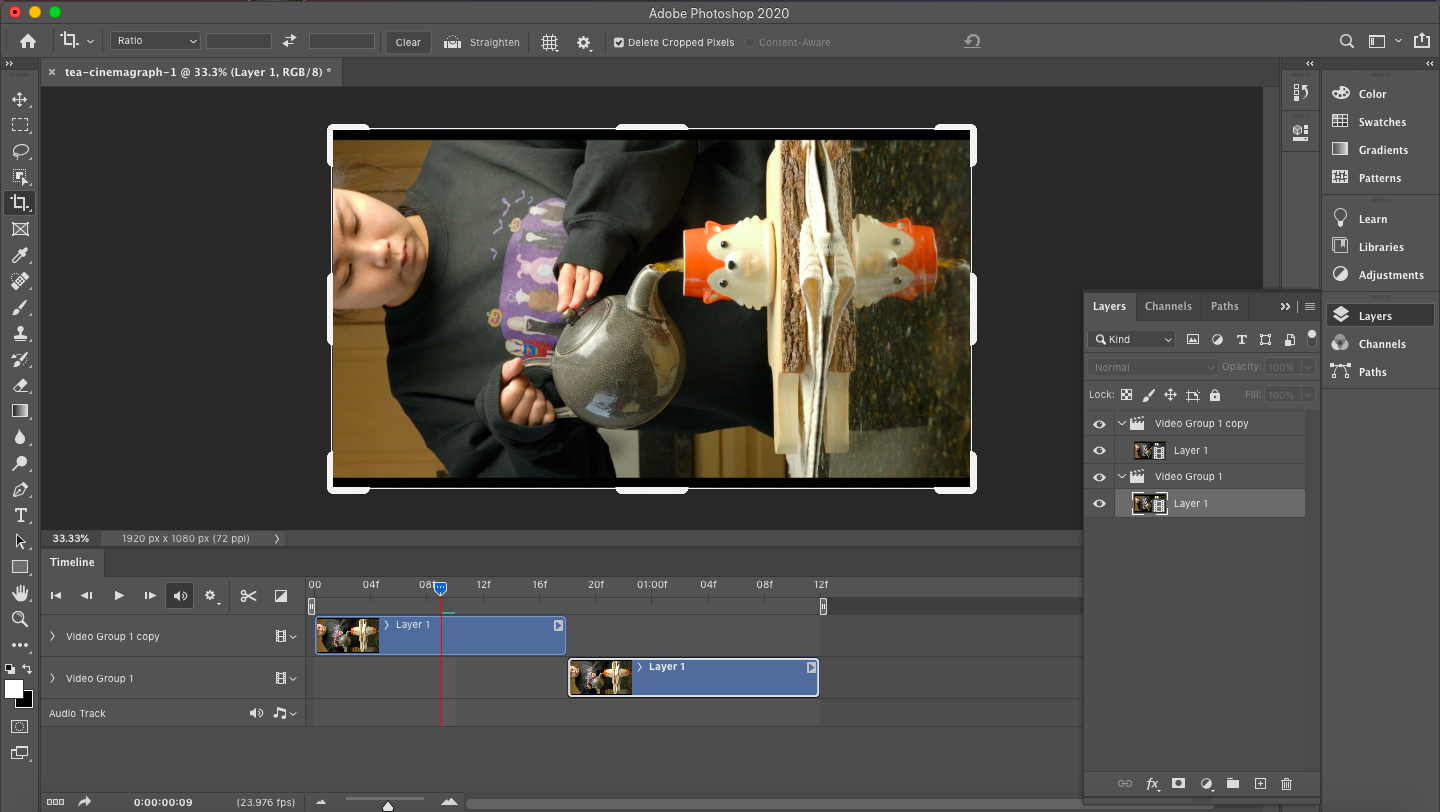
5. Open your layer tab and create another layer of the clip by dragging ‘Video Group 1’ over the ‘Add Layer’ button at the bottom (square with the plus sign in the middle)

6. Drag the second clip over so the beginning of the second clip begins at the end of the first clip

Screen Shot 2021-10-15 at 6.16.09 PM.png

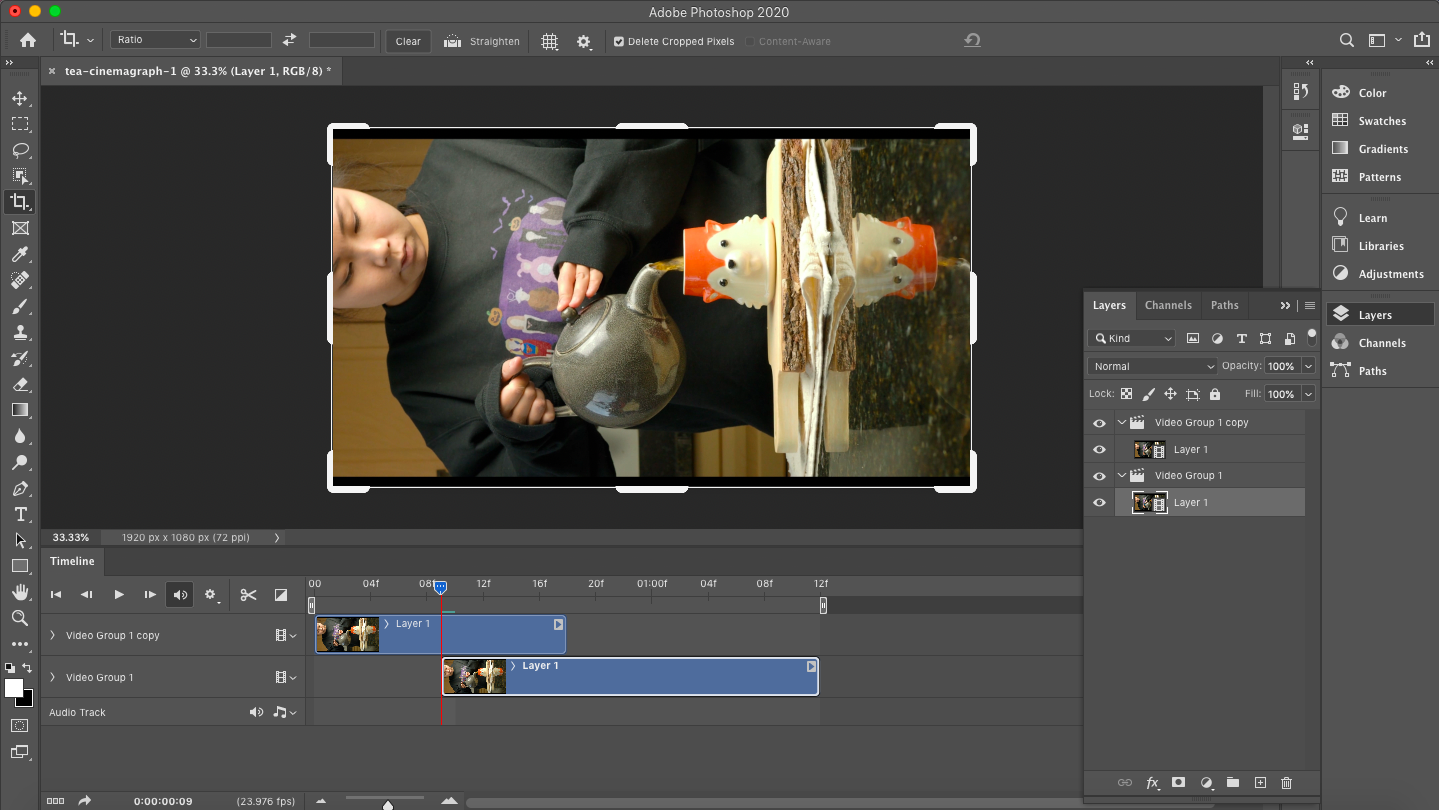
7. Drag the beginning of the clip over to the left

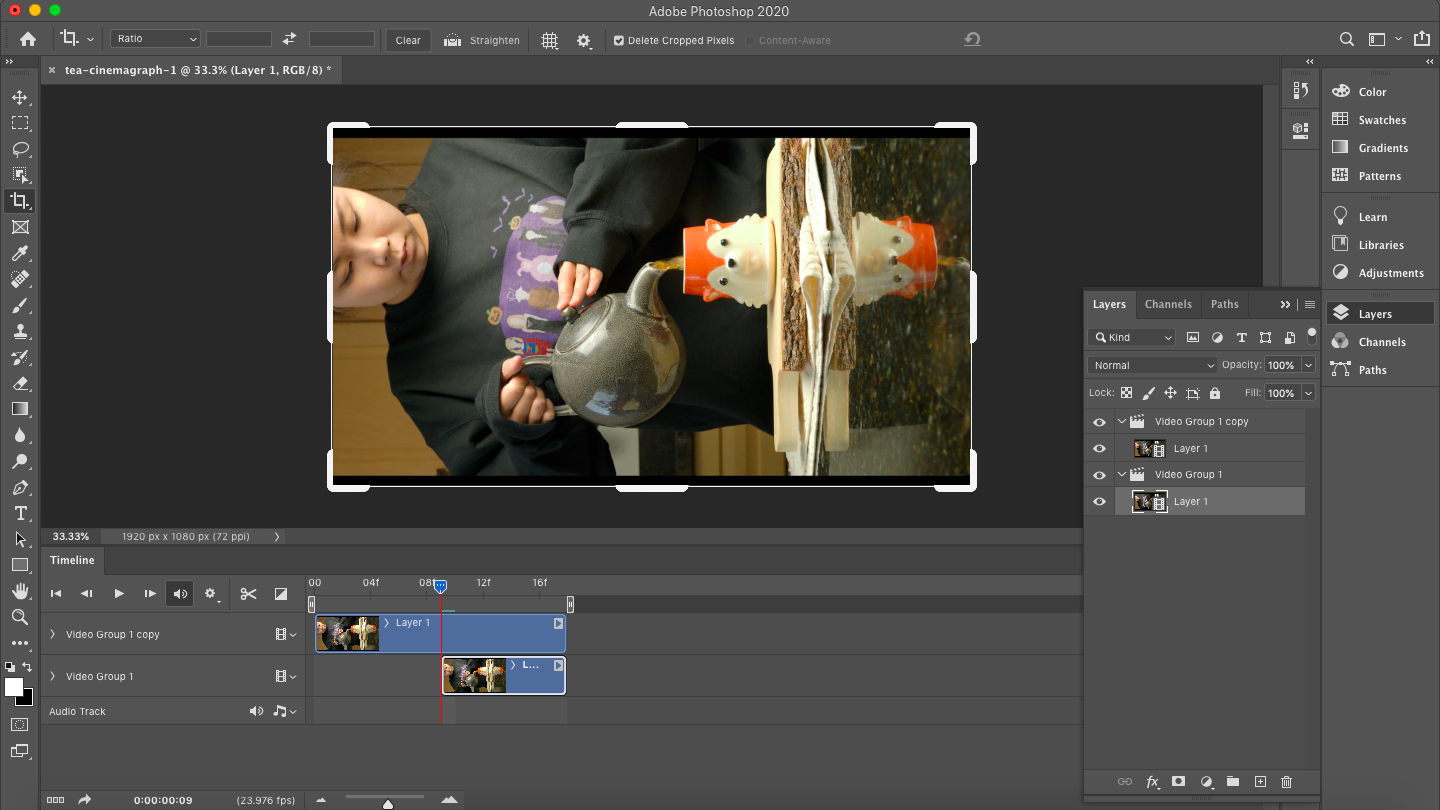
8. Drag the end of the second clip over to the left so the both ends match

Screen Shot 2021-10-15 at 6.16.29 PM.png

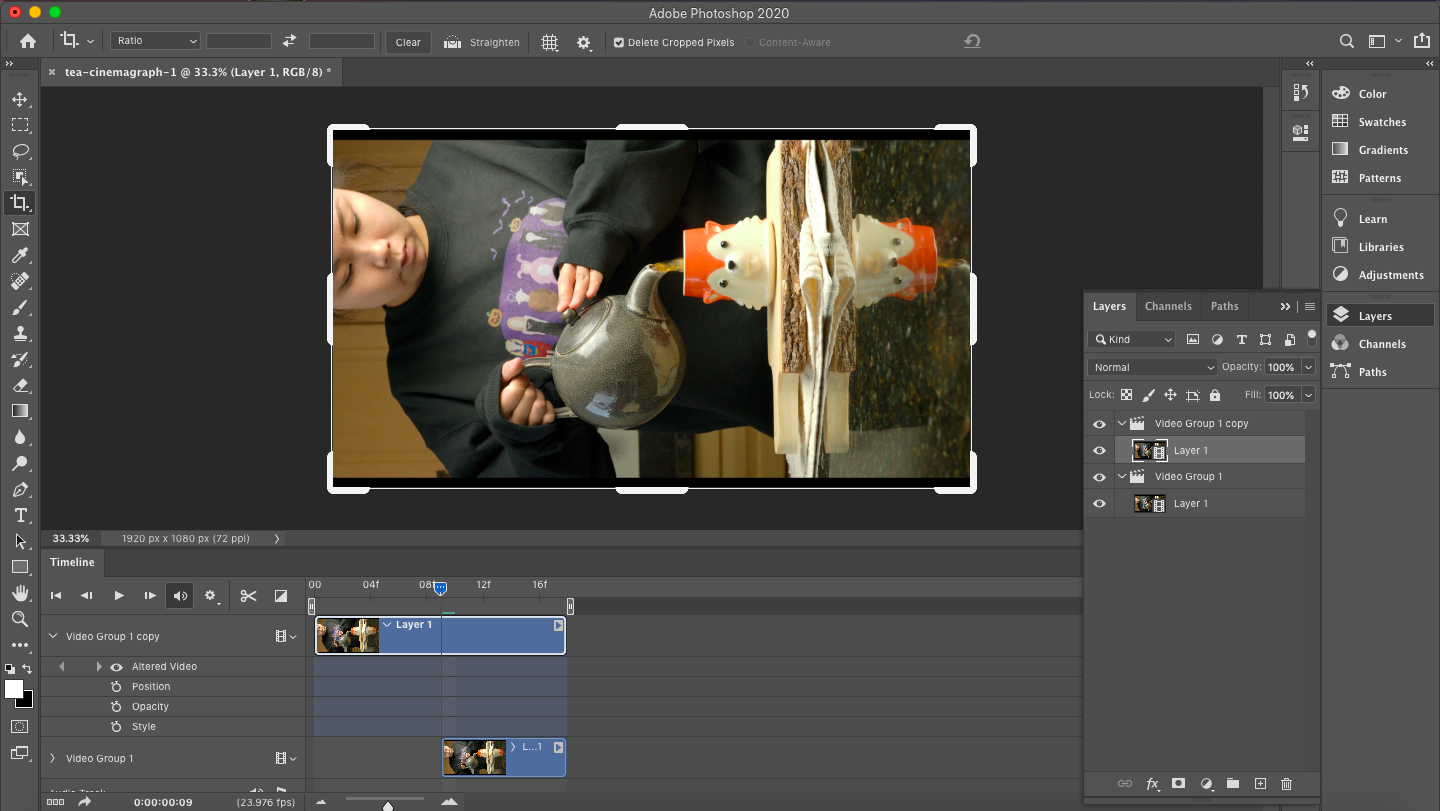
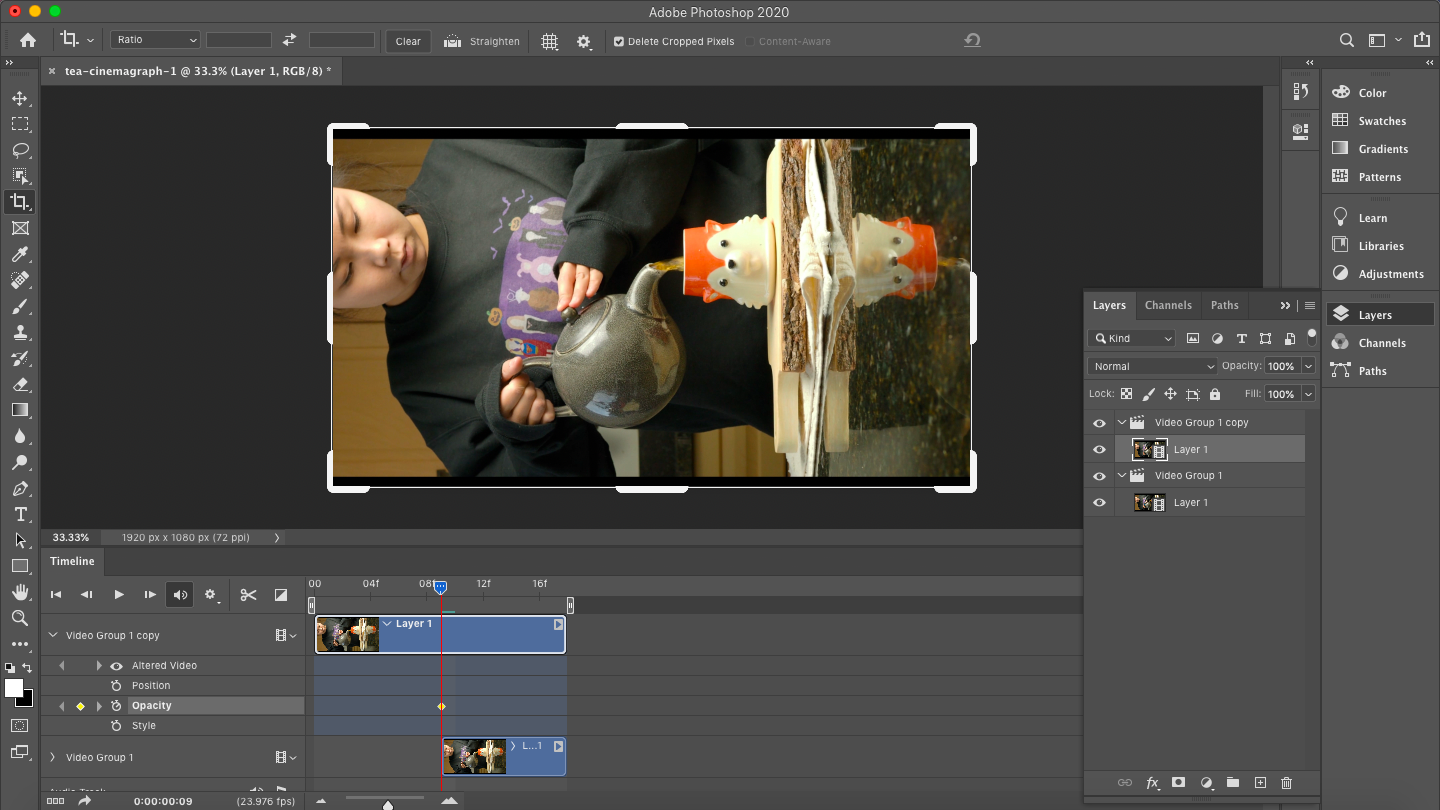
9. Over by your clips hit the down arrow and hit “opacity”

Screen Shot 2021-10-15 at 6.16.43 PM.png
Screen Shot 2021-10-15 at 6.16.54 PM.png

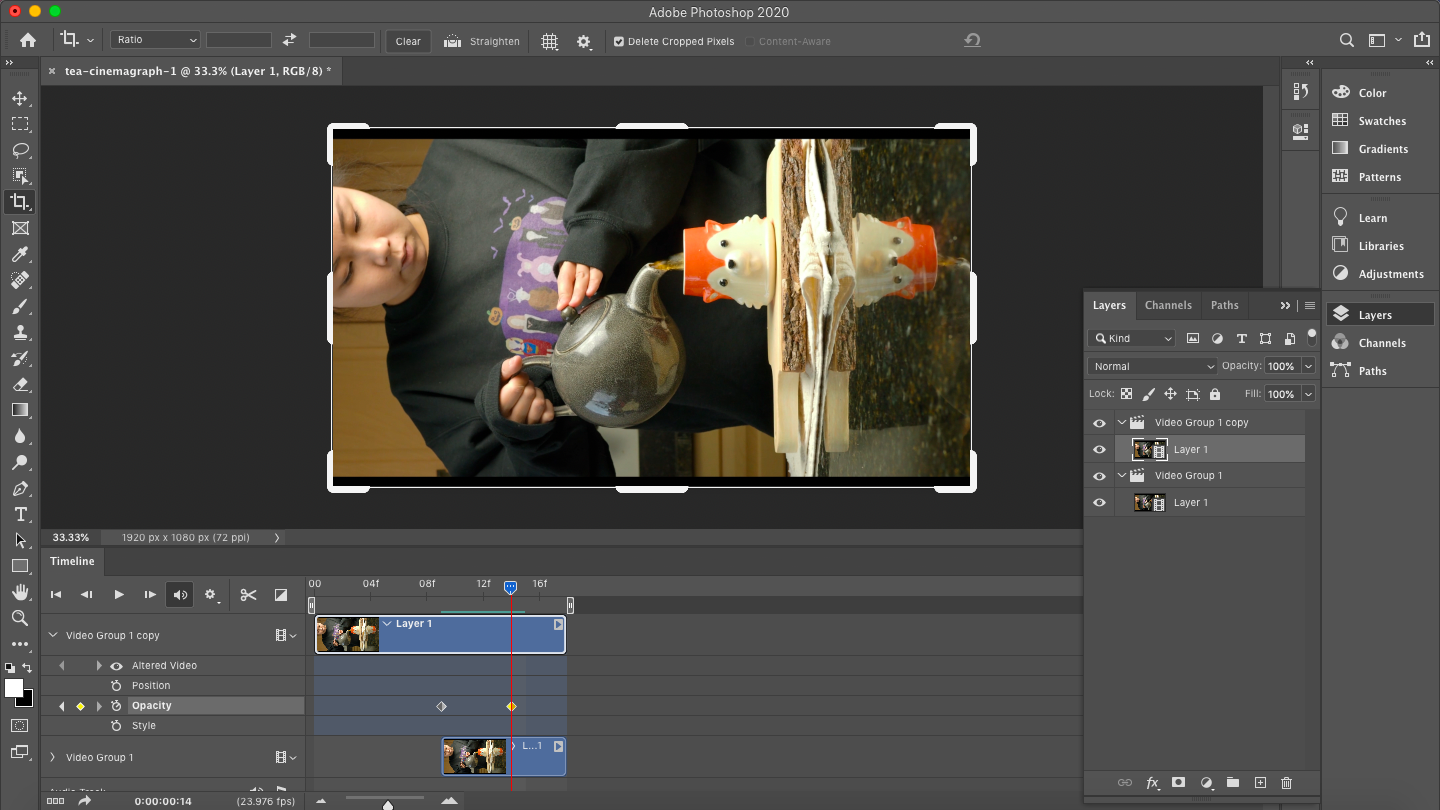
10. Select another part of your clip and hit “opacity” again

Screen Shot 2021-10-15 at 6.17.07 PM.png

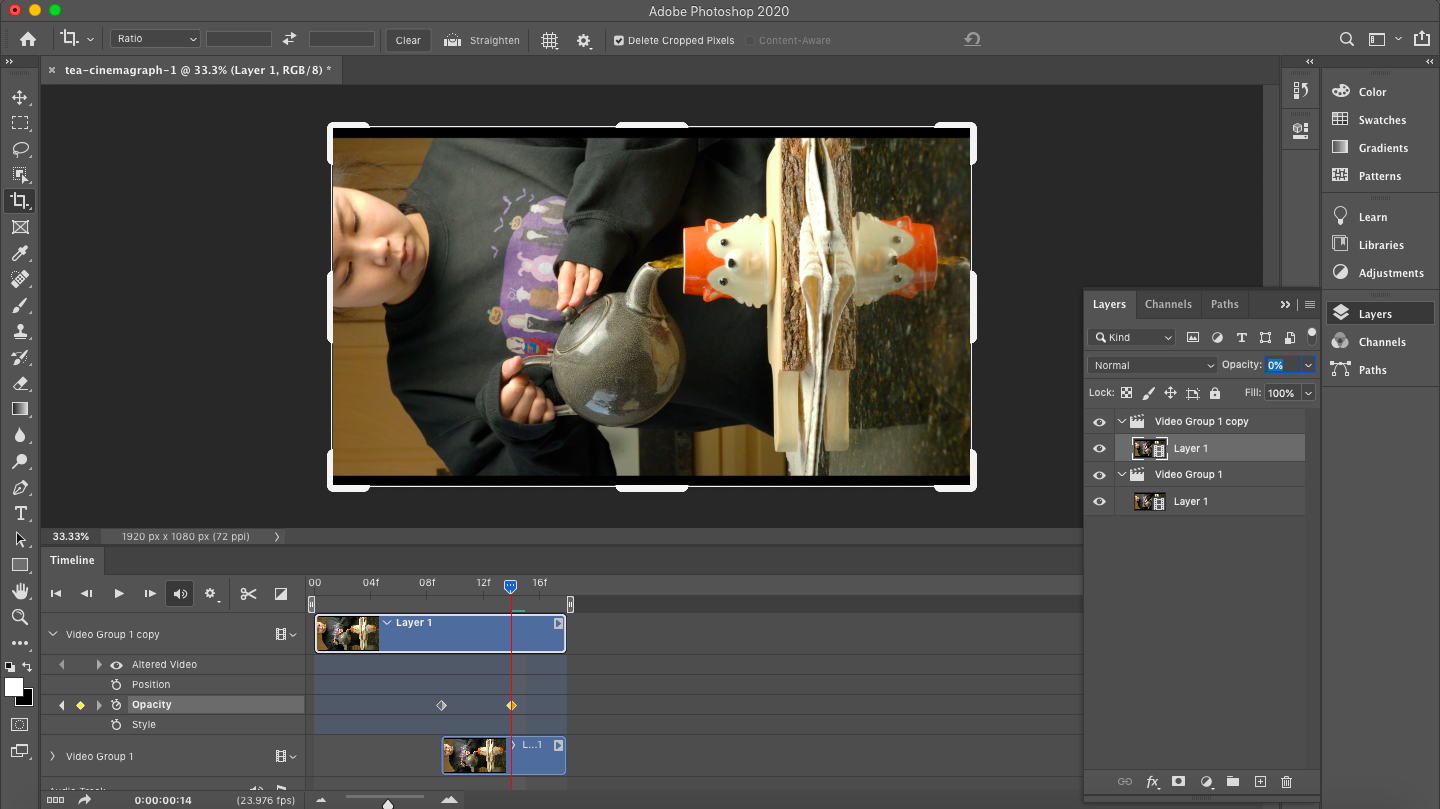
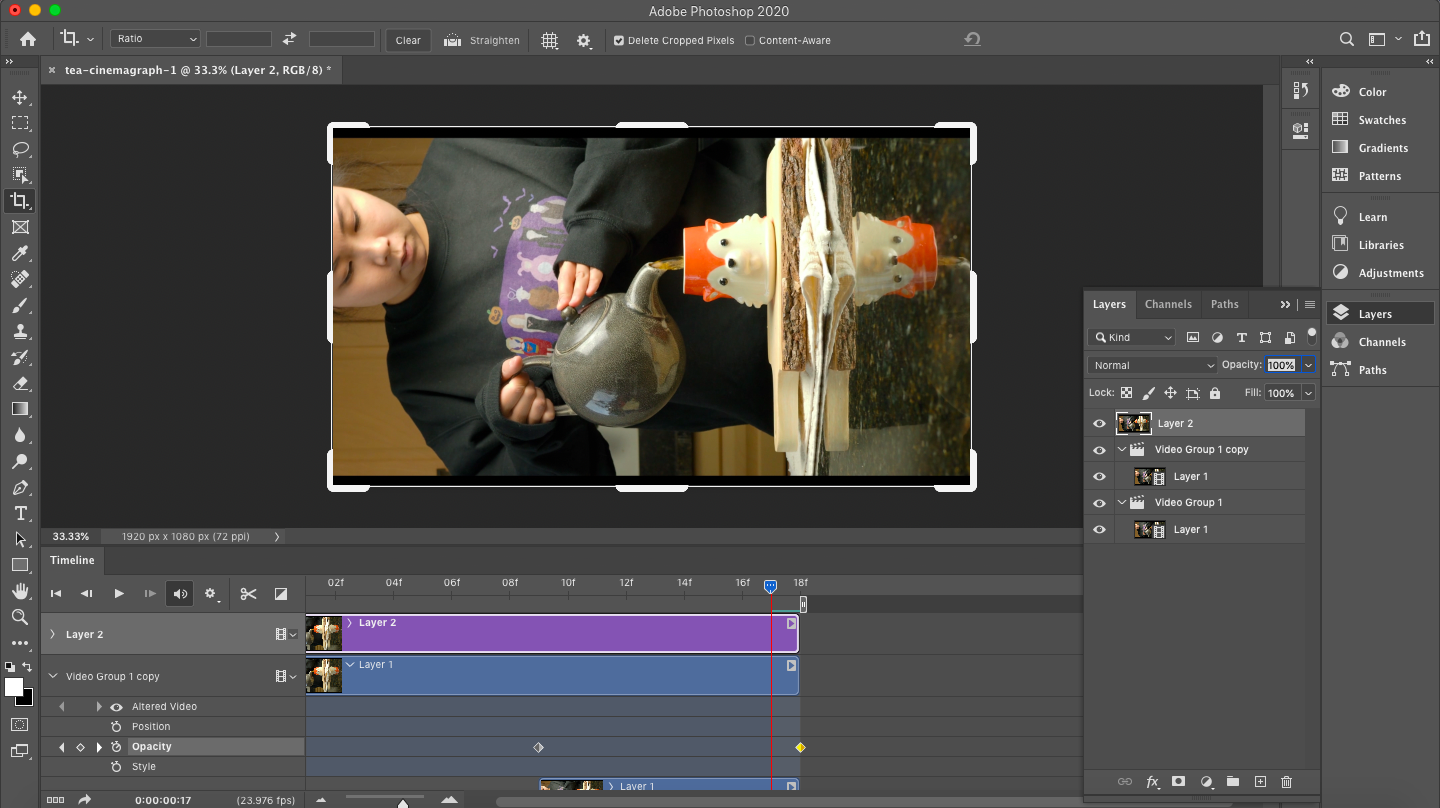
11. In your layers tab make sure the “opacity” is set to 0%

Screen Shot 2021-10-15 at 6.17.27 PM.png

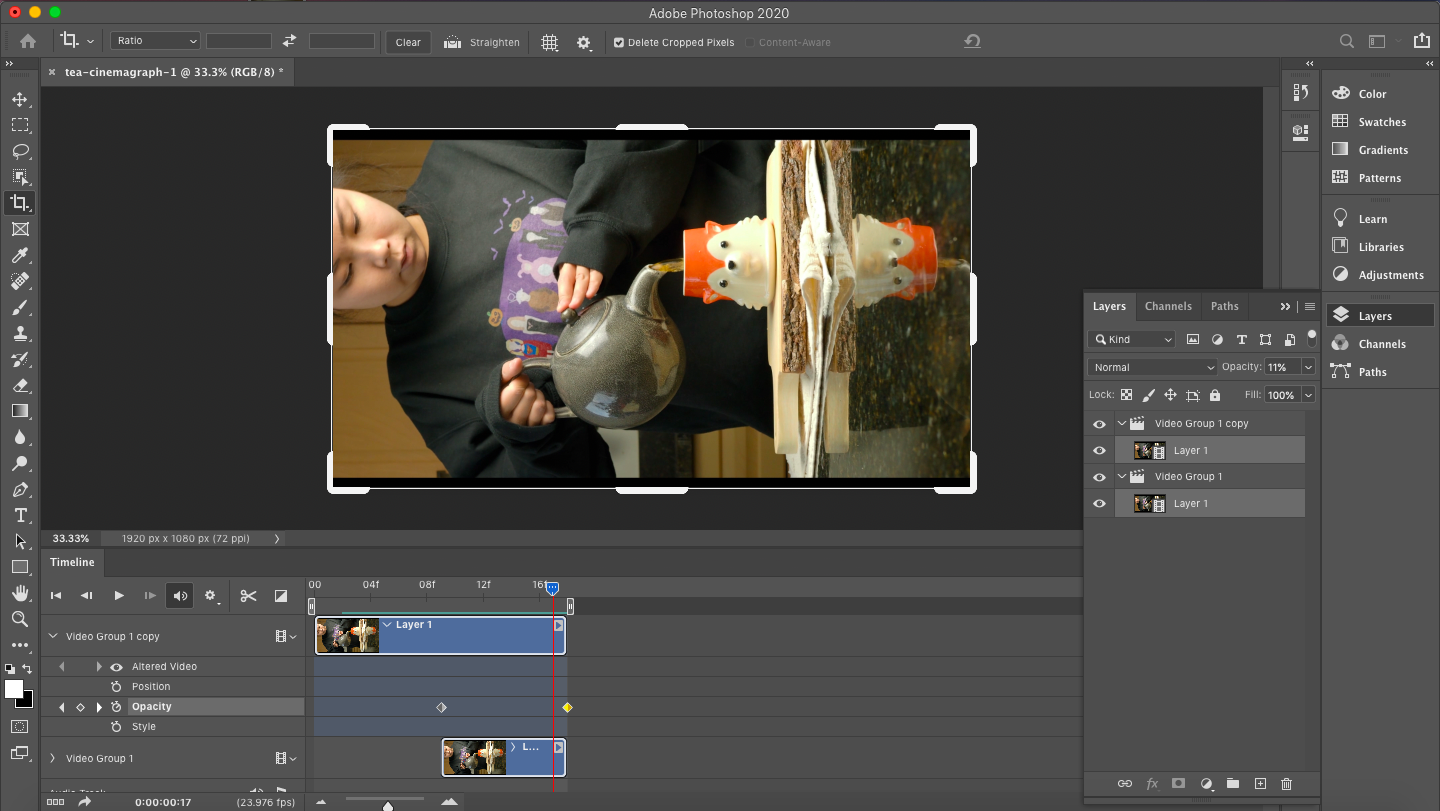
12. Then move the second opacity marker to the end of the clip

Screen Shot 2021-10-15 at 6.18.28 PM.png

13. To eliminate any slight movement you or your subject is making create another layer on top of your video files by hitting ctrl + option + shift + e

Screen Shot 2021-10-15 at 6.19.12 PM.png

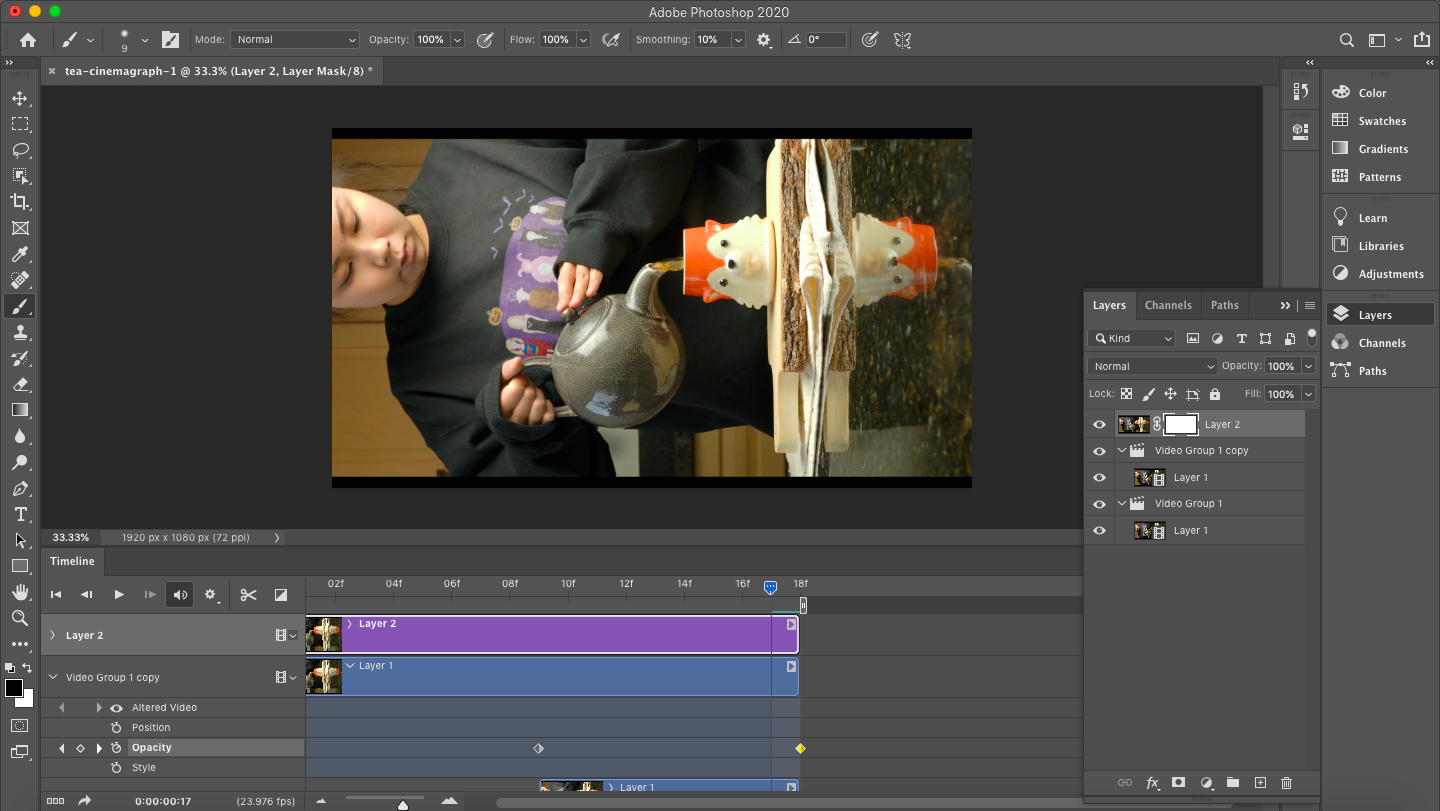
14. Select the layer you just created in the layer tab and create a mask (square icon at the bottom with a circle in the middle)

Screen Shot 2021-10-15 at 6.19.34 PM.png

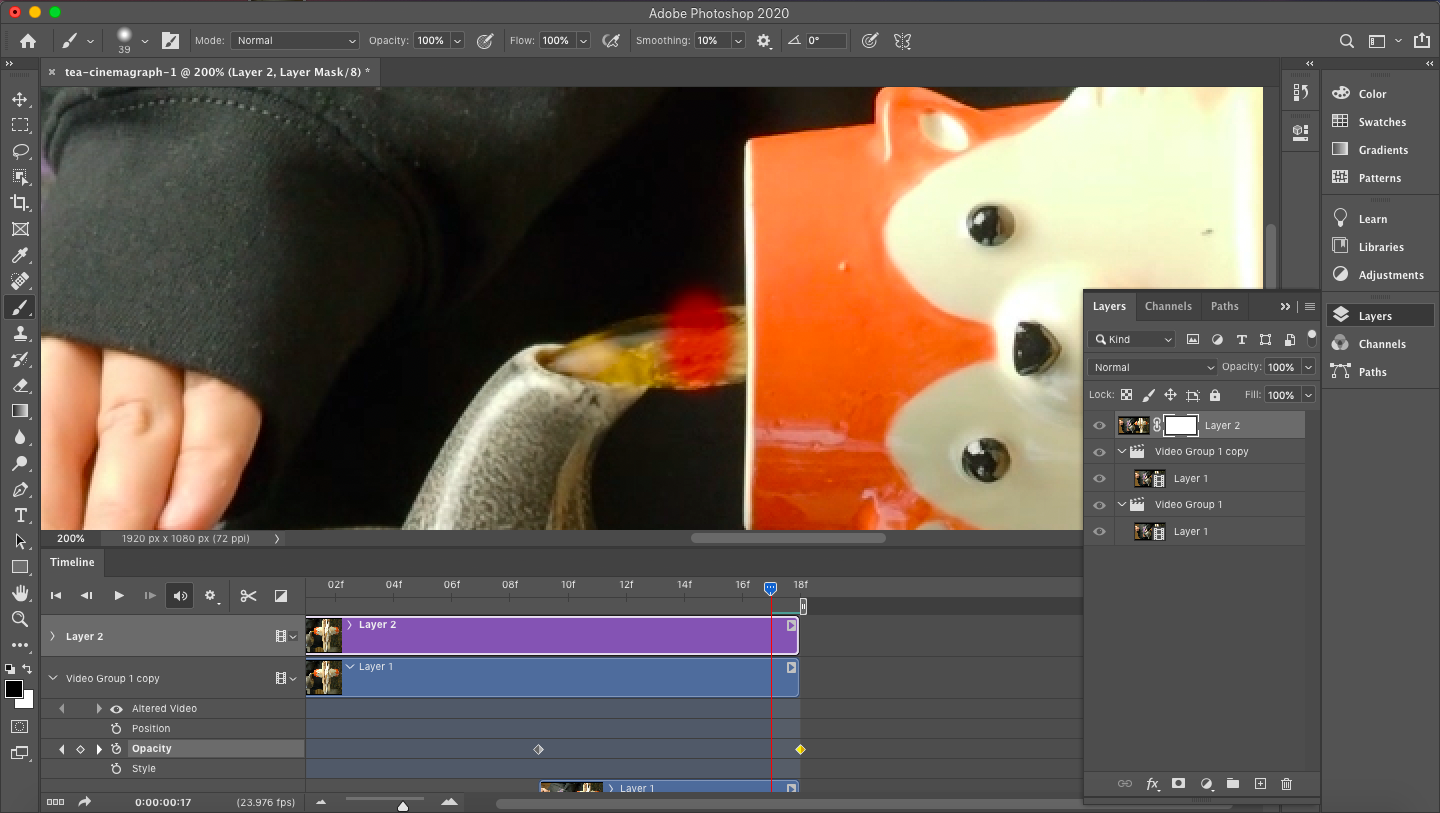
15. Making sure your brush and color black is on and brush over your movement area (for this one it’s my tea stream)

  • To see what you are brushing hit the slash key under your delete key on your keyboard

Screen Shot 2021-10-15 at 6.19.55 PM.png

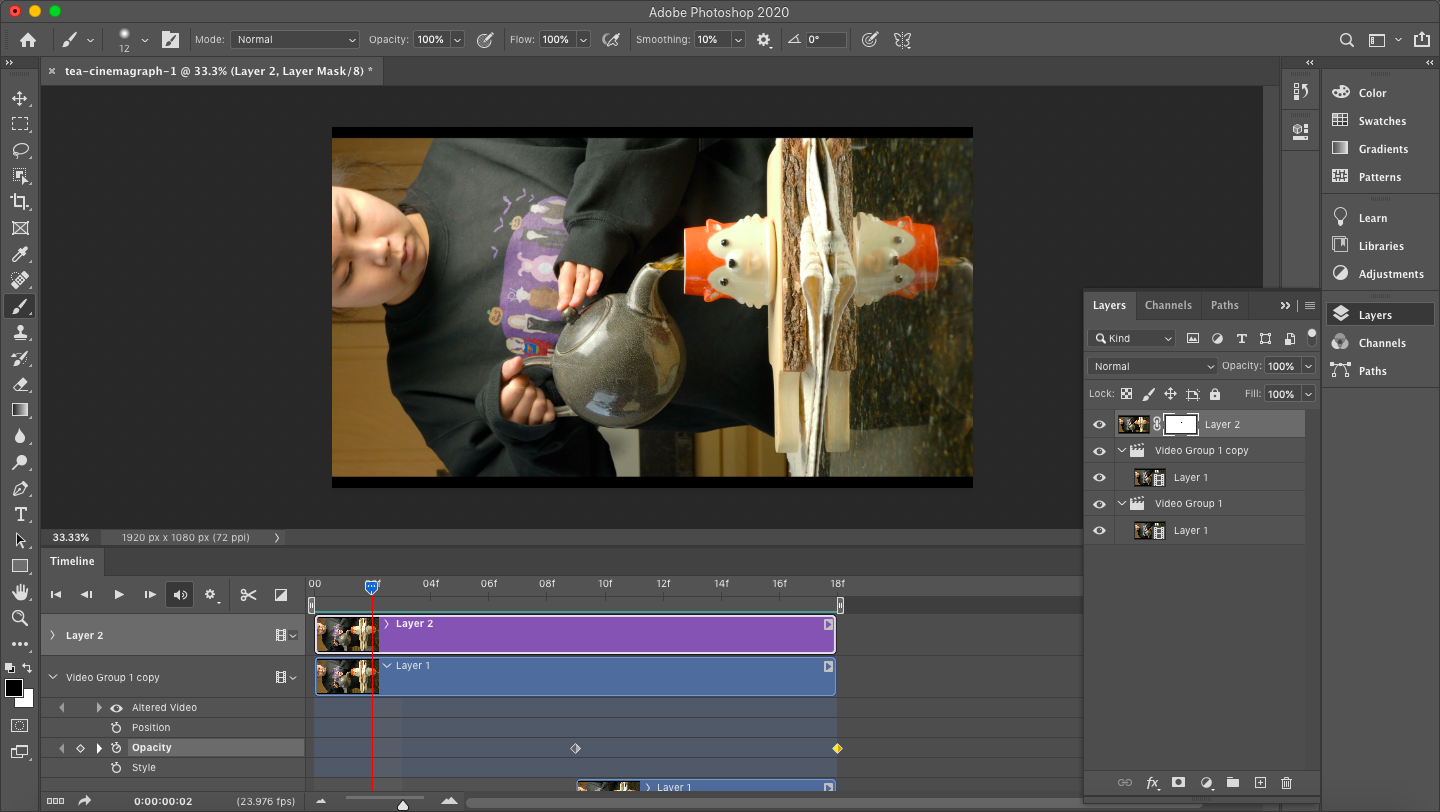
16. Rewatch a few times to make sure you’re happy with the cinemagraph

Screen Shot 2021-10-15 at 6.20.58 PM.png

Your Final Product

Voila, we just created a cinemagraph! I hope this inspires you to create a cinemagraph of your own!

cinemagraph-1 2.gif

Halloween Stop Motion | Autumn/Halloween Create with Me Series, Create with Olympus, Halloween Cupcakes

Welcome to WEEK TWO of the Autumn/Halloween Create with Me Series! Today we are doing a halloween inspired cupcake stop motion!

For this stop motion I went all out - I made chocolate cupcakes, crushed up oreos to imitate "dirt", bought gummy worms and made these RIP tombstones.

Stop motion doesn't have to be complex, long or difficult. Sometimes sweet, and simple is the best!

Happy Photographing!

Beautifully Wander | Robynne MacLeod
Clone Yourself Photography | Autumn Bucketlist, Fall/Halloween Create with Me Series, Olympus 7-14mm

For the month of October I’m excited to bring to you every Saturday an autumn/halloween inspired Create with Me series! This week we’re featuring a technique I’ve shown you before Clone Yourself Photography!

Step 1: Prep Work

To prep for your clone yourself photo write down what you want each of your clones in the photo to be doing. For my photo I was trying to string together a series of poses that illustrated what was on my autumn bucketlist.

Step 2: Cloning Yourself

Situate your camera on a tripod and don’t move after finding the right position, you want every photo to be the same.
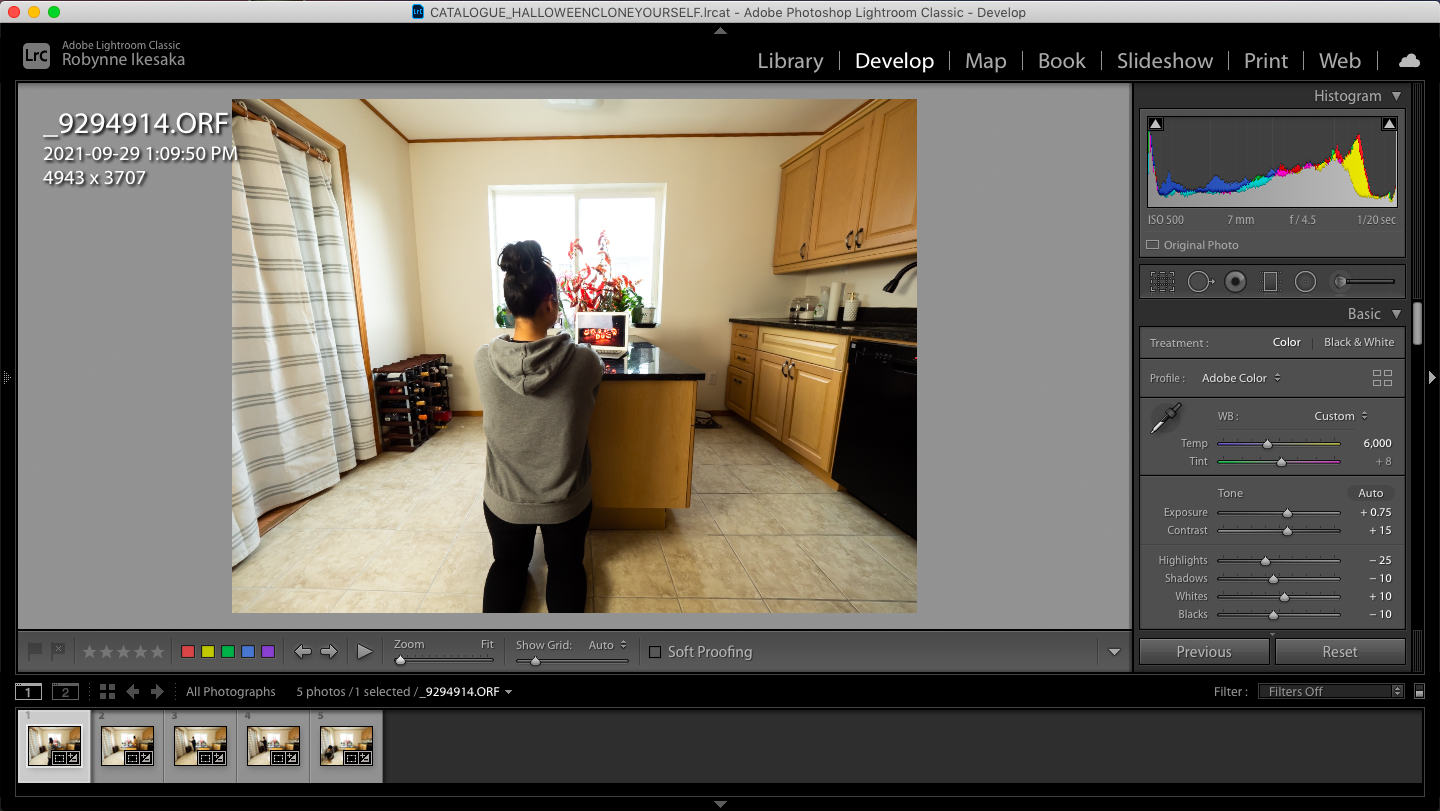
Step 3: Edit in Lightroom (optional)

After you’ve taken your photos, pull your photos into your editing software and post-process how you like then export.

Screen Shot 2021-09-30 at 4.45.50 PM.png

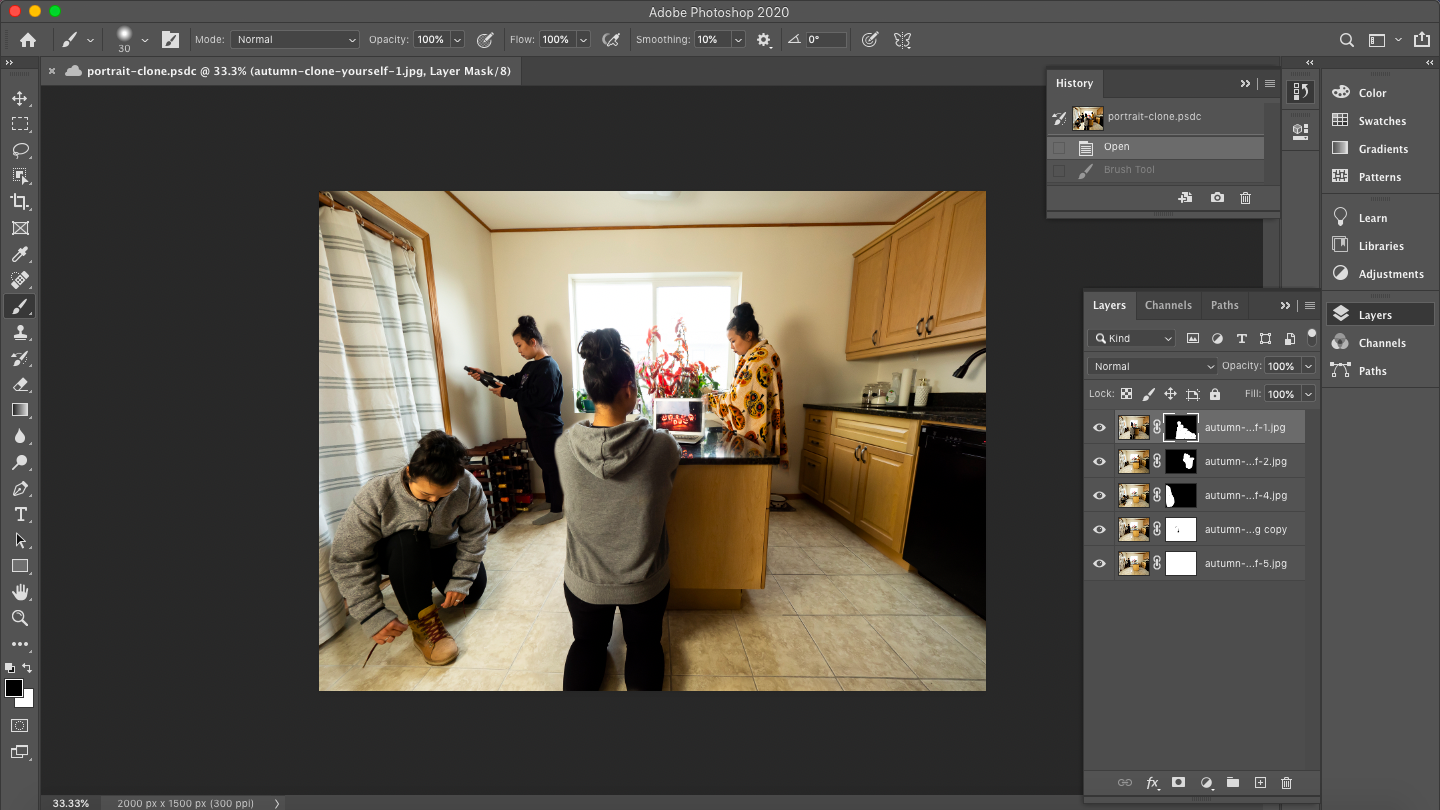
Step 4: Pull Together (Photoshop)

To pull your cloned portrait together:

  • Open a blank canvas in photoshop

  • Go to File -> Scripts -> Load Files into Stack

  • Select each photo and create a Mask

  • Select the layer mask for the first photo and use the brush tool along with the black and white squares at the bottom to brush over your first clone (make sure you are using the black color)

  • Before moving onto the next hit CTRL + I

  • Select your next layer mask and repeat the process (use the brush tool along with the black and white squares at the bottom to brush over your first clone)

  • If you have a clone that overlaps with another clone play around with the black and white color to hide and reveal until you get what you want

Alternative to Photoshop (Snapseed)

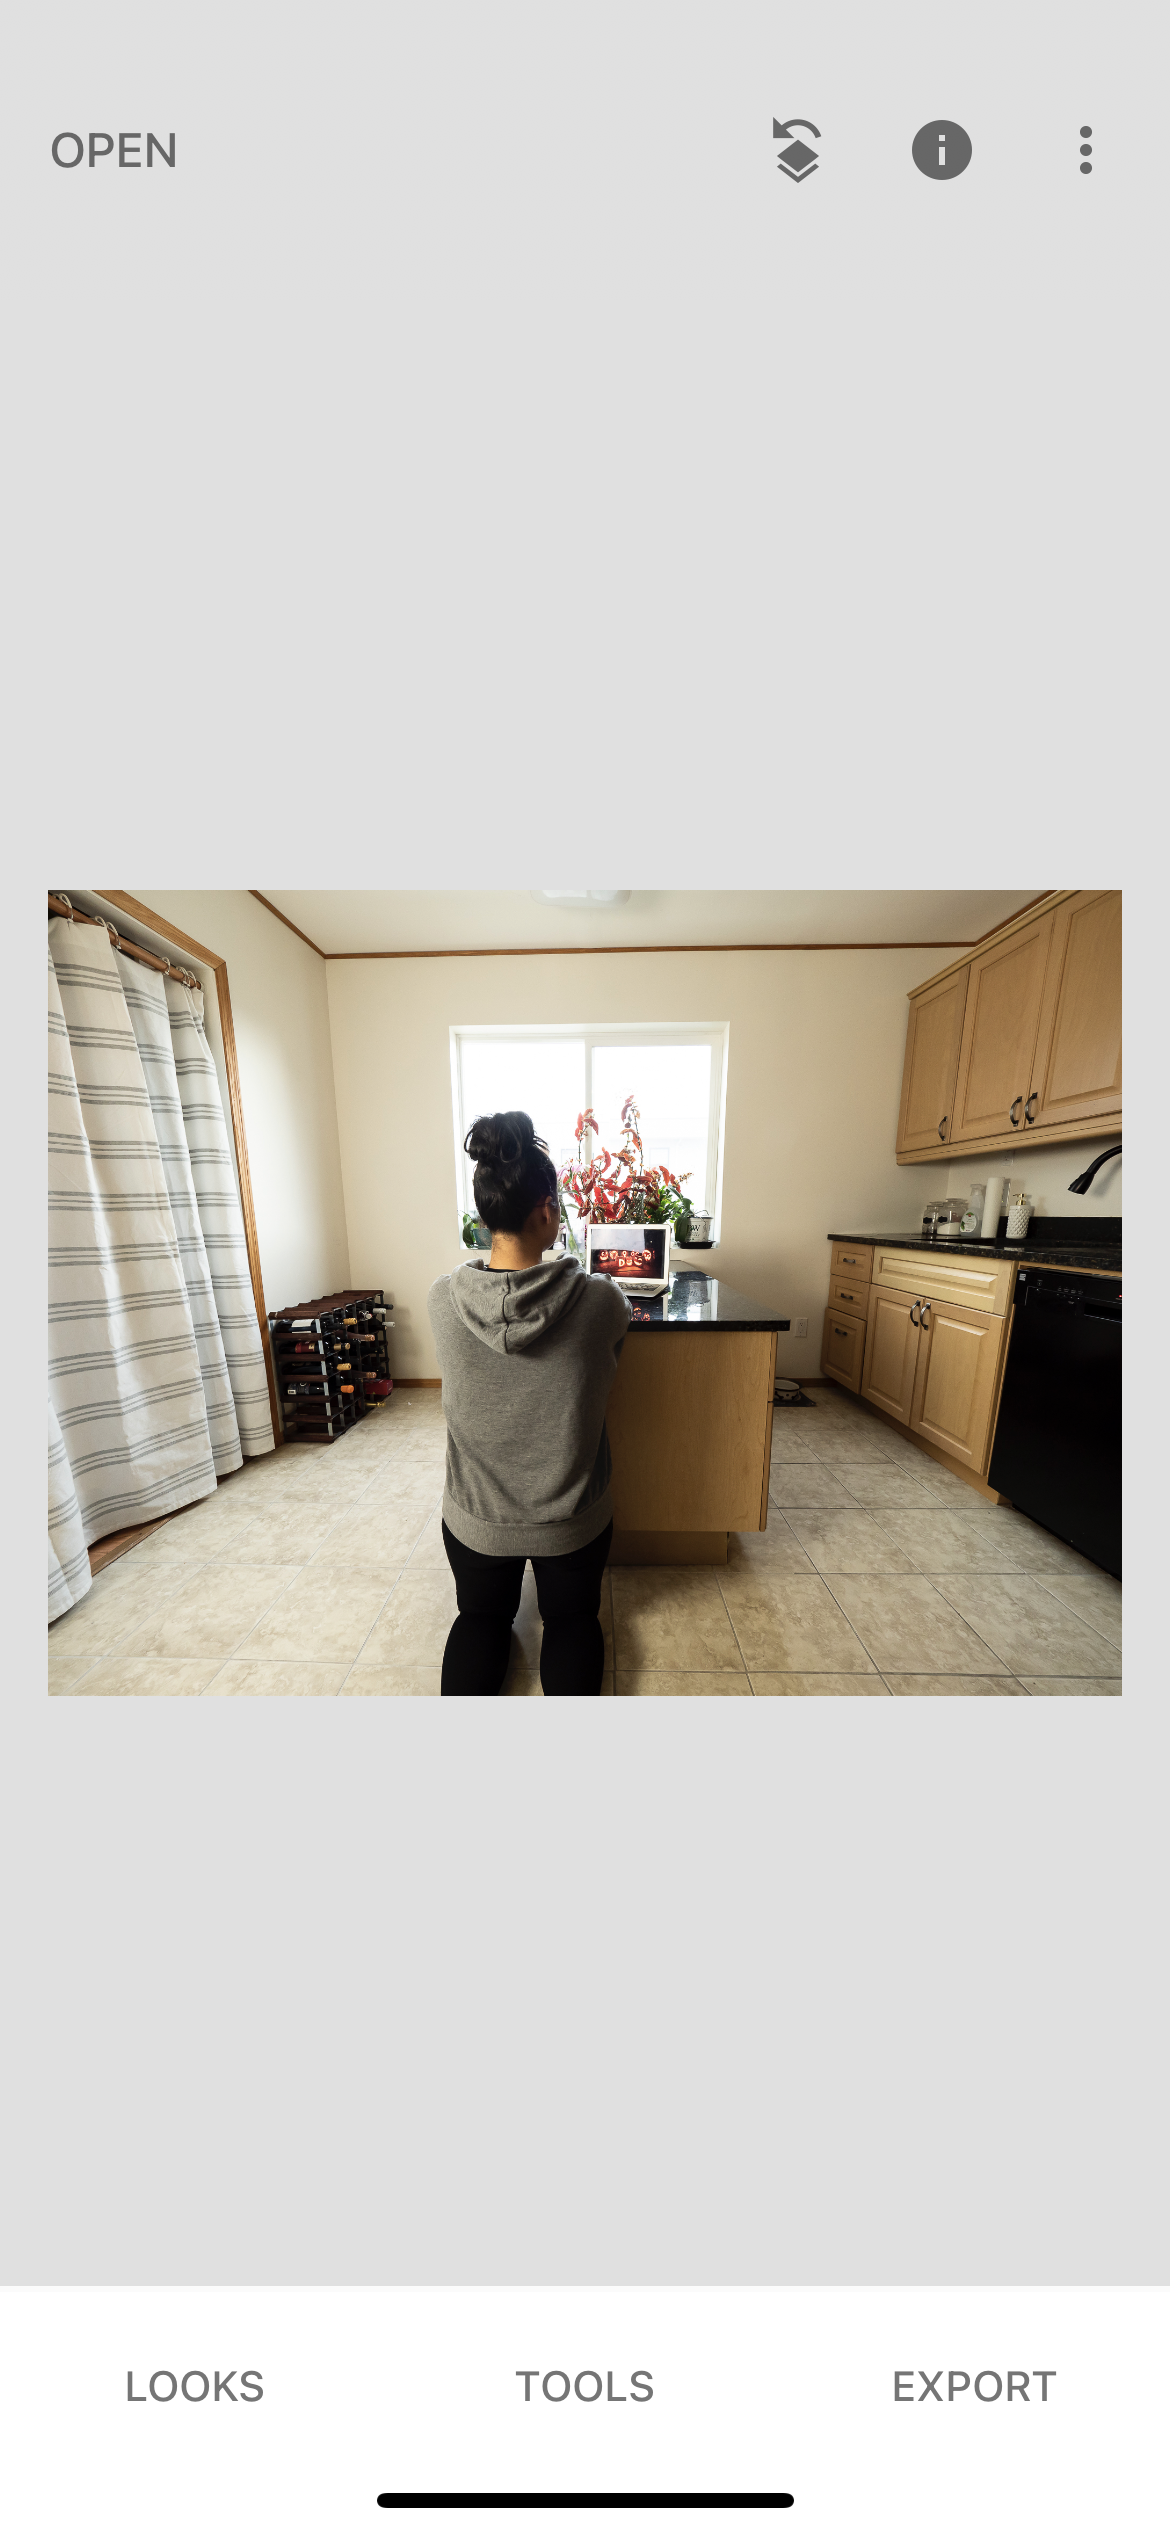
If you don’t have Photoshop then you can alternatively use Snapseed that is free!

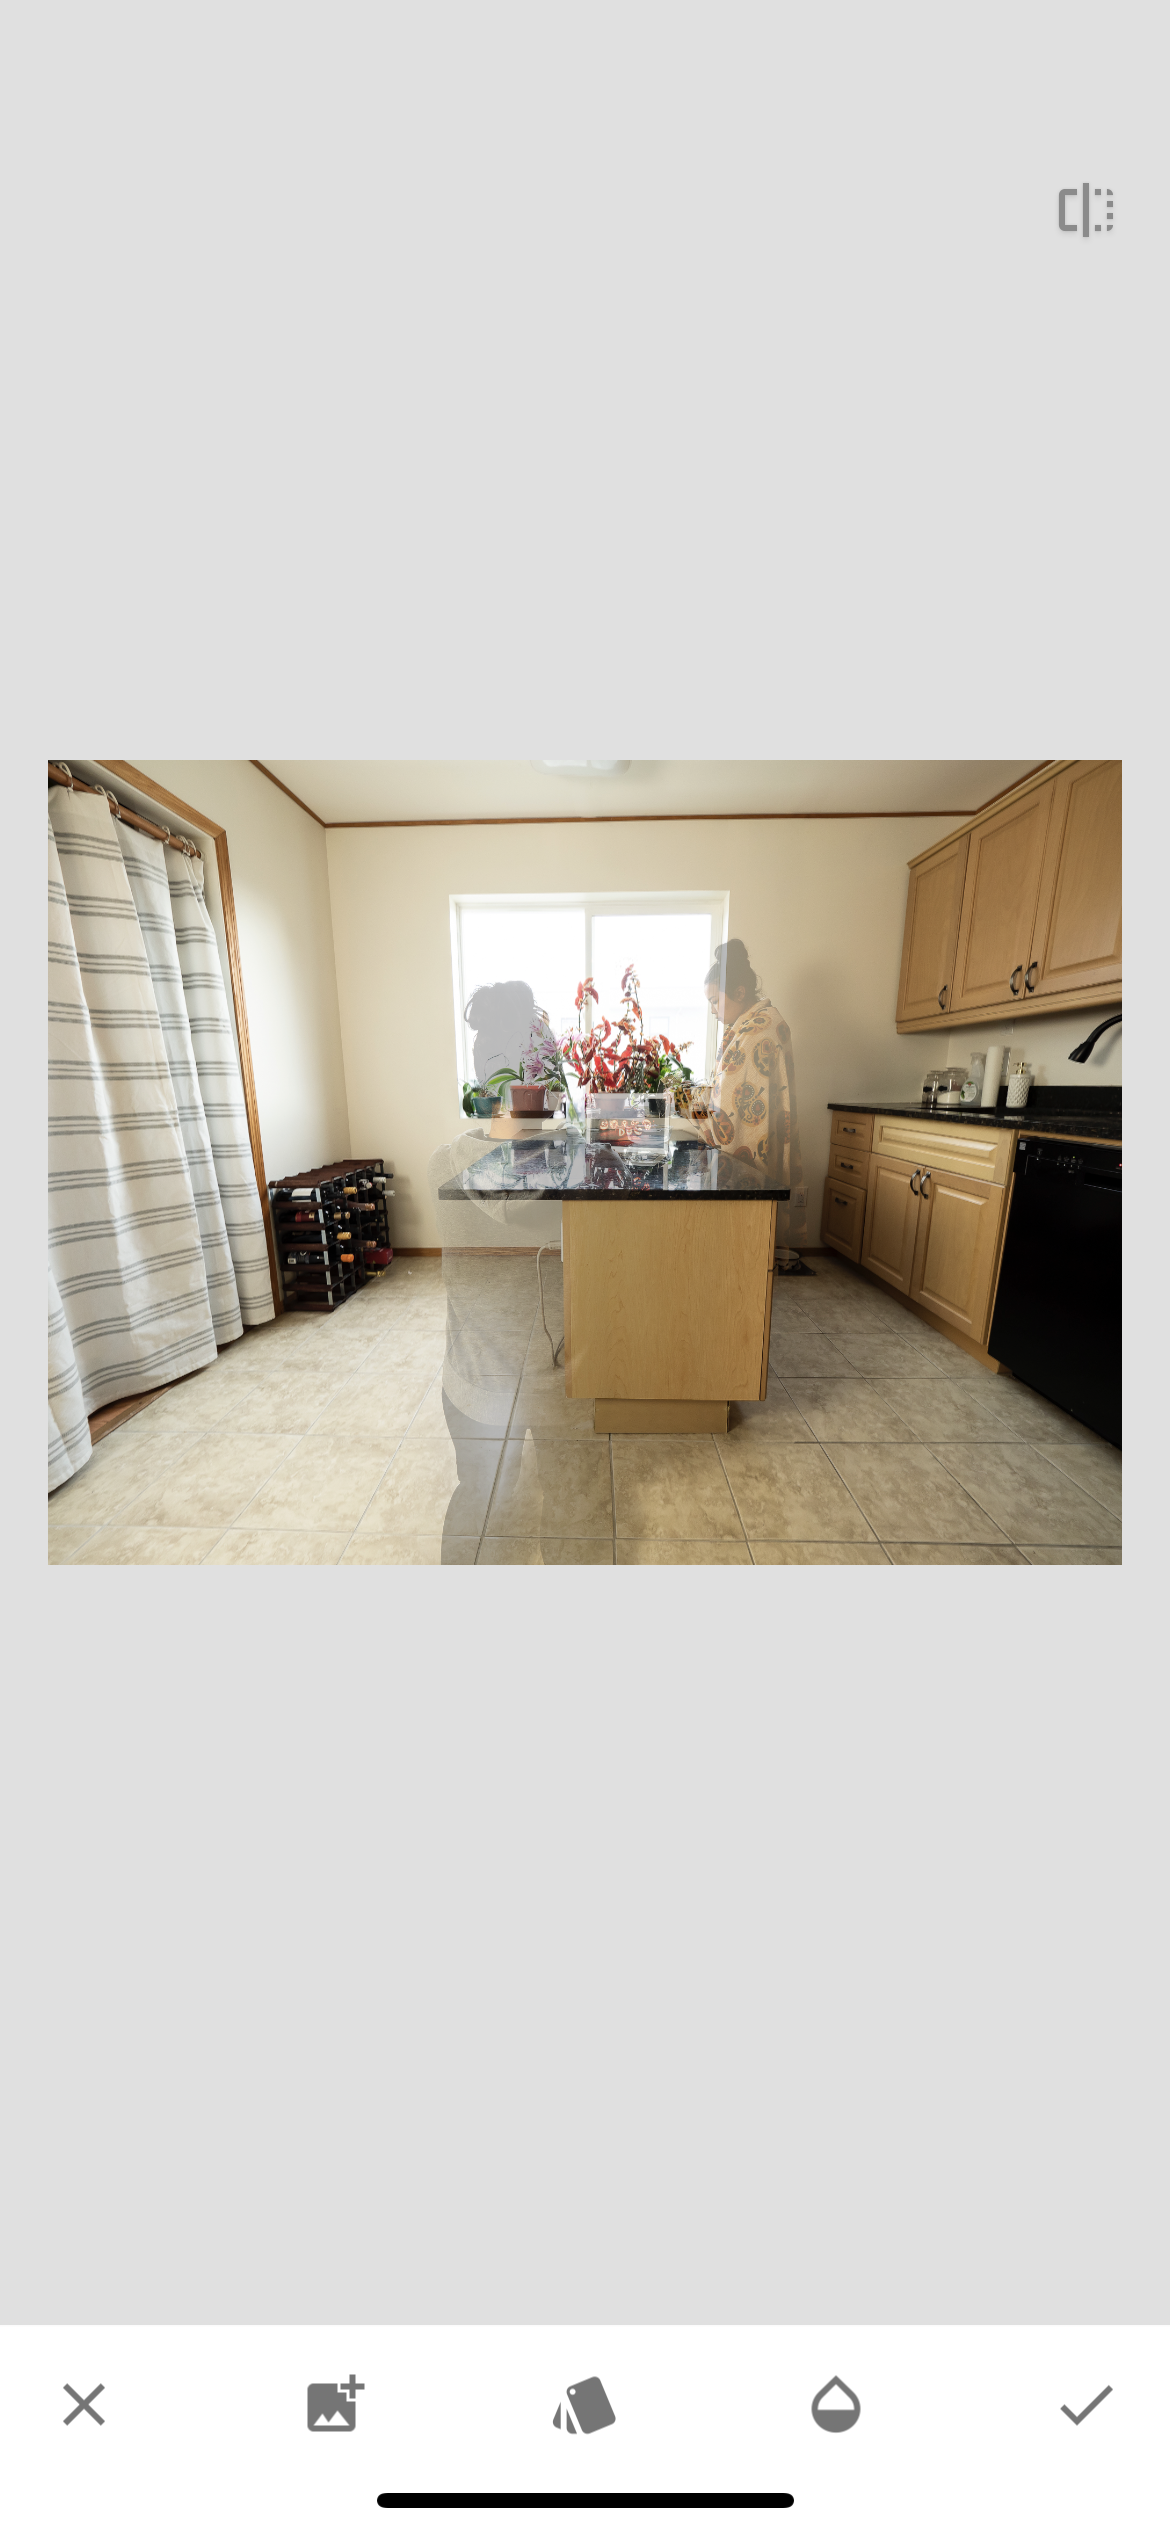
  • Open your first photo in Snapseed

  • Select Double Exposure

  • Add your second photo

  • Change the opacity to 100%

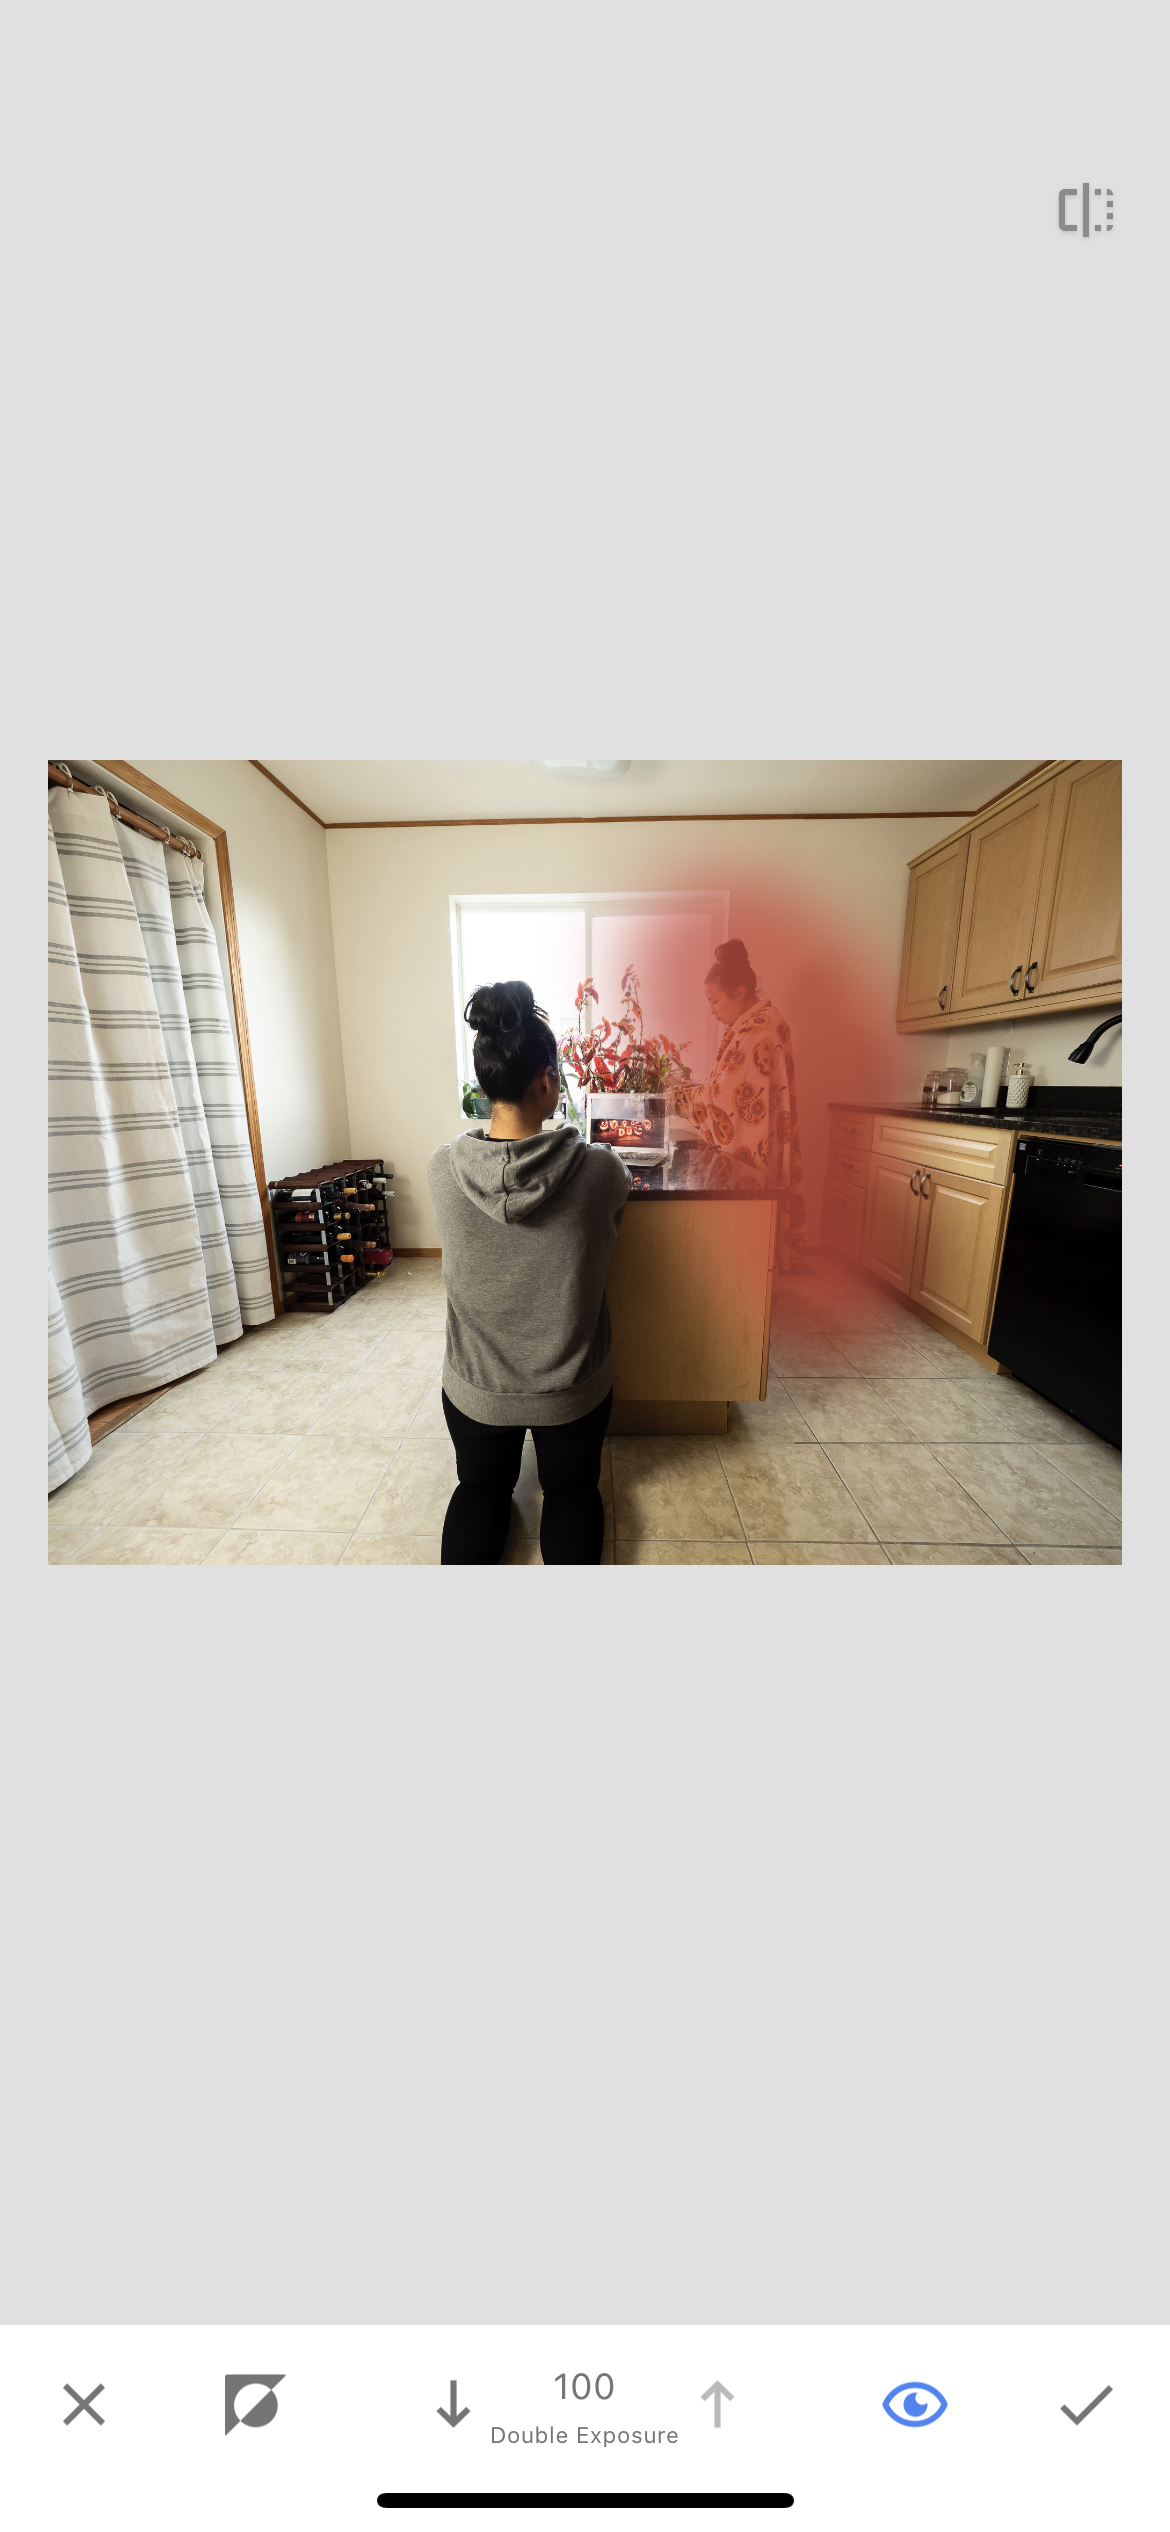
  • Select the layer button at the top

  • Select the middle paint brush icon under Double Exposure

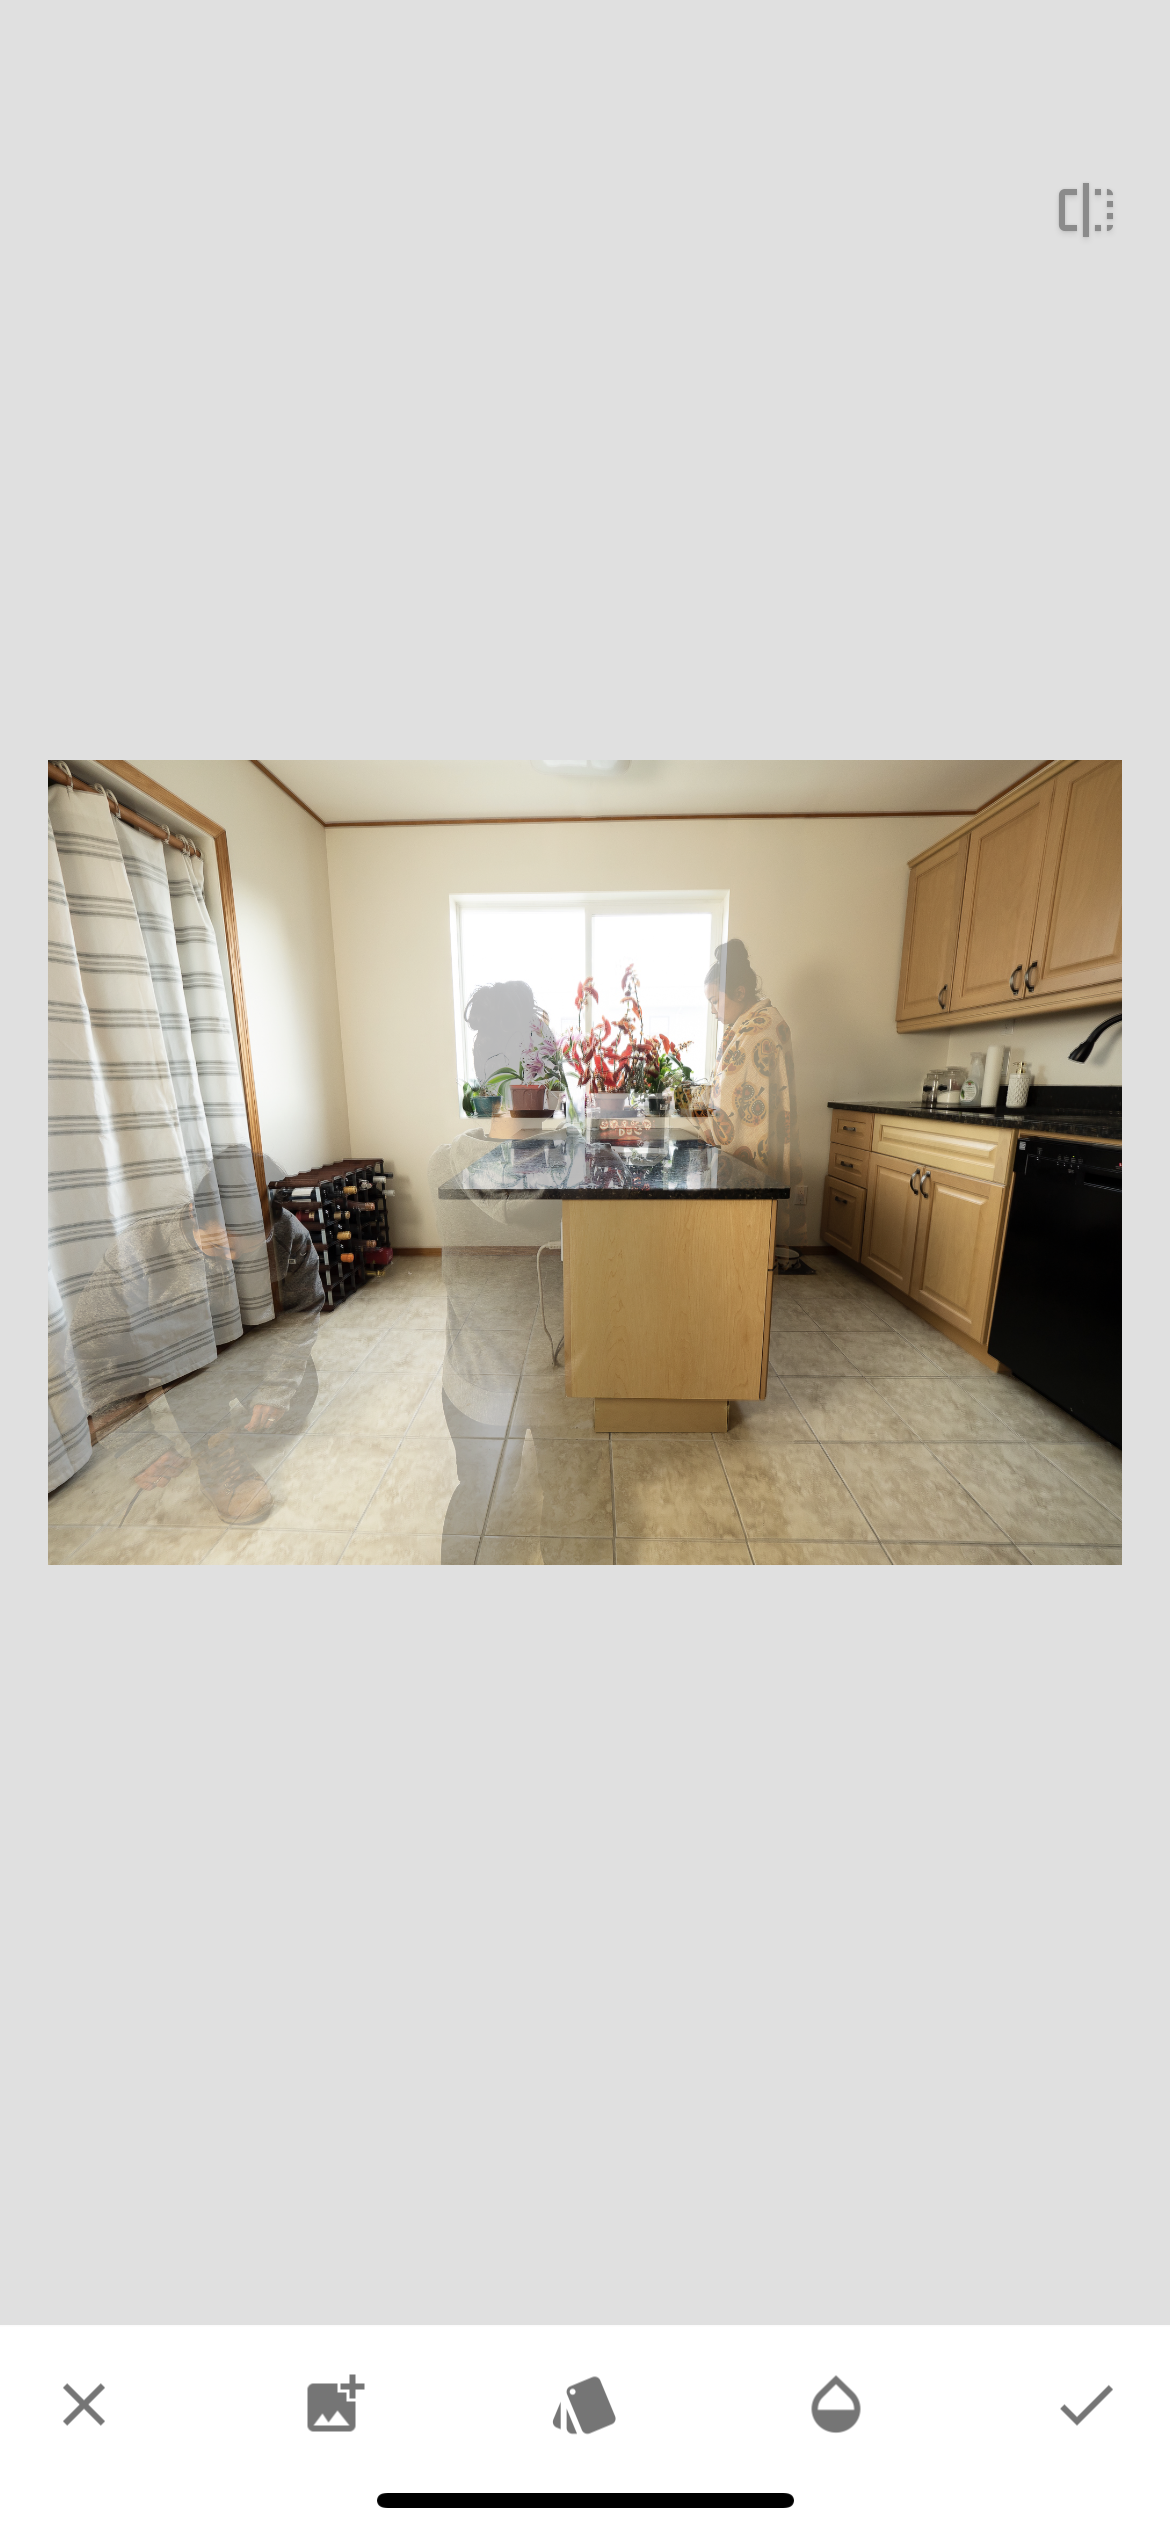
  • Repeat the process for your other clones

IMG_2019.PNG
IMG_2021.PNG
IMG_2027.PNG

Be aware that with Snapseed you can’t have any of your clones overlapping each other. Because I had clone 1 and clone 4 overlapping I could only add three clones in snapseed. This is where Photoshop has a better advantage.


Have fun cloning yourself!

Beautifully Wander | Robynne MacLeod