QUICK INTRODUCTION | Beautifully Wander

In this episode I give a quick introduction into who I am, my story, how I’m learning photography and my plans for the future!

My name is Robynne Ikesaka. When I started Beautifully Wander I was living in Northern Alberta and at the end of June I moved to the beautiful and sunny Okanagan! 

I did not go to school for photography or for business, I have a Bachelors degree in Emergency and Security Management but when I was unhappy in Fort McMurray I turned to photography as a creative outlet. 

I loved how a photo can evoke strong raw emotions and feelings, almost like you were just there!

In the Spring of 2020 I started to explore pursuing photography professionally and left my full-time job to do it. 

Since I’ve been back in the Okanagan I’ve been working on creating a photography business! 

If you enjoyed this post and want to follow along on my journey, please be sure to subscribe to Beautifully Wander on YouTube and follow on Instagram!

CREATIVE TRAVEL PHOTOGRAPHY | VLOG IN SHUSWAP, BC

In this episode I take you along with me to do some creative travel photography in Shuswap, BC. 

Being more creative with my photography is a huge goal of mine so I research constantly how to take more creative travel images!

Here I go to a familiar place, Shuswap BC and I hunt for details that through consistency it will hopefully train my eye to see details more naturally. 

It’s all in this episode today!

Lines & Angles

I’m trying to distinguish lines and angles better - railing of the boat, natural walking path, lines on the road, lines of the dock, etc.

Lines draw your eye towards something.

Drawing your eye to the mountain in the distance.

Drawing your eye to the mountain in the distance.

Drawing your eye to the dock.

Drawing your eye to the dock.

Drawing your eye to the other end of the road with the wildflowers lining the side.

Drawing your eye to the other end of the road with the wildflowers lining the side.

Drawing your eye to the picnic table at the top.

Drawing your eye to the picnic table at the top.

Drawing your eye to the water.

Drawing your eye to the water.

Drawing your eye to the mountain and lake.

Drawing your eye to the mountain and lake.

Depth of Field + Foreground Interest/Blur

I say '“shooting through something” because it’s faster to say than “depth of field and foreground interest/blur”. But I love this technique.

I shoot at a wide aperture and find things to shoot through with the actual subject in focus.

Shot through a bed of flowers with the sign as the focus point.

Shot through a bed of flowers with the sign as the focus point.

Shot through some leaves from a tree with the picnic table as the focus point.

Shot through some leaves from a tree with the picnic table as the focus point.

Shot through some plants and trees with the boat as the focus point.

Shot through some plants and trees with the boat as the focus point.

Shot through some plants with the floating dock and trees as the focus point.

Shot through some plants with the floating dock and trees as the focus point.

Shot through some reeds with the floating dock and trees as the focus point.

Shot through some reeds with the floating dock and trees as the focus point.

Shot through some reeds with the turtle as the focus point.

Shot through some reeds with the turtle as the focus point.

Reflections

Reflections are a relatively new obsession I have. I try to hunt for natural reflections in the lake or water but sometimes there isn’t any.

If there isn’t any natural reflectors then I will use my phone to create a reflection by shooting at a wide aperture and holding my phone up to the lens.

Natural reflection of the sky in the lake

Natural reflection of the sky in the lake

Phone reflection of the sky

Phone reflection of the sky

Phone reflection of the sky

Phone reflection of the sky

Phone reflection of the dock and boats

Phone reflection of the dock and boats

Patterns & Textures

Because the Shuswap area is so lush and green I found I gravitated towards the texture the wood would offer against lush green plants and forests.

Wood and metal shack amidst a bed of greens

Wood and metal shack amidst a bed of greens

Lines, texture and shadows from the lilly pads.

Lines, texture and shadows from the lilly pads.

Cute bird house against the lake and trees.

Cute bird house against the lake and trees.

All images were taken by Robynne Ikesaka (creator of Beautifully Wander) around White Lake, Shuswap BC on the Olympus EM1 Mark II + 12-40mm f/2.8 PRO.

If you enjoyed this post, please be sure to subscribe to Beautifully Wander on YouTube and check out Beautifully Wander on Instagram!

BIRDS EYE VIEW OF KELOWNA || DILWORTH MOUNTAIN PARK

Do you want a beautiful birds eye view of Kelowna but don’t want to hike or have the time? Visit Dilworth Mountain Park!

Dilworth Mountain Park is about 15 minutes from downtown Kelowna.

You will need a vehicle to get to the park because if you don’t you could be looking at a 1.5 hour walk uphill.

It has a small parking lot, playground, a few trails and benches spread out. It’s a light “hike” compared to Knox Mountain.

It’s a perfect spot for a picnic date!

  • Grab takeout from White Spot at the base of Dilworth Mountain (I love getting the Legendary Burger with fries and a side of mayo to dip)

  • Drive to Dilworth Mountain Park (5 min drive)

  • Walk to one of the many view points (a nice one is to the far left of the park)

If you’re a photographer the view point to the far left of the park is nice. There is another trail that leads to an even higher peak (if you’re interested in a little more of a hike). The right side of the park has a nice view of the golf course below.

dilworth mountain park-1.jpg
dilworth mountain park-2.jpg
dilworth mountain park-05.jpg
dilworth mountain park-18.jpg
dilworth mountain park-20.jpg
dilworth mountain park-04.jpg
dilworth mountain park-24.jpg
dilworth mountain park-01.jpg

KASUGAI GARDENS, KELOWNA BC - A STROLL THROUGH A JAPANESE GARDEN

Kasugai Gardens is a beautiful, peaceful and serene location in downtown Kelowna. It features lush plants, a koi pond, stone lanterns and a waterfall.

It was created to demonstrate the friendship between Kelowna and its sister city in Kasugai, Japan.

In the summer months The Garden is open from 9:00 AM to 8:00 PM.

It’s a wonderful place to get away from the bustle of a city and relax.

When you first walk into the garden and follow the signs one of the first little bridges you cross has this little creek running underneath it. To get this shot I got the camera real low to the water.ISO 2000 / 1/1600 sec f/2.8

When you first walk into the garden and follow the signs one of the first little bridges you cross has this little creek running underneath it. To get this shot I got the camera real low to the water.

ISO 2000 / 1/1600 sec f/2.8

Throughout the garden you will find these stone lanterns that is a traditional element found in Japanese Gardens. ISO 640 / 1/320 sec / f/2.8

Throughout the garden you will find these stone lanterns that is a traditional element found in Japanese Gardens.

ISO 640 / 1/320 sec / f/2.8

The largest bridge in the garden is found in the center and overlooks the Koi Pond. On the left side of the bridge you have the gazebo that also overlooks the Koi Pond and on the right the waterfall. ISO 640 / 1/800 sec / f/2.8

The largest bridge in the garden is found in the center and overlooks the Koi Pond. On the left side of the bridge you have the gazebo that also overlooks the Koi Pond and on the right the waterfall.

ISO 640 / 1/800 sec / f/2.8

Because the garden is full of plants and flowers it was the perfect location to play with depth of field and foreground blur! ISO 640 / 1/400 sec / f/2.8

Because the garden is full of plants and flowers it was the perfect location to play with depth of field and foreground blur!

ISO 640 / 1/400 sec / f/2.8

At one point during the evening this beautiful reflection of the gazebo showed. Because I love foreground blur I combined this with a reflection! ISO 640 / 1/400 sec / f.2,8

At one point during the evening this beautiful reflection of the gazebo showed. Because I love foreground blur I combined this with a reflection!

ISO 640 / 1/400 sec / f.2,8

Here is another stone structure in the garden creatively composed with foreground blur to make it more interesting. ISO 640 / 1/400 sec / f/2.8

Here is another stone structure in the garden creatively composed with foreground blur to make it more interesting.

ISO 640 / 1/400 sec / f/2.8

To get this shot I setup my Manfrotto Tripod at the end of the bridge and set my Olympus EM1 Mark II to continuous. It was set to 10 frames every .5 seconds but I could have bumped it down to 5 frames. ISO 640 / 1/640 sec / f/2.8

To get this shot I setup my Manfrotto Tripod at the end of the bridge and set my Olympus EM1 Mark II to continuous. It was set to 10 frames every .5 seconds but I could have bumped it down to 5 frames.

ISO 640 / 1/640 sec / f/2.8

Tips for visiting Kasugai Gardens:

  • It is not pet-friendly

  • Come early in the morning when it opens or right before it closes (Kasugai Gardens is located in downtown Kelowna so even though the garden isn’t overwhelmed with people the downtown core can be)

  • Respect all signage before entering the garden and inside

FAVOURITE CAMERA FEATURES FOR TRAVEL PHOTOGRAPHY | OLYMPUS OM-D E-M1 MARK II

Recently when I would talk to people about photography they would ask my why I chose Olympus. I’ve had my Olympus EM1 Mark II for almost 3 months now and if you haven’t watched already I have 3 other videos about my Olympus camera - unboxing my Olympus, choosing a camera and my setup and customization

I bought the EM1 Mark II over the Mark III because of the cost of the camera compared to where I was with photography. 

I know the EM1 Mark III has some new features that are amazing but when I was looking for what camera to buy I found comfort and inspiration when photographers I followed on Instagram wouldn’t use the top line camera or the most expensive equipment and yet they were able to produce absolutely beautiful, stunning images because of how they worked with their camera and their creative eye. 

I found that inspiring!

Here are 6 of my favourite features about the Olympus EM1 Mark II:

#1 - Continuous Shooting 

If your camera has continuous shooting you can set the camera to take x number of frames, every so many seconds so I have mine set for 10 frames, timed at 5 seconds and an interval length of .5 seconds. 

So when my fiancé and I travel I can setup my tripod up, my camera to continuous and get self-portraits of us that are more professional and better than “selfies”.

Here’s a comparison of when we were using a selfie-stick in Greece with my iPhone (when I didn’t have this camera) to when we were in Banff (when I had the Olympus EM1 Mark II and a Manfrotto Tripod). 

73.jpg
banff-27.jpg

#2 - The Grip

My second favourite feature is the grip. I don’t have large hands so this experience might differ for you but I find the camera grip quite comfortable.

I don’t tend to carry the camera off my neck anymore with a camera strap so having a comfortable grip is important so I don’t drop the camera and I can freehand with it. 

#3 - Articulating Screen

When I was looking for a camera a mandatory feature it needed to have was a fully articulating screen. 

With the screen I can get low, get high and still be able to see and not bend in an uncomfortable position just to see. 

Here are some shots I took where I required an articulating screen. 

tugboat+beach-01.jpg
tugboat+beach-03.jpg
white+lake-51.jpg

#4 - Weather Sealing

According to the Olympus website the EM1 Mark II is splash proof, dust proof and freeze proof. 

I haven’t experienced it with dust proof or freeze proof setting yet but I did take it out in the rain several weeks ago and it held up nicely.

When you travel you never know what the weather will be like. When we were in Greece there was one particular day that it hailed like crazy for an hour. 

Having a camera that can stand up to the different kinds of weather is super important. 

IMG_0279.jpg

#5 - Lightweight & Compact

If you compare the EM1 Mark II to a Canon M100, SL1 or SL2 or the Rebel series it is probably heavier. However, I love how compact the camera is. 

My biggest fear when I was searching for a camera was that it would be too bulky or heavy that I wouldn’t take it out for small trips - eating out, going for coffee, etc., and I would leave it at home or the hotel room. 

Having a selection of bags that I can carry my camera in and having certain accessories has helped with that. You can check out the post What’s in My Camera Bag for a full description of what I carry and what I use. 

#6 - Customization

The Olympus EM1 Mark II is super customizable! 

One of the customizations I have changed since my original video is back-button focusing. 

My AEL/AFL button still enables my ISO and White Balance but instead of pressing the shutter button half-way to focus I have moved it now to the FN1 button. 

Thus, when I go to shoot I first press the FN1 button to focus then the shutter to capture. 

Untitled design.png

I love travel photography so a lot of my favourite features make travel photography easier. These are my 6 favourite features of the Olympus EM1 Mark II that I suggest you think about if you are looking for a camera for travel photography. 

TUGBOAT BEACH & ROTARY MARSH PARK // Beautiful Location for Sunsets by the Water

Last week I visited Tugboat Beach a few times to relax, photograph Pepsi on the boardwalk and capture sunset images by the water.

It’s a beautiful location with many different spaces - you have Rotary Marsh Park, Tugboat Beach, the Boardwalk, and the Waterfront Park.

I love coming for picnics here. We typically do take out at one of our favourite restaurants and sit on the boardwalk, enjoying the lake!

Earlier in the week I took my pup Pepsi to the boardwalk for a dog photoshoot!

tugboat beach-03.jpg
tugboat beach-09.jpg
tugboat beach-10.jpg
tugboat beach-11.jpg
tugboat beach-13.jpg
tugboat beach-14.jpg
tugboat beach-07.jpg
tugboat beach-08.jpg
tugboat beach-05.jpg

Later in the week I went by myself to capture some sunset images by the water! On this day the sunset left behind these beautiful pastels in the sky.

tugboat beach-06-2.jpg
tugboat beach-09.jpg
tugboat beach-12.jpg
tugboat beach-07-2.jpg
tugboat beach-11.jpg
tugboat beach-10.jpg
tugboat beach-08-2.jpg

5 TIPS on GETTING BUY-IN FOR YOUR BUSINESS CRISIS PREPAREDNESS PROGRAM | FOR CREATORS & SMALL BUSINESS OWNERS

My name is Robynne Ikesaka, I have a Bachelors of Emergency and Security Management from the Justice Institute of British Columbia (JIBC) and until recently I have been working for a municipality in northern Alberta as an emergency coordinator. I wanted to be more creative but keep my roots in Emergency Management and finally build the program that I have dreamed of for years! 

My goal to you is to break building.a crisis preparedness program into manageable chunks and help you small business owners and creators create a more resilient business so you can continue doing what you love and the disasters of today impact you a little less!

Tune in every Wednesday on YouTube for some tips on building your business crisis preparedness program. 

Checkout my last video about why you need a business crisis preparedness program! 

One of the most important steps you can take early on in building your crisis preparedness program is getting buy-in from key people in your business. 

If you are the entire business (photographer, freelance web developer or graphic designer, videographer, etc.,) then you need to see the importance of having a crisis preparedness program and make it a priority. 

If you are part of a team, have a boss or work for a business that has owners, managers and supervisors then they need to see the importance of having a crisis preparedness program and make it a priority. 

The risk of not having buy-in from key people in your business before starting is that you will likely run into problems later in the process - you might have to constantly re-explain concepts or re-do some or worst all the work you have done because they didn’t know, they didn’t like it, or they wanted to be part of the process. 

It’s really important you get the appropriate buy-in from key people before you start!

Here are 5 tips that can help you achieve that buy-in:

#1 - Honest Reflection or Open Conversation

If you are the entire business you need to have an honest reflection with yourself about crisis preparedness.

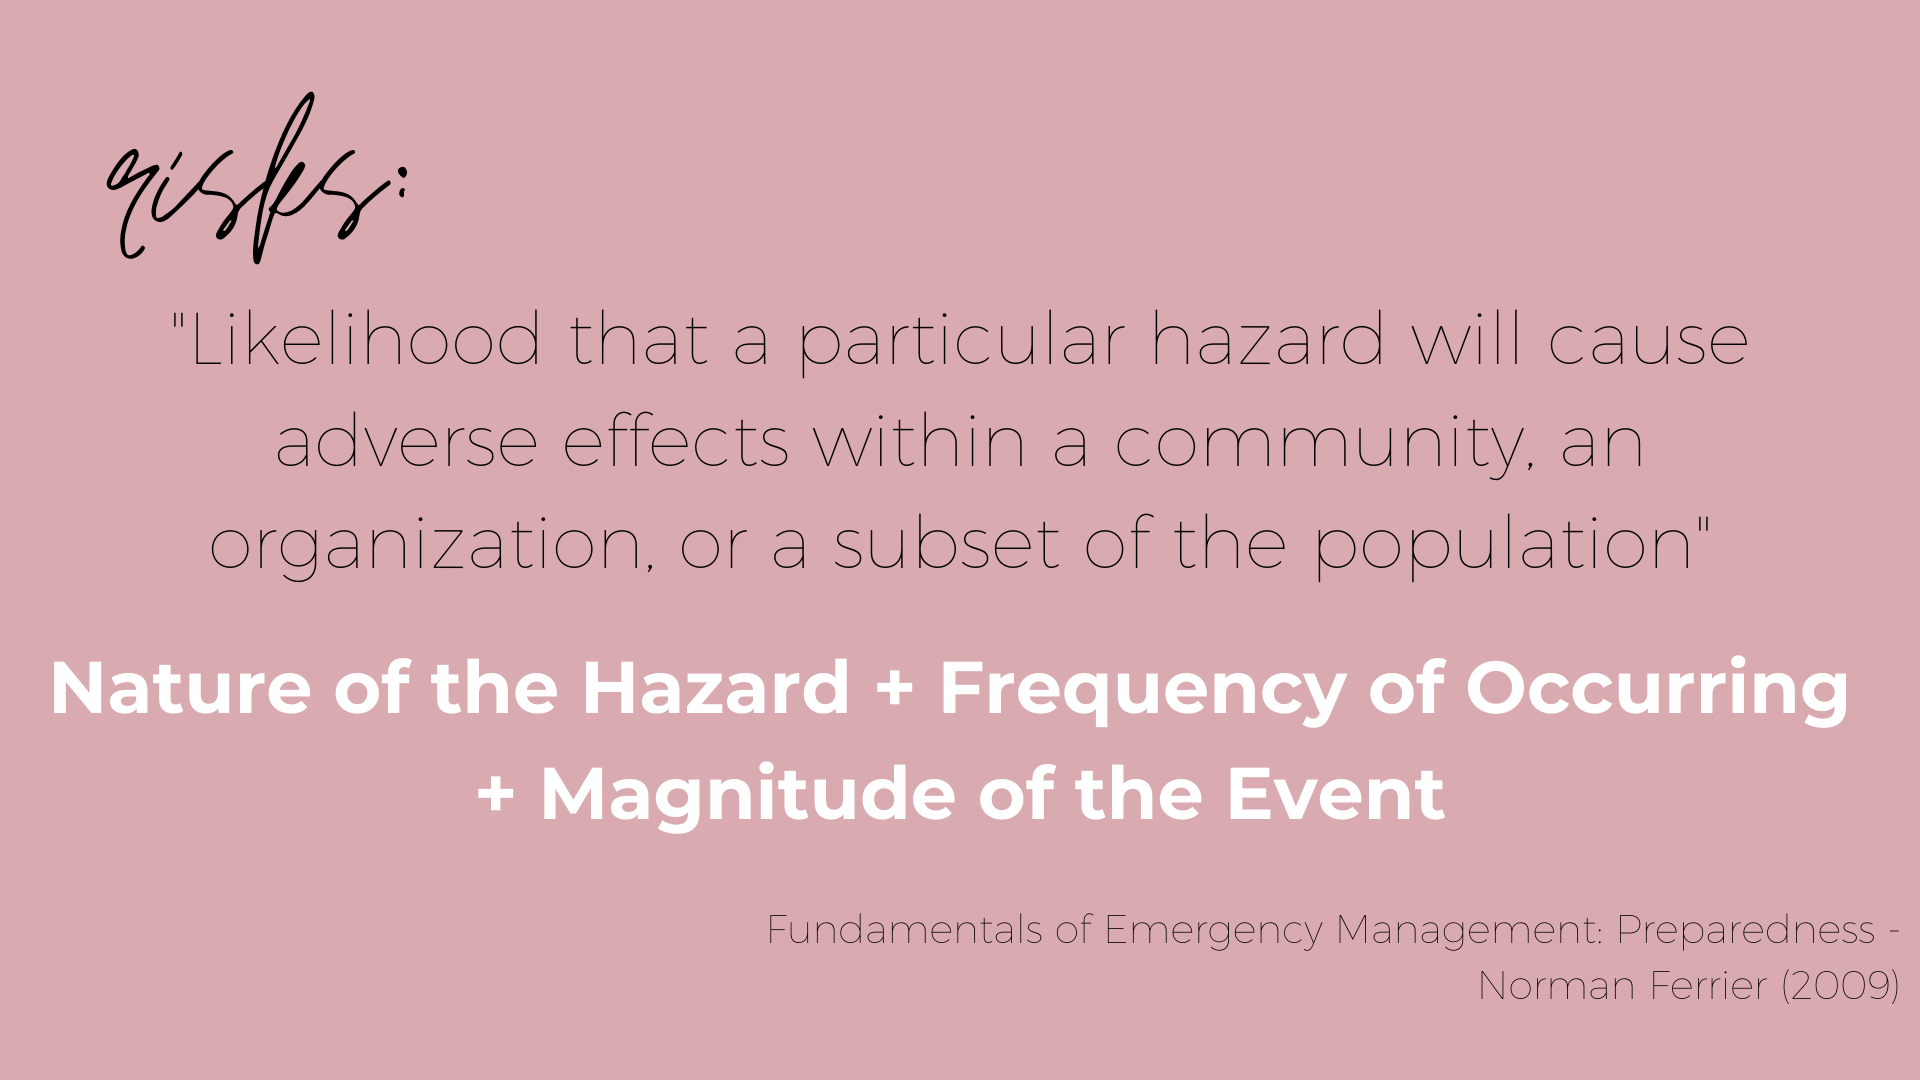
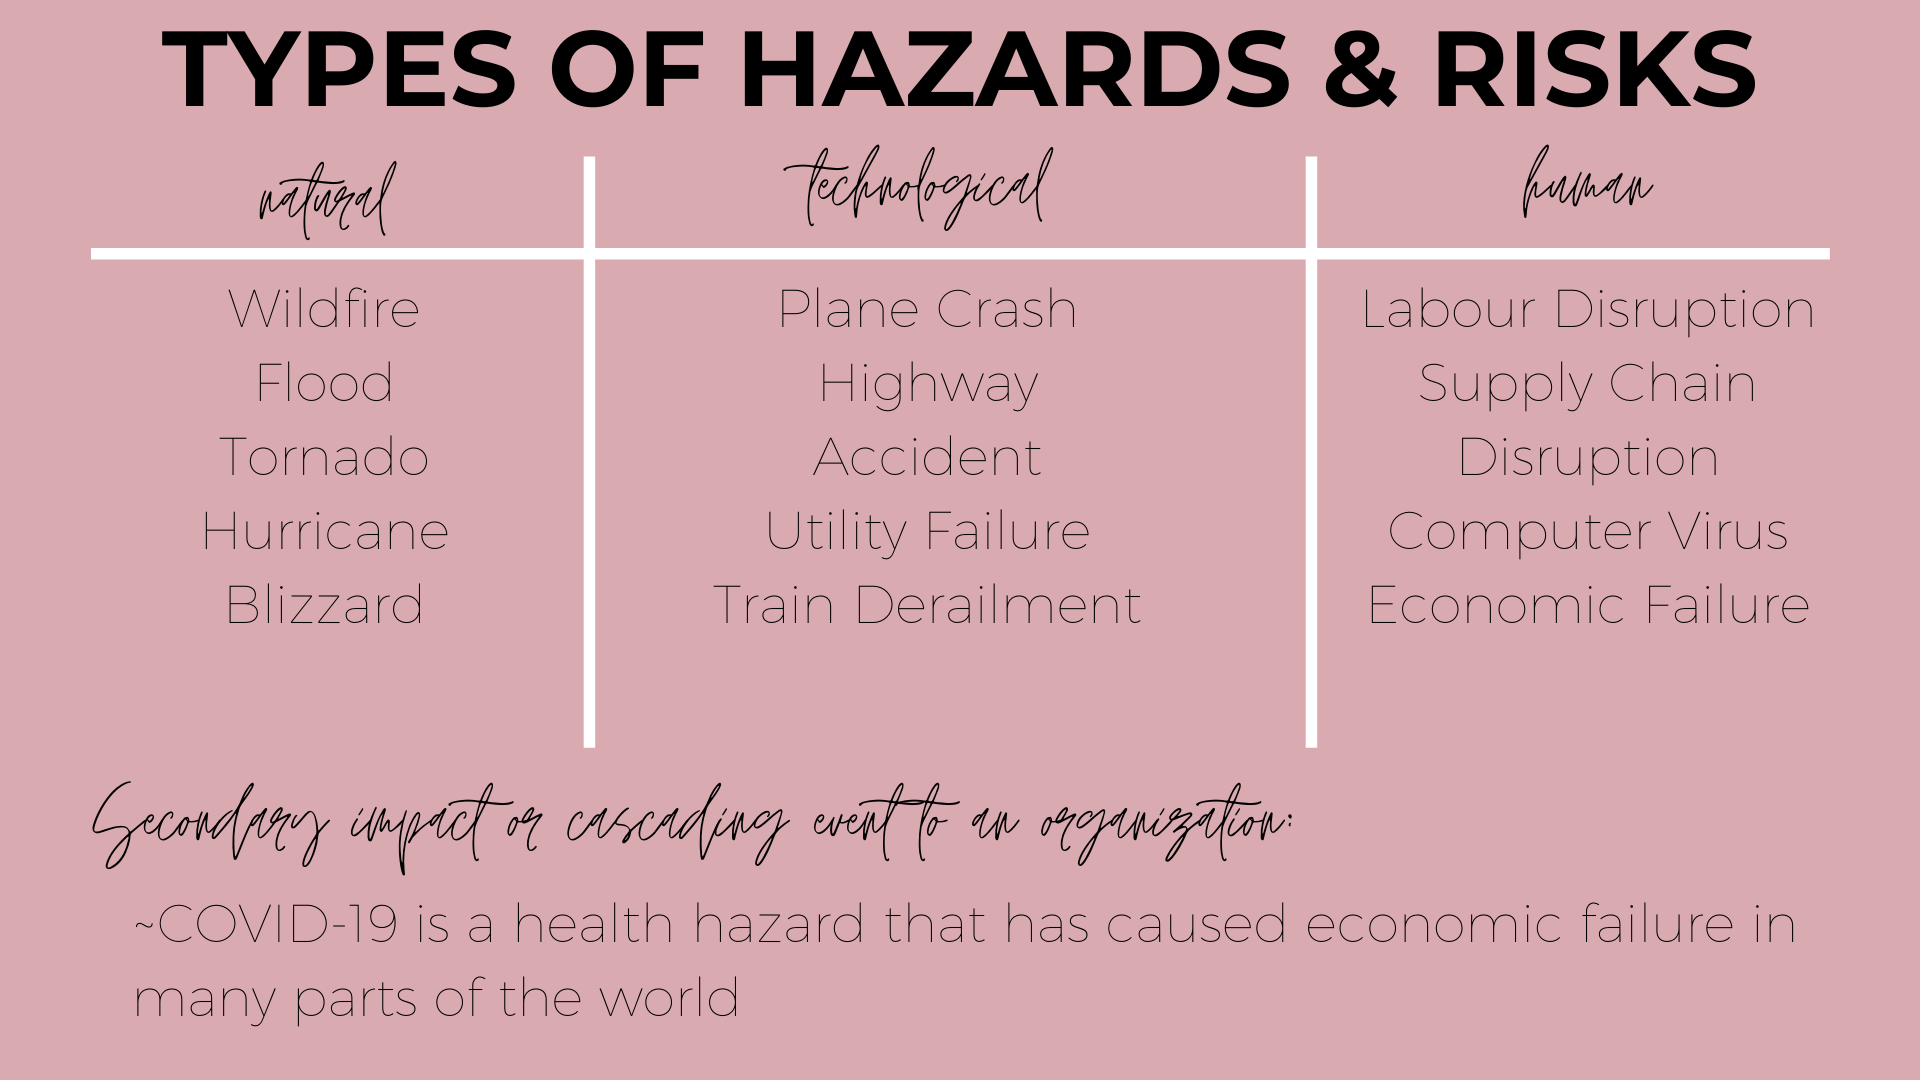
If you are a small business have an open conversation with someone key in that organization about the risks to the business, the impacts and if they know what you would do in different situations. 

For example:

  • If you are a restaurant owner what impact would a Boil Water Advisory have on your business?

  • If you are a photographer what would the impact of a community-wide curfew be?

  • If you are a small retail owner that relies on in-person sales what would the impact be if your area was evacuated for an extended period of time?

  • If you run a small online business what would the impact be if there was an extended utility failure?

#2 - The Benefits

Come up the with benefits of getting the businesses prepared specifically tailored for your business before entering the conversation. 

One of the broad benefits of getting your business prepared ahead of the emergency is finances. 

If you’re prepared financially for the risks you have identified then you will feel less of the impacts when it does hit. 

Another benefit is the continuity of your business operations. If you are prepared for the risks you have identified then you are prepared to continue operation during and after the emergency. 

#3 - Find Your Champion

This applies more to people that have to convince their boss or other supervisors of creating a crisis preparedness program but find the right person to talk to and get involved.

In Emergency Management we would call them ‘champions’ and they basically champion the idea, the project or the initiative. 

It can take time finding who those champions are but it is worth the time to find that right person then to struggle and convince someone that doesn’t care or understand the importance or purpose. 

#4 - Use Recent Emergencies or Incidents as Examples For Your Case

It’s unfortunate but a lot of times you can’t convince people, businesses or communities that planning and preparedness is important, that we need to do XYZ or that these are the risks and the impacts and we need to do something about it. 

It’s not until they come face-to-face with the incident that their mindset and perspective shift enough that an opportunity is created to try again. 

Speaking from experience, I have worked with people that for years I could not get them to buy into the planning process and it wasn’t until a major emergency hit that they finally turned their head, started paying attention and engaged back in the conversation. 

#5 - Keep the Momentum Going 

If you capture the attention of the person that needs buy-in, keep that momentum going!

Keep the topic on the radar, set deadlines for the next meeting, the next deliverable and keep that momentum going. 

If you are the entire business then continue doing the research on the importance of business preparedness, look for resources and have conversations with others. 

Next Wednesday’s video is about conducting a Hazard, Risk and Vulnerability Assessment (HRVA) for your business so make sure you tune in next Wednesday!

WHITE LAKE WITH THE FAMILY | GRANDMA'S 90TH BIRTHDAY AND CAMPING WITH THE FAM IN OVER 10 YEARS!

When I was a child my family would go on these salmon fishing trips every summer. We went to Poett Nook, Bamfield, and Tofino!

On one of the trips we forgot Grandma’s purse at the diner, got a flat tire, played “Extreme Dime Racing”, had coffee for the first time and ended up across the U.S border by accident!

Extreme Dime Racing was an activity we played when the road trip got extremely boring - we each chose a coin on the dash and because the road was incredibly rocky we would race and see whose coin got to the finish line first. It was a silly game we played to pass the time.

We salmon fished early in the morning, had family dinners together, and played Gaji in the evening.

I have so many fond memories of these trips! Tofino was the last trip we took before my grandfather died who was the hardcore fishermen. We haven’t done a trip since then…until last weekend.

My grandma turned 90 in April but we opted to delay her birthday celebration. Last weekend we all went up to White Lake, BC! It was the first time in over 10 years that we’ve been on a trip all together!

It was a short weekend, we went up Friday evening and came back Sunday morning but it was nice to relive part of my childhood! :)

white lake-03.jpg
white lake-05.jpg
white lake-08.jpg
white lake-21.jpg
white lake-22.jpg
white lake-23.jpg
white lake-32.jpg
white lake-35.jpg
white lake-31.jpg
white lake-33.jpg
white lake-37.jpg
white lake-12.jpg
white lake-07.jpg
white lake-14.jpg
white lake-16.jpg
white lake-17.jpg
white lake-13.jpg
white lake-40.jpg
white lake-42.jpg
white lake-45.jpg
white lake-49.jpg
white lake-02.jpg

WHY YOU NEED A CRISIS PREPAREDNESS PROGRAM FOR YOUR BUSINESS | FOR CREATORS & SMALL BUSINESS OWNERS

My name is Robynne Ikesaka, I have a Bachelors of Emergency and Security Management from the Justice Institute of British Columbia (JIBC) and until recently I have been working for a municipality in northern Alberta as an emergency coordinator. I left to pursue a more creative career but I wanted to infuse my love and passion for emergency management into Beautifully Wander.

My goal here is to break down building.a crisis preparedness program into manageable chunks and help you small business owners and creators create a more resilient business so you can continue doing what you love and the disasters of today impact you a little less!

Tune in every Wednesday on YouTube for some tips on building your business crisis preparedness program. 

Just as you have a business plan, marketing strategy, projects to improve your business, and thought-out processes for booking clients, invoicing clients, balancing the books, you should have plans, projects and thought-out processes for your business crisis preparedness program. 

The program designed to help you prevent and mitigate risks to your business and navigate the impacts when they do hit - no matter what your business is and what size your business is! 

  • Local Retail Owner (sell soaps, candles, mugs, clothes, etc.,)

  • Small Restaurant 

  • Photographer

  • Videographer

  • Graphic Designer

  • Etc.

COVID-19 has likely inserted some sort of personal or professional challenge in your life. For small business owners you might have experienced:

  • Employment loss and retention

  • Store closures

  • Financial loss

  • Lost clients

  • Reputation damage

Every business is subjected to some hazards and risks:

YOUTUBE GRAPHICS 3.png

There are three very broad categories of hazards - natural, technological and human-caused:

YOUTUBE GRAPHICS 4.png

Now, there are many beliefs that people hold on to on why they don’t have a crisis preparedness program. However, getting prepared, taking the steps, thinking ahead, and having these conversations will help your business survive and maybe thrive during and after. 

Here are 3 examples that emphasize the importance of having a crisis preparedness program for your business!

Example #1

When I was living in Fort McMurray there was a local camera store that was located in Lower Townsite. Lower Townsite in Fort McMurray is in a flood plain (located between the Athabasca River and the Clearwater River) so they have a high likelihood of flooding. 

Like any retail store they had camera inventory everywhere.

A common recommendation that a municipality will give to residents that live in a flood plain is to raise their belongings (don’t keep things on the floor or the bottom shelves). This recommendation can apply for businesses as well - raise your inventory. 

A couple months ago some areas of Fort McMurray experienced a really bad flood and this shop had lost thousands of dollars of inventory because a lot of their inventory was on the floor and the bottom shelves. 

Takeaway: If they had planned, budgeted and invested in a mitigation project (re-organizing the store, or buying/building new shelves) for their business they would have reduced their risk to flooding (a known risk for that location) and they wouldn’t have experienced as much of a financial loss then they did.

Example #2

During COVID-19 I was following how the pandemic was affecting small businesses and I read about how a store-front jewellery store was struggling to make it through because they couldn’t allow customers to shop. Thus, during COVID-19 the owner was working on a website so she could sell her inventory online. 

A potential project for that businesses crisis preparedness program could have been developing the website ahead of time. They are not only expanding how they do business but if based on their hazards and risks it would have created a redundant system that helped them maintain businesses during times like this. 

Takeaway: Understand the risks to your business, always have a Plan A, B and C, figure out what you can mitigate, identify what you need to do to prepare for when it happens, and figure out how you can create redundancy for your business. 

Example #3

For many people and businesses COVID-19 has caused some financial strain. 

A common recommendation municipalities will give to their residents is to have an 3-6 month emergency fund or rainy day fund. 

Basically, if you were out of work for 3-6 months or if you had unexpected emergencies pop up the emergency fund will help cover you. 

This recommendation can apply to businesses as well. 

Figure out what your expenses are and come up with a plan to create a nest egg that will help cover you during emergencies. 

Photographers, if you have $1000 worth of business expenses and $2000 worth of personal expenses a month you need to consider saving $9,000 - $18, 000. 

Takeaway: Coming up with the money isn’t going to be immediate and how much and how you come up with the money is entirely up to you and is different for everyone but build a cushion that will help save you during emergencies. 

These are three examples of how investing in a business crisis preparedness program is important and can save you time, stress and financial loss. 

YOUTUBE GRAPHICS 9.png

WHAT'S IN MY CAMERA BAG (JULY 2020) | Bagsmart Camera Bag

NOTE: These are not affiliate links to products or paid promotion. I don’t get paid to include or promote these products. These are my genuine thoughts that I like to share and make easy for you.

‘What’s in my Camera Bag’ are some of my favourite videos to watch on YouTube! I love seeing what camera bag other people have, what accessories they’re carrying, and if there is anything I should buy (because I have a shopping habit).

I knew after I received my Olympus EM1 Mark II I wanted to purchase a professional camera bag. I needed something that:

  • Didn’t look like a camera bag

  • Had room for non-camera essentials (glasses, wallet, miscellaneous bag, re-useable bag, snacks, etc.,)

  • Could carry my tripod

  • Had easy access into the bag but had security as well

  • Customizable inside

  • Can carry my 13” Macbook Air

I found this Bagsmart Camera Backpack on Amazon for $80 CAD and it’s been a great purchase! I took it on my road trip to Banff and Lake Louise and it was nice to have all my camera gear and essentials in one place. I don’t like travelling with several bags, I like to keep it to 1-2 bags (3 if I am travelling with Pepsi).

Two of my favourite features about this bag is one, it has a simple security deterrent on the bag that makes pick pocketing the inside contents challenging - it clasps the 3 zips together. The second feature I really like that was a bonus was that it can slide onto my rolling carry-on if I’m travelling with it.

I like to use this camera bag to store all my equipment in, take on road trips, or take hiking.

It can get significantly heavy when you load it with your camera gear, laptop and tripod. However, it’s only that heavy if I’m travelling to a destination. If I’m out exploring I’ll leave behind some equipment so it’s not terribly heavy on my back.

whats-in-my-camera-bag-01.jpg
whats-in-my-camera-bag-08.jpg
whats-in-my-camera-bag-09.jpg

If I am travelling into the city to try a new cafe or restaurant and I want to bring my camera equipment but I don’t want the large backpack with the tripod I’ll take the inserts from my main camera bag and I’ll insert it into my everyday backpack (also from Amazon) which is lighter and more compact.

It can fit my Olympus EM1 Mark II with the 12-40mm f/2.8 lens, my miscellaneous bag that I keep odd bits and ends in, my glasses, a small tripod, and my wallet.

It also has two side pockets that I can keep my phone in, a water bottle, or some sanitization material. It has a front pocket that zips that I will keep my phone battery packs in. As well, it zips in the back (so again it makes it challenging for pick pocketers).

Photo from MY TRAVEL ESSENTIALS .

I don’t have a ton of photography equipment but its nice that I can grow with the bag.

Even though these bags have been great so far I do have my eye on the Lo & Sons Claremont or the Ona Bowery Camera Bag (but again, I have a bit of a shopping habit).

I hope you enjoyed and I’ll see you next time :)

MOUNTAINS ARE CALLING ME HOME || Exciting News, New Chapter, and Returning Home

Note: Throughout this post are photos that I took on my last trip down to Kelowna 

I’ve been keeping this news to myself pretty closely until we got closer but for a few months now we have been working on how to move back to Kelowna, BC and it’s finally happening! June 26th, 2020 is my last day at work, on June 28th the movers are coming and on June 29th we will be making the 16-hour drive back to Kelowna. 

may long weekend-1.jpg

In April 2020 I decided that I wanted to move back to Kelowna, BC but the timing wasn’t right. For 3 months I have slowly worked on getting my “ducks in a row” and waited for certain conditions to be met before I made the leap. Although there are some boxes not met in my plan to move back, the decision was right and both my fiancé and I agreed that our time in Fort McMurray was up.

I don’t regret the move to Fort McMurray, Alberta. I have made many friends, I have experienced many things and I’ve grown a lot as a person here.

There are many reasons why we are moving back to Kelowna, BC but the main reason is that Fort McMurray doesn’t suit the life that we both want. 

may long weekend-2.jpg

COVID-19 did spark some of this change. I realized what was important to me, the benefit I’ve gained by living here but also the loss that I’ve received since moving here so we truly are heading into a new chapter of our life.

may long weekend-3.jpg
may long weekend-6.jpg

Come July you’ll be seeing more content about the Okanagan and photography so stay tuned here for informations and tips. You can also find more daily updates over at my Instagram. 

I look forward to bringing you along on this new journey! 

Take care!

5 TIPS FOR PHOTOGRAPHING IN BORING PLACES | How I Find Inspiration

I am a huge believer that your eyes are the most valuable part of your kit and it’s about how you compose a shot and not how fancy or techy your camera is.

I mentioned this in my previous post but I love travel photography - food, landscapes, architecture, bodies of water and color.

However, I currently live in northern Alberta (Fort McMurray) and this place doesn’t quite jive with my photography style.

So, in this episode I shed some light on 5 tips that has helped me and will hopefully help you photograph in boring locations!

Tip #1 - Details, Patterns & Textures

Look for any details, pattern or textures. This can be the centre of a flower, the texture of a tree, the lines in an object. It could be any bump or groove.

ISO 200 / 1/250 / f/2.8

ISO 200 / 1/250 / f/2.8

Tip #2 - Lines

Look for any leading lines.

I love the the lines in this picture. The green trees and dark brown wood on the left and the pink trees and green grass on the right with the paved path right down the middle.

ISO 200 / 1/500 / f/2.8

ISO 200 / 1/500 / f/2.8

Tip #3 - Color

I like to look for any pops of color that I can fill the frame with. Some of the flowers right now are this beautiful vibrant pink (probably because of all the rain we're getting).

ISO 200 / 1/80 / f/2.8

ISO 200 / 1/80 / f/2.8

ISO 200 / 1/160 / f/2.8

ISO 200 / 1/160 / f/2.8

Tip #4 - Perspective

Change your perspective. Get low, get high and change your angle.

If there is any texture on the ground like rocks, grass, or wood I love to get low and incorporate more foreground elements.

The image on the left was shot at eye level. The image on the right was shot low from a different perspective with the rocks more in the foreground. Same setting but different composition.

ISO 200 / 1/320 / f/2.8

ISO 200 / 1/320 / f/2.8

ISO 200 / 1/400 / f/3.2

ISO 200 / 1/400 / f/3.2

Tip #5 - Subject + Foreground Blur

This is my absolute, hands down, go-to favorite composition technique. Framing your subject with foreground blur. You shoot with a really wide aperture and through something. Every time I go out I look for a plant, tree or flower to do this with.

ISO 200 / 1/250 / f/2.8

ISO 200 / 1/250 / f/2.8

ISO 200 / 1/250 / f/2.8

ISO 200 / 1/250 / f/2.8

ISO 200 / 1/250 / f/2.8

ISO 200 / 1/250 / f/2.8

Thanks for tuning into todays episode! Please be sure to follow Beautifully Wander on Instagram and YouTube!

IMPROVE YOUR PHOTOGRAPHY | Photo walk #1 at Lions Park, Fort McMurray

At least once a week I try to go for a photo walk or excursion! I typically choose a location and photograph whatever catches my eye. This weeks photo walk was at Lions Park in Fort McMurray.

I go for these photo excursions to practice my photography, relax and just get out of the house.

I did find myself agreeing with Chris Sale’s a landscape photographer from England in that filming YouTube videos can be a distraction when you’re trying to practice your photography. For me, I’m trying to film myself, film b-roll, and compose my shots and it can be hard. So in this try I wanted to focus less on filming myself and more on my photography all while still telling a story. Check below to see what I was able to produce!

When I get to a location I always look for a couple shots:

  • Shot that will set the scene

  • Detail shots

  • Patterns or textures

  • Something to shoot through

All images taken on the Olympus EM1 Mark II :)

ISO 200 | 1/200 | f/2.8

ISO 200 | 1/200 | f/2.8

ISO 200 | 1/200 | f/3.2

ISO 200 | 1/200 | f/3.2

ISO 200 | 1/200 | f/3.2

ISO 200 | 1/200 | f/3.2

ISO 200 | 1/200 | f/3.2

ISO 200 | 1/200 | f/3.2

This mural can be found at Lions Park in Fort McMurray (3 Tolen Drive). It was painted by Daniel J. Kirk and Ivan Ostapenko and was unveiled on September 18th, 2015.

ISO 250 | 1/125 | f/2.8

ISO 250 | 1/125 | f/2.8

If I’m struggling to compose a shot I like to do one of the following things:

  • Fill the frame

  • Look for patterns or textures

  • Get low

ISO 200 | 1/80 | f/3.2

ISO 200 | 1/80 | f/3.2

ISO 250 | 1/60 | f/2.8

ISO 250 | 1/60 | f/2.8

ISO 250 | 1/250 | f/2.8

ISO 250 | 1/250 | f/2.8

ISO 250 | 1/250 | f/3.2

ISO 250 | 1/250 | f/3.2

ISO 250 | 1/250 | f/2.8

ISO 250 | 1/250 | f/2.8

ISO 250 | 1/200 | f/2.8

ISO 250 | 1/200 | f/2.8

Towards the end of my photo walk I thought I would try some self-portraits!

ISO 400 | 1/200 | f/2.8

ISO 400 | 1/200 | f/2.8

ISO 400 | 1/200 | f/2.8

ISO 400 | 1/200 | f/2.8

ISO 400 | 1/200 | f/2.8

ISO 400 | 1/200 | f/2.8

I found I was able to create significantly more photos in this try than I have in the past. This could be because of the location but it could be because I was dedicating more time to photography than filming.

Follow Along!

In this week’s video I take you to Lions Park in Fort McMurray!

FAVORITE PHOTOGRAPHY APPS | Editing, Planning & Creating

I split a lot of my photography workflow between my Macbook and iPhone. Typically, when I am posting images to my instagram account @beautifullywander I edit and plan on my phone and if I post on my website or YouTube I create on my laptop. Follow along to see what my favourite photography apps are!

Lightroom

I used to edit on VSCO for the specific reason that you could copy your edits and paste onto other images for free. However, a few months ago I started using Lightroom and recently purchased the paid version so I can edit images on my laptop and have the copy-paste version on my phone.

In the video I take you through how I edit my images in Lightroom to be posted on @beautifullywander.

IMG_7499.JPG
Copy of Untitled.png

Planoly

After I edit the images I want to upload to my Instagram I use Planoly to plan out my feed. I look for what images will allow me to keep a consistent and coherent feed.

You can schedule your posts in Planoly but I mostly use it to plan my feed.

IMG_7576.PNG
IMG_7577.PNG

Caption Kit

I used to put periods when I wanted line breaks on my instagram captions until I discovered Caption Kit! With this app I can copy my text from my notes app and paste it into the app, when you hit generate it will copy the text into your clipboard and when you paste into Instagram it will copy over.

IMG_7578.PNG
IMG_7579.PNG

Unfold

I love Unfold to create my Instagram layouts! I have a few favorites that I like to use (Ripped Paper and Northwell text). Like my Instagram feed I wanted to create a form of branding with my Instagram stories and this makes it possible!

IMG_7580.PNG
IMG_7581.PNG

Other Apps

Camera Connect Apps (Canon & Olympus)

I typically use the camera connect apps for transferring images wirelessly. I LOVE this capability now with cameras! I don’t always carry my laptop with me so it’s nice if I want to only transfer a few images to be able to do that and not have to wait until I get home.

You can remotely control your camera with these connect apps which I don’t use too often but I want to definitely try and use it more on our future travels!

Canon Mini Printer

I bought a Canon Mini Printer last Christmas so I can print photos for my journal and I love it! It connects to my phone so I can print any photo on my phone onto mini polaroid paper.

Squarespace App

I don’t use the Squarespace app too often on my phone - I mostly create my website content on the laptop but it’s nice having the capability to create or make quick fixes on the go!

Follow Along!

You can follow along on how I edit, create and plan my content for Beautifully Wander on YouTube!

Samples Images from the Olympus OM-D E-M1 Mark II

Unfortunately, the Buffalo’s weren’t out when I went to the Buffalo View Point here in Fort McMurray so here are some adorable pictures I took of my pup Pepsi!

ISO 640 | 1/500 | f/2.8

_5230023.jpg
_5230016.jpg
_5230015.jpg
_5230012.jpg

Those are my favorite photography apps on my iPhone for editing, planning and creating! I hope you enjoyed and see you next time! :)

OLYMPUS EM1 MARK II | MY SETUP + CUSTOMIZATION

I LOVE how much you can customize your setup in the Olympus system! There are so many buttons that you can map so when you’re shooting the camera feels natural to you! Feel free to follow along by playing the video where I walk you through the following steps and check out the actual images I have taken with this camera at the bottom of this page!

Untitled design (1).png

SHOOTING CONTROL PANEL

By clicking on the top left button it will bring up your entire shooting control panel where you can change your ISO, white balance, card slot reading, image stabilization, face auto detect, etc.,

I liked where this button is mapped right now so I have left it where it is.

1.png

ISO

You can change your ISO in the shooting control panel by going to the top left of the screen but I mapped ISO to the AEL/AFL button by:

-Clicking MENU

-Scrolling to the CUSTOM MENU (GEAR ICON)

-Down to B

-Over to BUTTON FUNCTION

-Down to AEL/AFL FUNCTION

-Selecting ISO/WB (where the back dial changes the ISO and the front dial changes white balance)

2.png

MEMORY CARD

The EM1 Mark II has dual slot memory cards that you can map as well by:

-Scrolling down to the MEMORY CARD 1 AND 2

-Selecting your preference

3.png

IMAGE STABILIZATION

Your Image Stabilization helps reduce the amount of camera shake when you’re shooting in low light or with high magnification and you can do this by:

-Scrolling down to the IMAGE STABILIZER ON THE LEFT HAND SIDE

-Selecting S-IS1 for all direction shake (if you want specifically vertical or horizontal shake you can select S-IS2 or S-IS3)

If you would rather you can also change the Image Stabilization by:

-Clicking on MENU

-Scrolling down to CUSTOM MENU (GEAR ICON)

-Scrolling down to C2

-Clicking on IMAGE STABILIZER and switching it to S-IS1, S-IS2 or S-IS3

6.png

FACE AUTO-DETECT

I have been primarily shooting landscapes and travel photos with not a lot of people so I turned my face auto-detect off by:

-Scrolling down to the SMILEY FACE icon

-Clicking OFF

8.png

AUTOFOCUS (AF) AREA

Out of the gate if you scroll to the AF Area it is by default set to cover the entire area but you can change it by using the back dial button to change your AF area.

10.png

SINGLE AF | CONTINUOUS AF | MANUAL FOCUS

Switching between the different modes of focusing is super simple by:

-Clicking on the AF BUTTON on the top left of the camera

-Scrolling to choose SINGLE AF, CONTINUOUS AF OR MANUAL

By default this button is mapped to do this function and I like where it is currently so I have left it alone.

If you would rather you can also change your autofocus in the MENU by:

-Scrolling to the CUSTOM MENU (GEAR ICON)

-Selecting A1

-Selecting the AF MODE and changing it to single, continuous or manual focus

11.png

MANUAL FOCUS CLUTCH

I do like switching between single autofocus and manual focus so I have left the manual focus clutch as operative. The Manual Focus Clutch is the feature on the lens of the camera that you can switch on and off between auto focus and manual. You can disable or enable it by:

-Clicking on the MENU

-Scrolling down to the CUSTOM MENU (GEAR ICON)

-Scroll down to A3

-Click on MF CLUTCH and switch it to OPERATIVE or INOPERATIVE

12.png

RESETTING CUSTOMIZATIONS

If you want to reset your camera to start fresh you can reset by:

-Scrolling to SHOOTING MENU 1

-Clicking on RESET/CUSTOM MODE

13.png

SHOOTING SETTINGS

You can change your shooting settings such as to self-timer, sequential, interval by:

-Scrolling to SHOOTING MENU 1

-Scrolling to the very bottom and select the mode you want

14.png

ANTI-SHOCK

Your Anti-Shock will help you prevent any small vibrations that occur when you press the shutter, you can set it by:

-Clicking on SHOOTING MENU 2

-Scrolling to ANTI-SHOCK

-Setting it to 0

15.png

AF AREA POINTER

If you want to display your frame while the shutter button is half pressed :

-Scroll down to CUSTOM MENU (GEAR ICON)

-Toggle over to A1

-Scroll down to AF Area Pointer

-Change it to On2

16.png

AF TARGETING PAD

By enabling the AF Targeting Pad you can use the viewfinder and use your fingers on the screen to change where you’re focusing, to do this in the CUSTOM MENU:

-Toggle over to A2

-Scroll to the AF Targeting Pad

-Switch to ON

17.png

AF ILLUMINATOR

To turn off the AF Illuminator:

-Scroll down to the AF Illuminator

-Switch to OFF

18.png

BUTTON FUNCTIONS

You can change a lot of the buttons on the Olympus and make it perfect for you!

Scroll down to B

-Toggle over to BUTTON FUNCTION

-From here you can go in and really change and map your buttons (I changed the AEL/AFL Button on the back of the camera to change my ISO and White Balance)

19.png

LIVE BOOST MODE

By turning off Live Boost Mode you can see the exposure settings and the image you see is the same as that of the final product, to do this:

-Scroll down to D2 in the CUSTOM MENU

-Turn the Live Boost Mode OFF

20.png

EQUALLY VALUE

I set my Default Setting to Equally Value so when I preview my image and zoom in it directly goes to 1:1 ratio, to do this:

-Scroll down to Default Setting

-Set it to Equally Value

21.png

AF CONFIRMATION BEEP

When you are shooting and your autofocus is confirmed it will by default beep, to turn it off:

-Scroll down to D4 in the CUSTOM MENU (GEAR ICON)

-Toggle over to the first selection (AF CONFIRMATION BEEP)

-Turn it OFF

22.png

NOISE REDUCTION

You can change the amount of noise reduction performed at high ISO sensitivity by changing the Noise Filter - I don’t shoot a lot right now in high ISO so I’ve turned mine off:

-Scroll down to E1 in the CUSTOM MENU (GEAR ICON)

-Toggle down to NOISE FILTER

-Turn it OFF

JPEG IMAGE QUALITY MODE

I’ve switched my JPEG Image Quality Mode to superfine by:

-Scrolling down to G in the CUSTOM MENU (GEAR ICON)

-Toggle down to JPEG Image Quality Mode

-Set the first image (second box) to SF (superfine)

24.png

KEEP WARM COLOR

I also turn my Keep Warm Color Off and change the color space to Adobe RGB by:

-Scrolling down KEEP WARM COLOR

-Switching it OFF

-Scrolling down to COLOR SPACE

-Switching it to ADOBE RGB

26.png

EVF AUTOSWITCH

When you are using the Olympus camera you have a viewfinder and a screen that you can see what you are capturing, by default it is set to automatically switch when you put your eye to the viewfinder and when you bring it down it will switch to the screen, to turn this off:

-Scroll down to I

-Toggle over to EVF AUTOSWITCH

-Turn it OFF (I like this feature so I leave mine ON)

27.png

PICTURE VIEWING

To save battery I have heard that you can turn the image viewer off - I do this when I am travelling and its important to conserve battery, to do this:

-Scroll down to the SETUP MENU on the left hand side (TOOL ICON)

-Scroll down to REC VIEW

-Scroll and choose what you would prefer - 0.5 seconds, 0.3 seconds, OFF, etc.,

29.png

SAVE CUSTOMIZATIONS

To save any of your customizations that you make on the camera for next time:

-Click on the SHOOTING MENU 1

-Toggle over to RESET/CUSTOM MODES

-Scroll down to ASSIGN TO CUSTOM MODE

-Select which CUSTOM MODE you want to set it to C1, C2 or C3 on the top dial (I’ve set mine to C1)

Follow along!

Feel free to follow along with my video on how I setup my camera!

Sample Images from the OM-D E-M1 Mark II

_5100014 2.jpg
_5100001.jpg
_5100015 2.jpg
_5100019.jpg

CHOOSING A CAMERA

Last week I posted a blog post and video about my unboxing of the Olympus OM-D E-M1 Mark II and today I wanted to share:

  • How I chose which camera to buy

  • Why I picked the Olympus system

  • Why I chose the EM1 Mark II over the Mark III

Scroll down to the bottom if you’d rather watch a video!

Choosing a Camera

When I started the journey to find the “perfect camera” I poured over YouTube videos watching everything and anything that would tell me what camera to buy - of course everyone had a different opinion.

I realized later that depending on what you want to shoot and what your photography niche is certain features of a camera are going to be more and less important to you.

So I made a list of what I wanted to photograph:

  • Travel photography - streets, landscapes, culture, food, and architecture

  • Storytelling photography - families and couples

  • Social impact photography - events and companies that are doing great things for the world

I then made a list of what I wanted in a camera:

  • Mirrorless camera

  • Light and compact for travelling

  • Budget hovered around $2000

  • Front facing screen

  • WiFi connection

  • Use it professionally

  • Solid lens selection

  • Good quality reviews

  • Aesthetically pleasing

  • Produce amazing quality images

The four companies I looked at were Canon, Sony, Fujifilm and Olympus.

I watched several reviews on Youtube and researched Instagram accounts and what I ended up finding was that:

  • I didn’t care for the mirrorless lens and camera selection for Canon

  • I did have my eye out for the Sony A7III but I really wanted a camera with the front facing screen and the price point was hard to justify without this feature I really wanted

  • I did love the Fujifilm aesthetic but I had hesitations on using it professionally

The Olympus System

The Olympus system ticked more boxes:

  • It was a mirrorless system

  • It had a front facing screen

  • It was within my budget

  • I was happy with my lens selection and camera lineup

  • There were good quality reviews of the camera

  • I could use it professionally

  • I could upgrade easily

  • It was light and compact

  • Aesthetically looked good

Why I chose the EM1 Mark II over the Mark III

The primary reason why I chose the Mark II over the Mark III was because of my budget for the camera. Here in Canada a Mark III on Amazon would go for about $3400 and on Best Buy or the Olympus store would be around $3200.

The Mark II that I bought with the 12-40mm f/2.8 was on sale for $2000 at Best Buy.

To get the Mark II it would have been an additional $1200 to $1400 investment that wasn’t in my budget.

I also really wanted to purchase the 12-100mm f/2.8 so instead of waiting to have enough savings for a Mark III and an additional lens which would have taken a while I decided to purchase the Mark II.

I did spend a lot of time debating between the two because I wanted to produce that magic that I have seen other photographers create with the Olympus system. Although I watched a lot of YouTube on what camera to buy I didn’t find the numbers and technical details super helpful because I’m a visual learner/person so I wanted to see images of what this camera could do - so I found websites like The Wander Lens and Instagram accounts like Brooke Little Bear more helpful.

Of course, if the opportunity came along to upgrade to the Mark III I definitely would, but I am more than happy with my current purchase.

Sample Images from the OM-D E-M1 Mark II

P5050087.jpg
P5050095.jpg
P5050111.jpg
P5050093.jpg
P5050099.jpg

Choosing a Camera + Why I Chose Olympus

See below for a video capturing how I chose my camera, and why I chose Olympus and the Mark II!

OLYMPUS OM-D E-M1 MARK II UNBOXING

In December 2019 I decided I wanted to pursue photography as a hobby and because I didn’t know which system I wanted to invest my money in I bought the Canon M100 as a beginner camera. It was small, affordable and it allowed me to learn about cameras and photography and venture away from automatic.

My first trip with this camera was Denver, Colorado - it was here that I really tried to pay attention to composition.

After returning back home I decided that I wanted to pursue photography more professionally and purchase a professional camera for my next trip - New York!

After hours of research, watching Youtube videos, reading reviews/articles, and scrolling on Instagram I decided to invest in the Olympus camera system.

Why did I choose the Olympus system over the other popular brands - Sony and Canon?

  1. The Olympus system is compact and light for travelling. Often when I travel back home to Kelowna or internationally we fly carry-on only so everything that I bring needs to fit either in that or my purse that fits under the seat.

  2. The camera body and lens have great weather sealing. On our second day in Athens it freakishly hailed a ton in the afternoon. We had just finished our Acropolis tour outside when it started so we were able to make it inside but you never know when you’ll run into some bad weather!

  3. I wanted crisp images. I poured over Instagram accounts specific to Olympus, watched Youtube videos and read articles because I wanted to be able to produce those images with outstanding detail.

  4. I loved the company behind Olympus! You can really see that they invest not only in their camera quality but their buyers and users too! I loved how they are constantly producing useful content for their users on their website and Instagram.

IMG_7048.JPG

What was I looking for in a camera?

  1. It needed to be light and compact for travel purposes

  2. Full-articulating screen

  3. Capable of producing crisp images

  4. Within my price range

IMG_7044.JPG
IMG_7047.JPG

Camera unboxing!

See below for a video of my first unboxing!

I bought this camera in early March in anticipation of my trip with my mom to New York. However, because of the global pandemic (COVID-19) we did cancel our trip.

I hope you enjoyed this post! To come along on my photography and Olympus journey follow me on Instagram at Beautifully Wander!

MY BEAUTIFUL OASIS: WHITE LAKE

White Lake is the one place on this earth that I would repeatedly go back to every year! For me White Lake is more than a place…

I love driving down the windy road through the forest and seeing the set of mailboxes that indicate we’re here.

I love the features that shape this place - the turtles, lilly pads, the beautiful water and the familiar houses across the lake.

I love the night sky and the beautiful stars.

I love the family activities we do here - playing Sticks and Gaji and drinks by the campfire.

There are so many beautiful places in British Columbia, Canada, the world but White Lake is my favorite place because of the memories I make here.

We have been coming here as a family for years and that’s what makes this place so special.

UNADJUSTEDNONRAW_thumb_a34.jpg
UNADJUSTEDNONRAW_thumb_1d41.jpg
UNADJUSTEDNONRAW_thumb_1d3b.jpg
UNADJUSTEDNONRAW_thumb_1d4d.jpg
UNADJUSTEDNONRAW_thumb_1d40.jpg
UNADJUSTEDNONRAW_thumb_1d4b.jpg
UNADJUSTEDNONRAW_thumb_1d31.jpg
UNADJUSTEDNONRAW_thumb_641.jpg

This post is dedicated to my Grandfather - Noboru Ikesaka. It’s been 10 years since you passed. You are what started this journey, this blog. You are who I dedicate Beautifully Wander to.

“Even those who are gone, are with us as we go on”

Charity Sanoy, Cam Clarke, Ladysmith Black Mambazo

Happy Birthday Grandpa.