I LOVE how much you can customize your setup in the Olympus system! There are so many buttons that you can map so when you’re shooting the camera feels natural to you! Feel free to follow along by playing the video where I walk you through the following steps and check out the actual images I have taken with this camera at the bottom of this page!
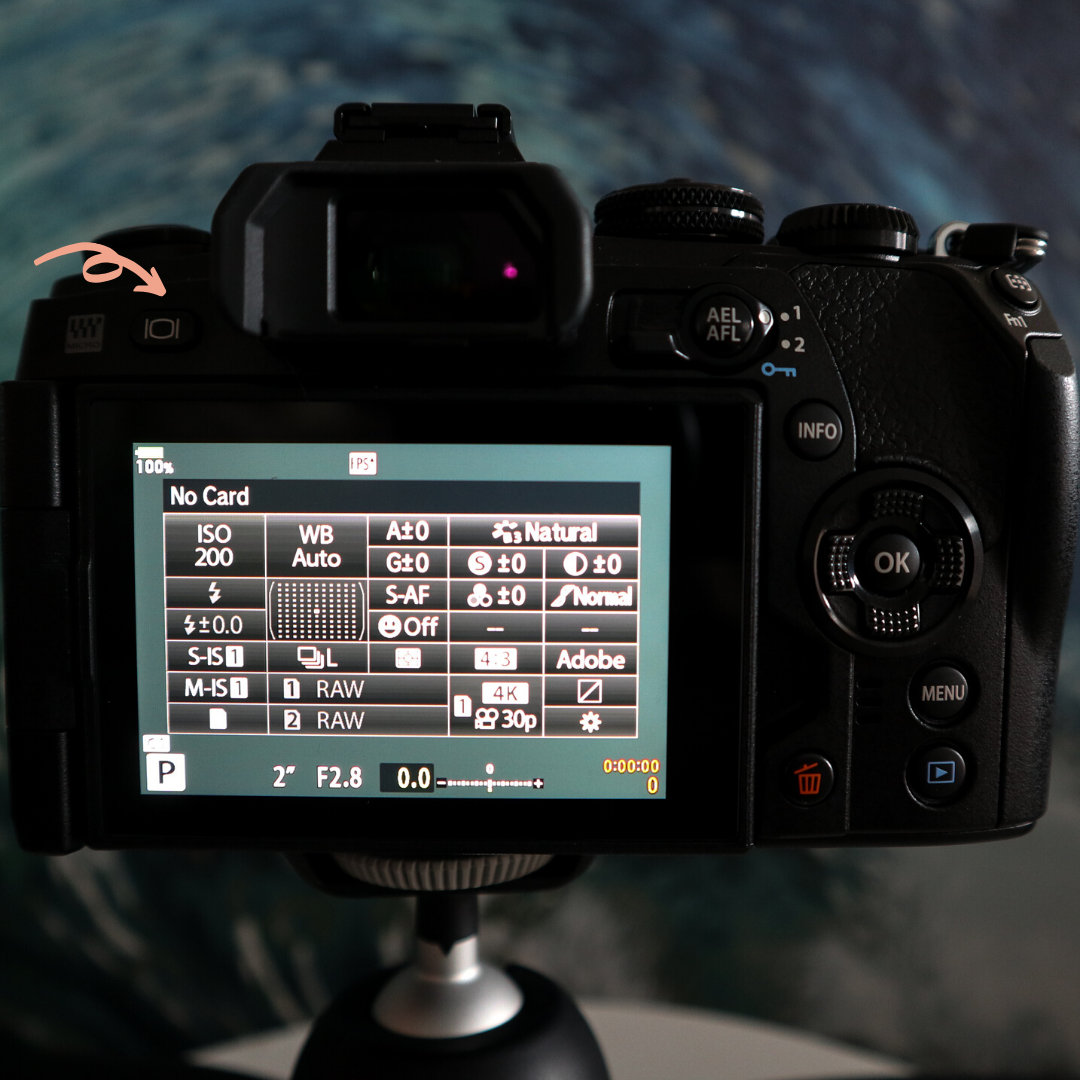
SHOOTING CONTROL PANEL
By clicking on the top left button it will bring up your entire shooting control panel where you can change your ISO, white balance, card slot reading, image stabilization, face auto detect, etc.,
I liked where this button is mapped right now so I have left it where it is.
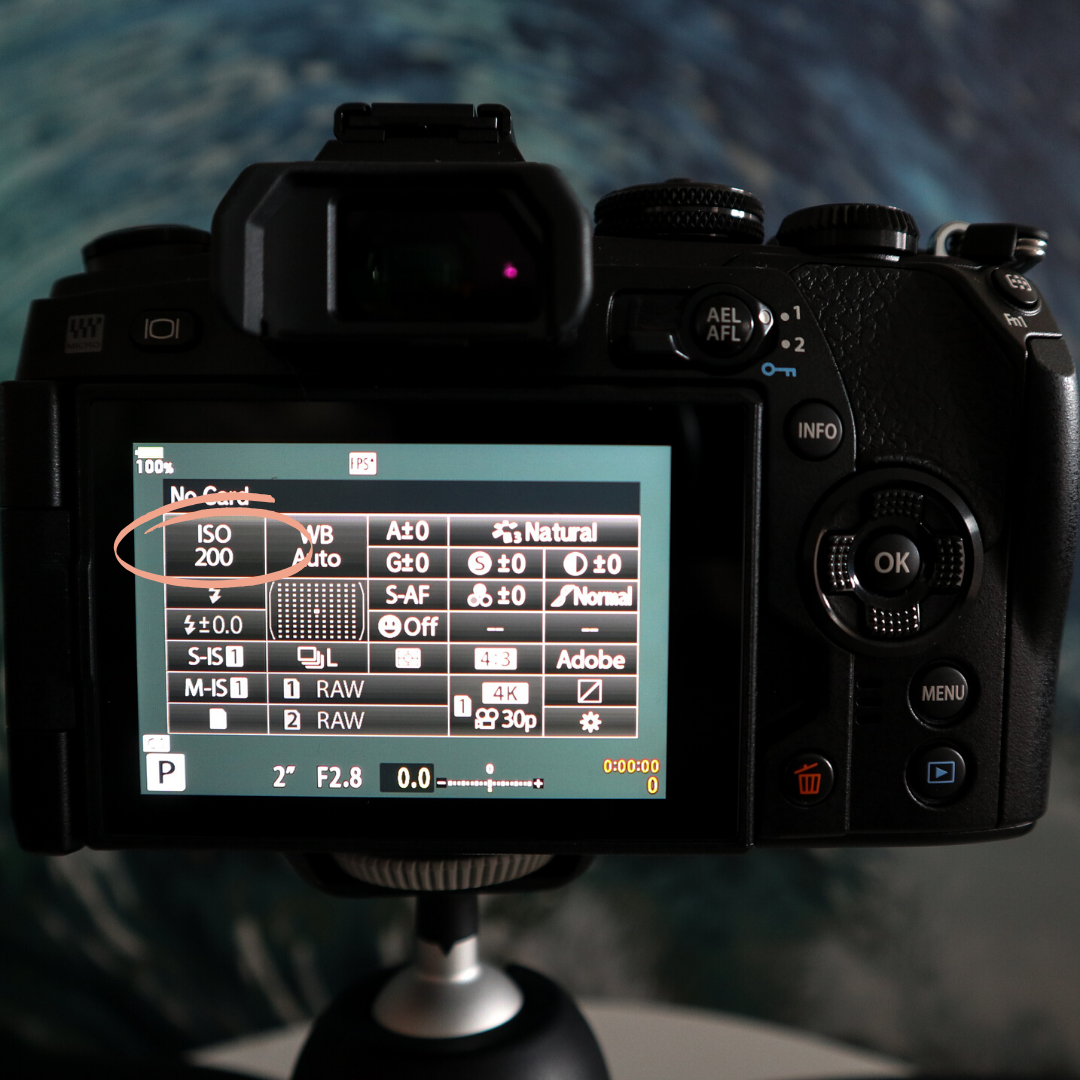
ISO
You can change your ISO in the shooting control panel by going to the top left of the screen but I mapped ISO to the AEL/AFL button by:
-Clicking MENU
-Scrolling to the CUSTOM MENU (GEAR ICON)
-Down to B
-Over to BUTTON FUNCTION
-Down to AEL/AFL FUNCTION
-Selecting ISO/WB (where the back dial changes the ISO and the front dial changes white balance)
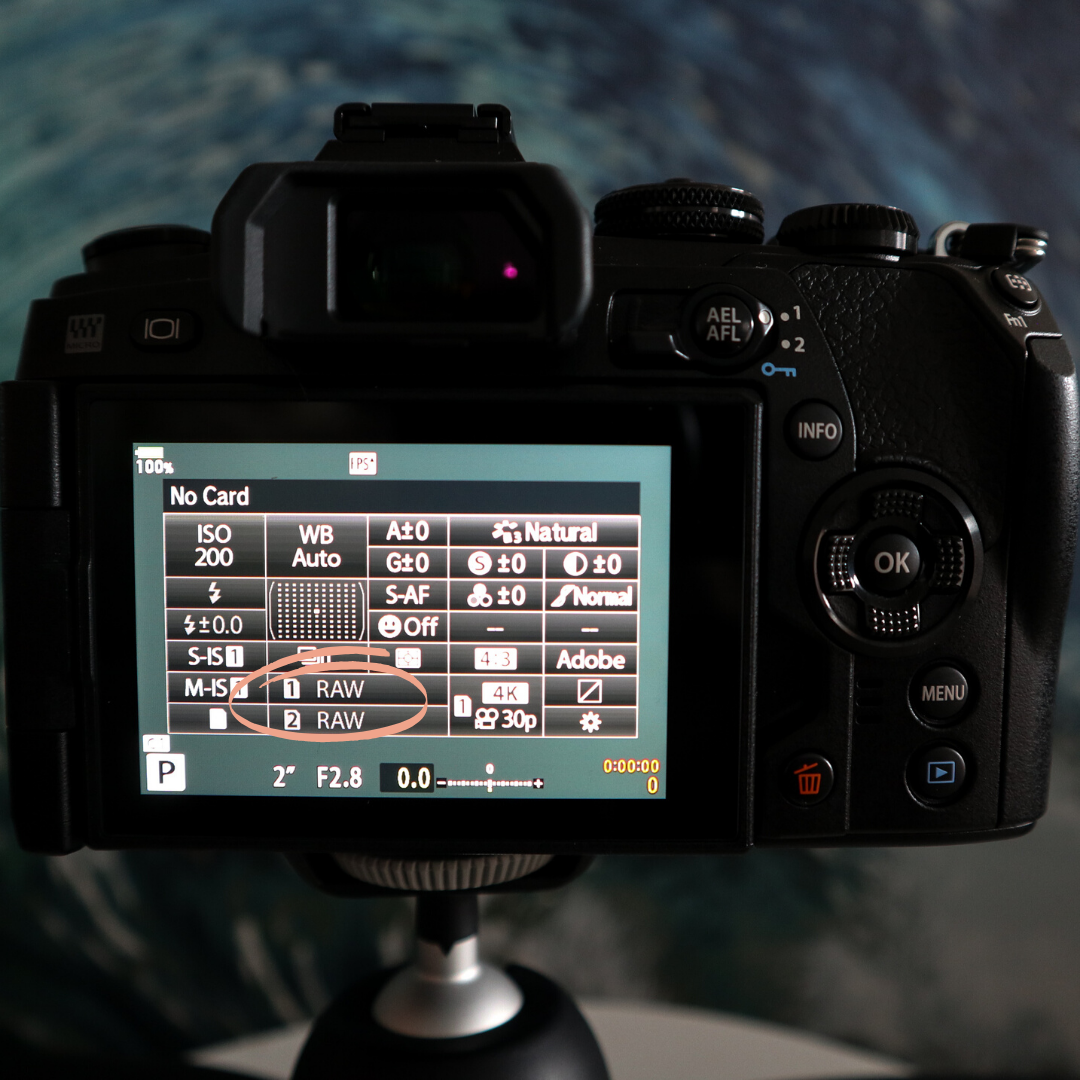
MEMORY CARD
The EM1 Mark II has dual slot memory cards that you can map as well by:
-Scrolling down to the MEMORY CARD 1 AND 2
-Selecting your preference
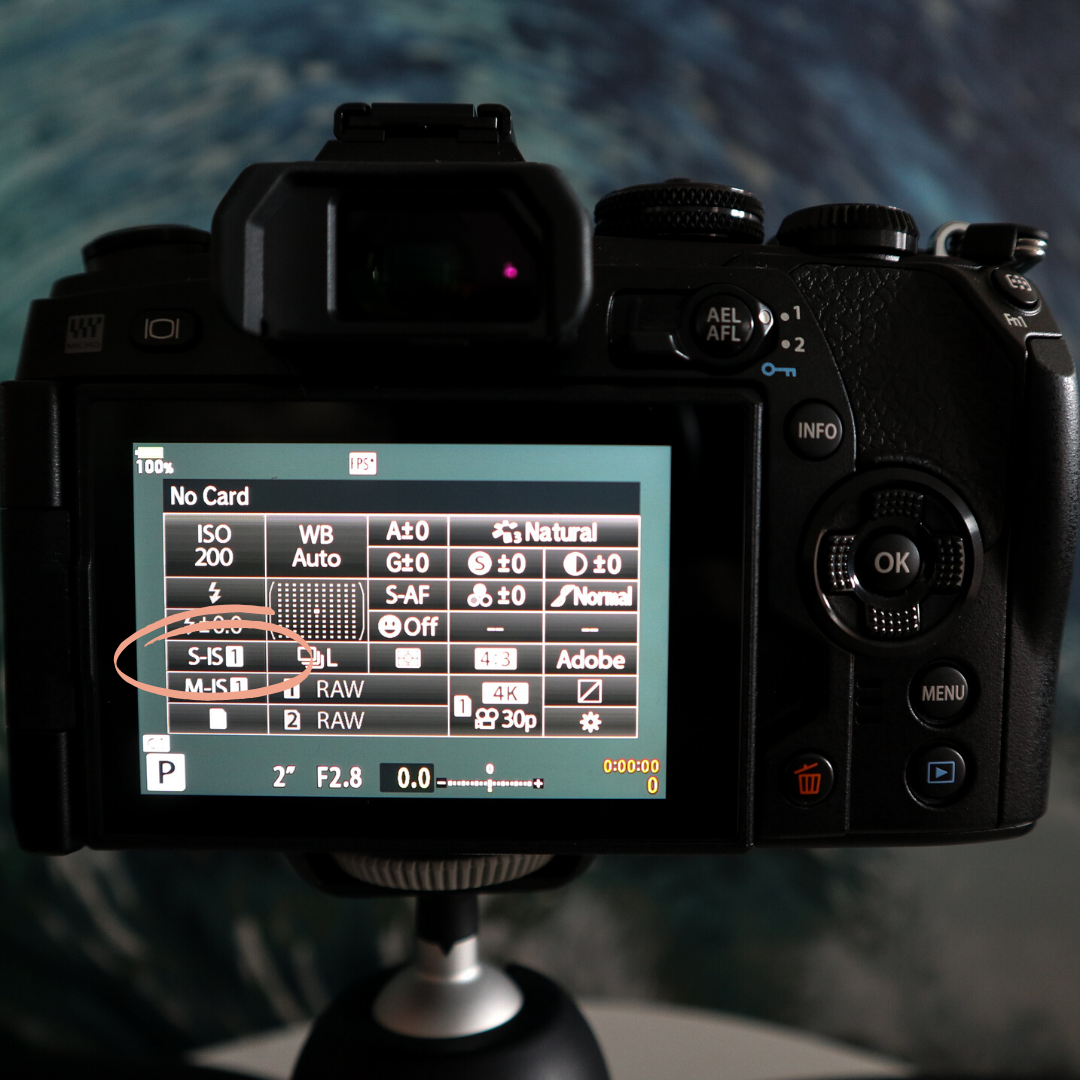
IMAGE STABILIZATION
Your Image Stabilization helps reduce the amount of camera shake when you’re shooting in low light or with high magnification and you can do this by:
-Scrolling down to the IMAGE STABILIZER ON THE LEFT HAND SIDE
-Selecting S-IS1 for all direction shake (if you want specifically vertical or horizontal shake you can select S-IS2 or S-IS3)
If you would rather you can also change the Image Stabilization by:
-Clicking on MENU
-Scrolling down to CUSTOM MENU (GEAR ICON)
-Scrolling down to C2
-Clicking on IMAGE STABILIZER and switching it to S-IS1, S-IS2 or S-IS3
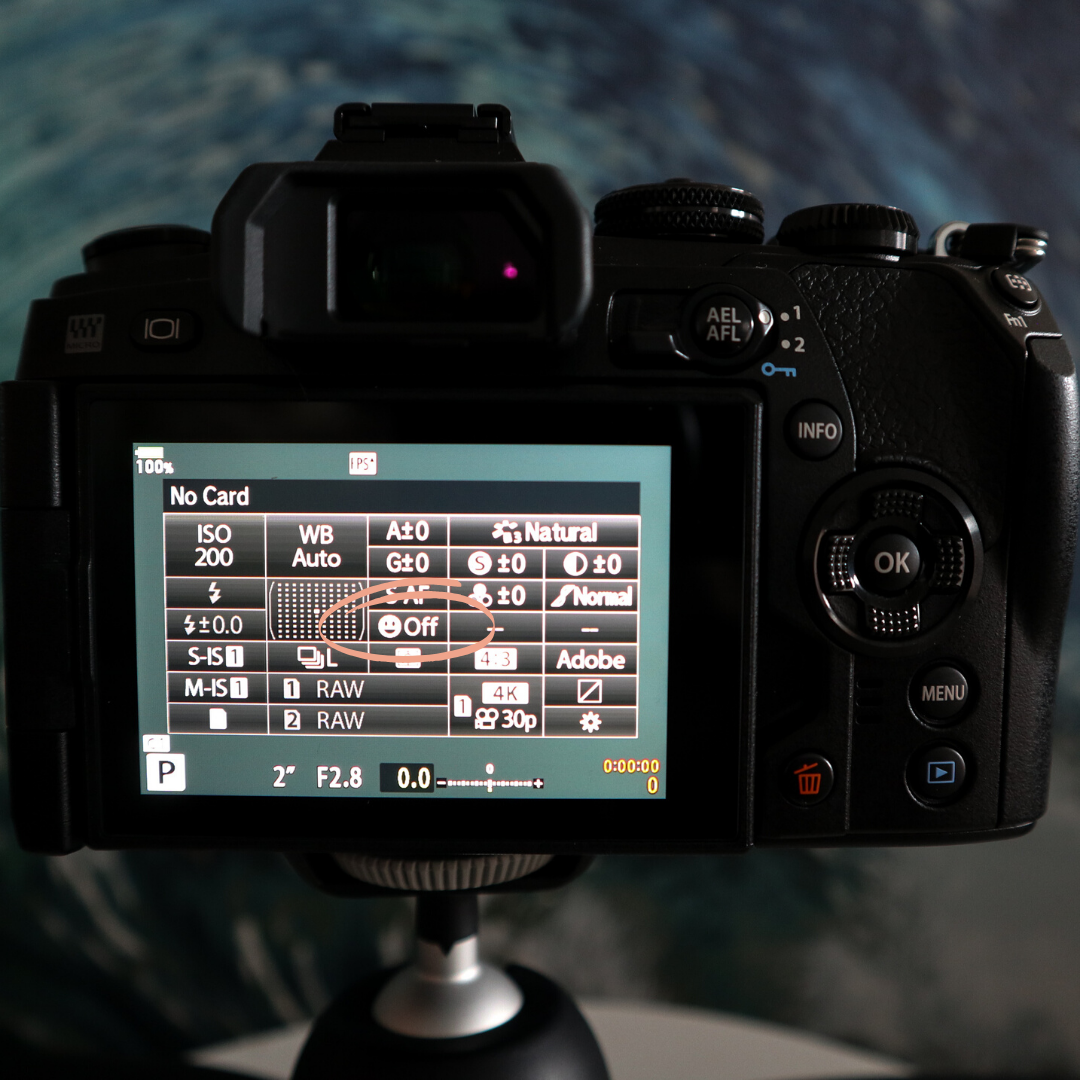
FACE AUTO-DETECT
I have been primarily shooting landscapes and travel photos with not a lot of people so I turned my face auto-detect off by:
-Scrolling down to the SMILEY FACE icon
-Clicking OFF
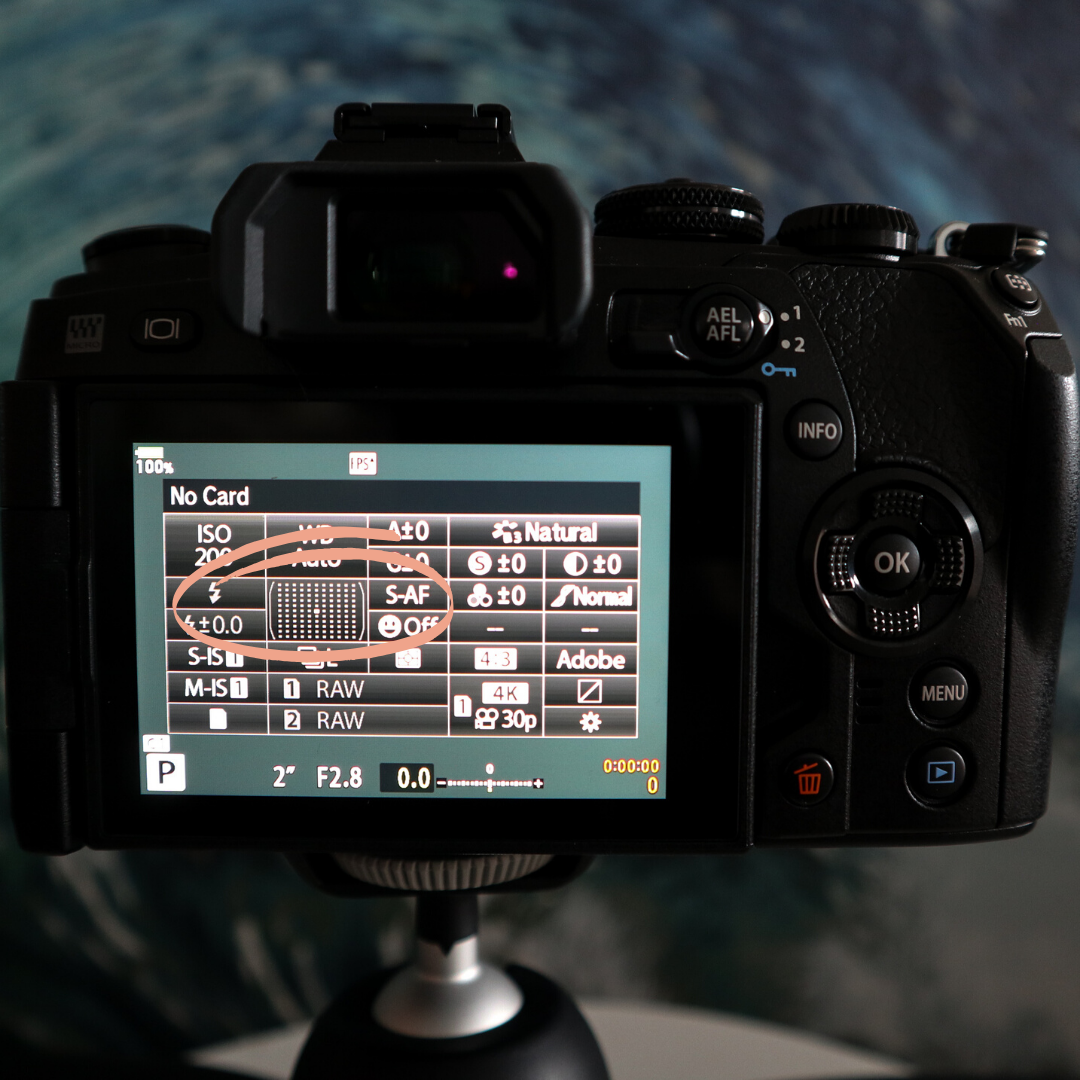
AUTOFOCUS (AF) AREA
Out of the gate if you scroll to the AF Area it is by default set to cover the entire area but you can change it by using the back dial button to change your AF area.
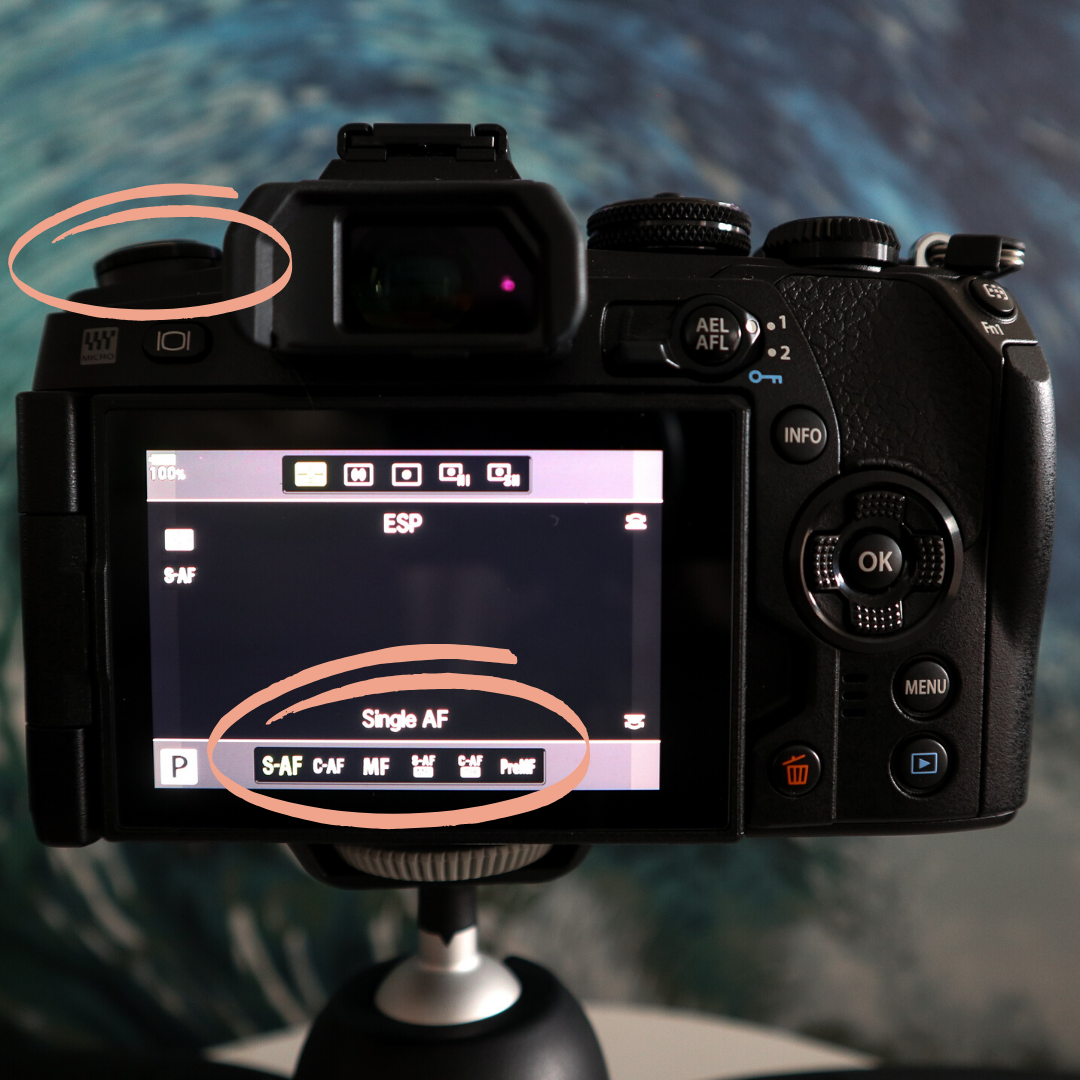
SINGLE AF | CONTINUOUS AF | MANUAL FOCUS
Switching between the different modes of focusing is super simple by:
-Clicking on the AF BUTTON on the top left of the camera
-Scrolling to choose SINGLE AF, CONTINUOUS AF OR MANUAL
By default this button is mapped to do this function and I like where it is currently so I have left it alone.
If you would rather you can also change your autofocus in the MENU by:
-Scrolling to the CUSTOM MENU (GEAR ICON)
-Selecting A1
-Selecting the AF MODE and changing it to single, continuous or manual focus
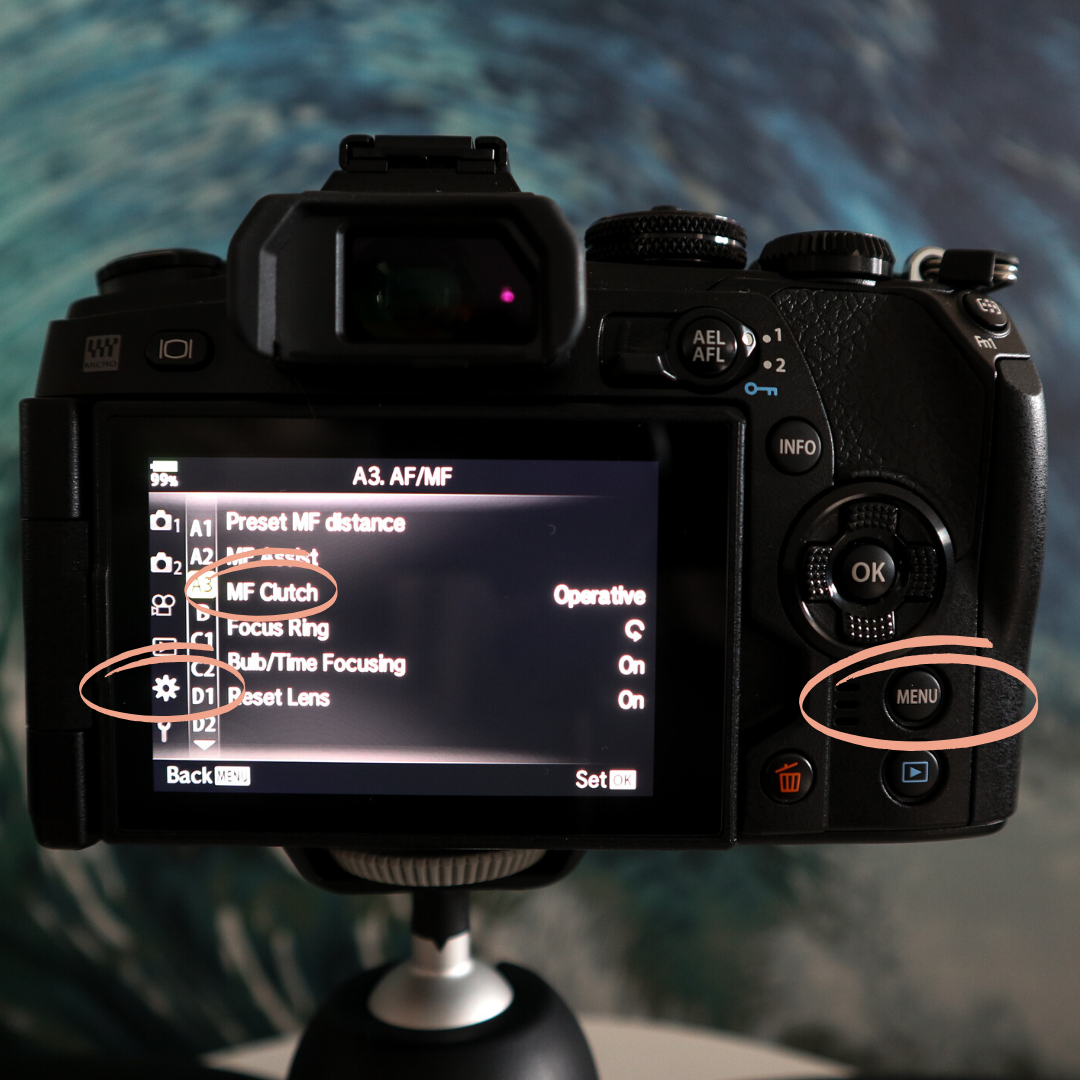
MANUAL FOCUS CLUTCH
I do like switching between single autofocus and manual focus so I have left the manual focus clutch as operative. The Manual Focus Clutch is the feature on the lens of the camera that you can switch on and off between auto focus and manual. You can disable or enable it by:
-Clicking on the MENU
-Scrolling down to the CUSTOM MENU (GEAR ICON)
-Scroll down to A3
-Click on MF CLUTCH and switch it to OPERATIVE or INOPERATIVE
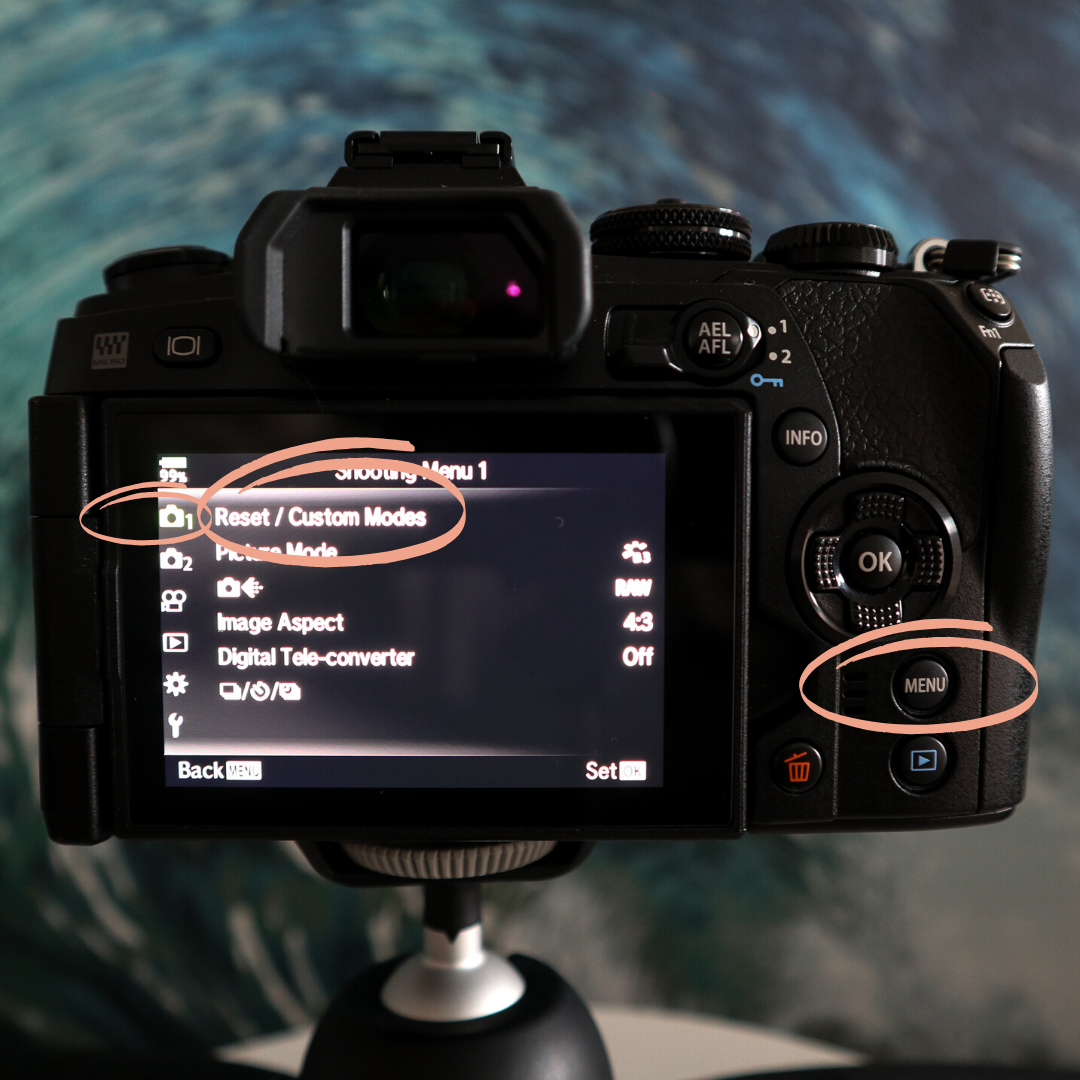
RESETTING CUSTOMIZATIONS
If you want to reset your camera to start fresh you can reset by:
-Scrolling to SHOOTING MENU 1
-Clicking on RESET/CUSTOM MODE
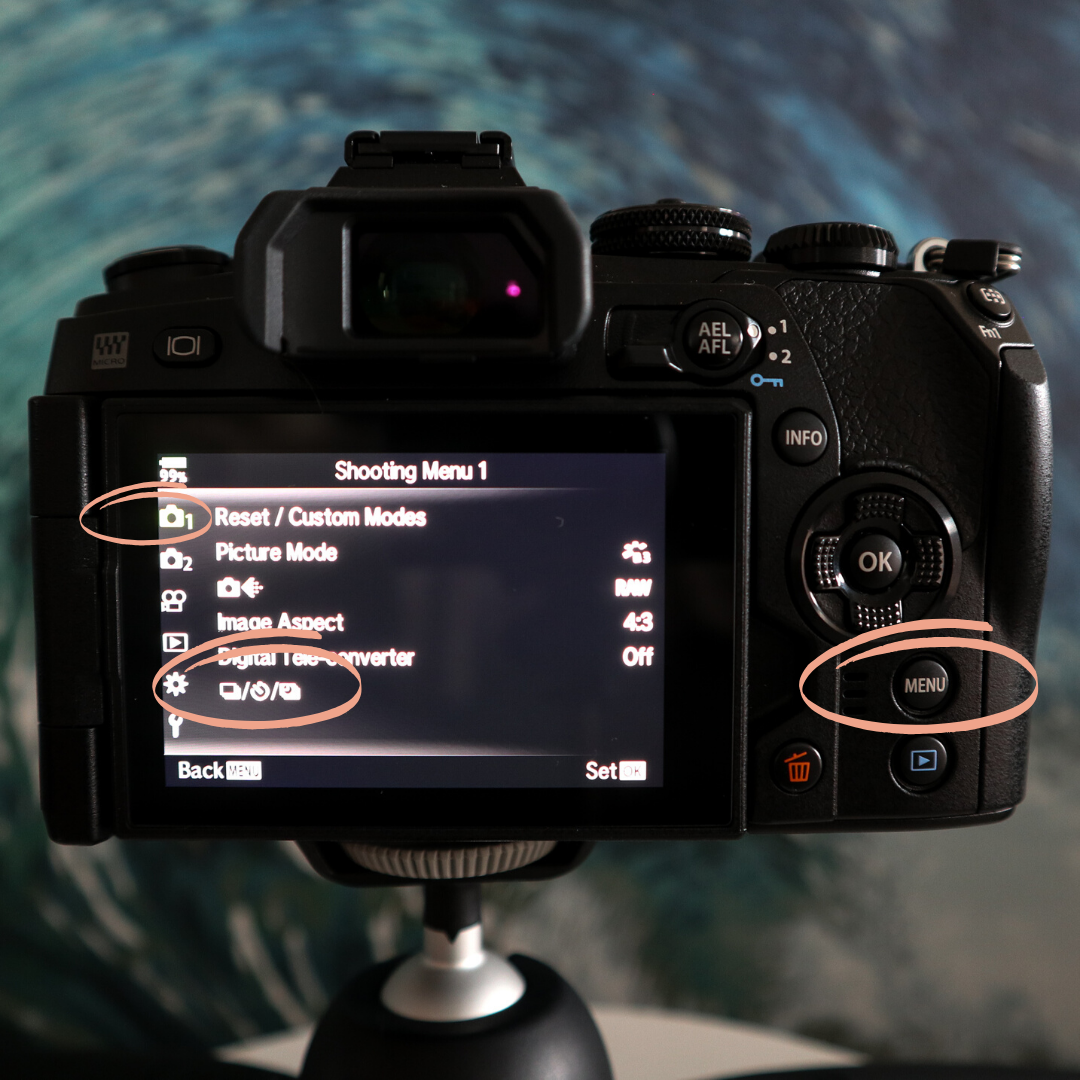
SHOOTING SETTINGS
You can change your shooting settings such as to self-timer, sequential, interval by:
-Scrolling to SHOOTING MENU 1
-Scrolling to the very bottom and select the mode you want
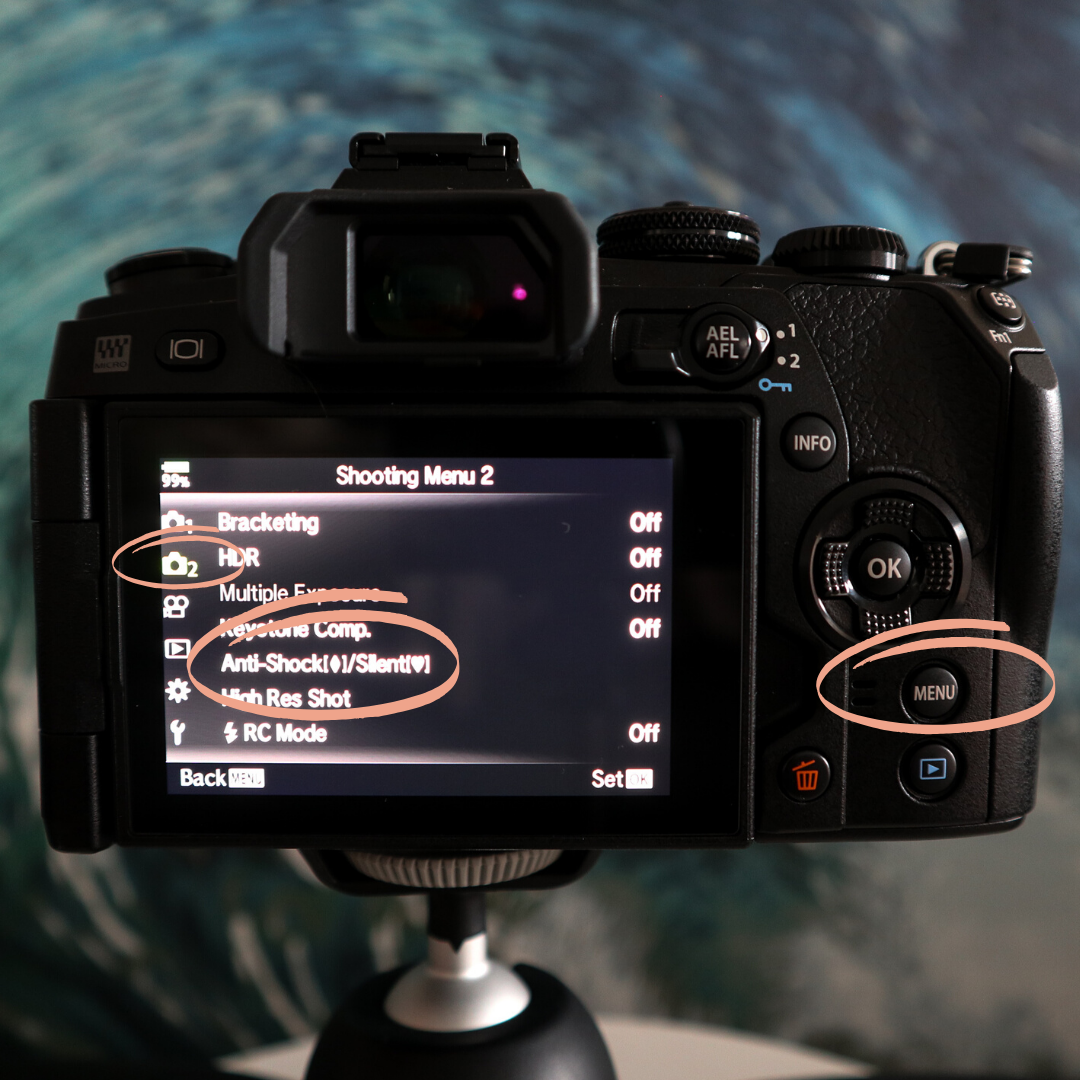
ANTI-SHOCK
Your Anti-Shock will help you prevent any small vibrations that occur when you press the shutter, you can set it by:
-Clicking on SHOOTING MENU 2
-Scrolling to ANTI-SHOCK
-Setting it to 0
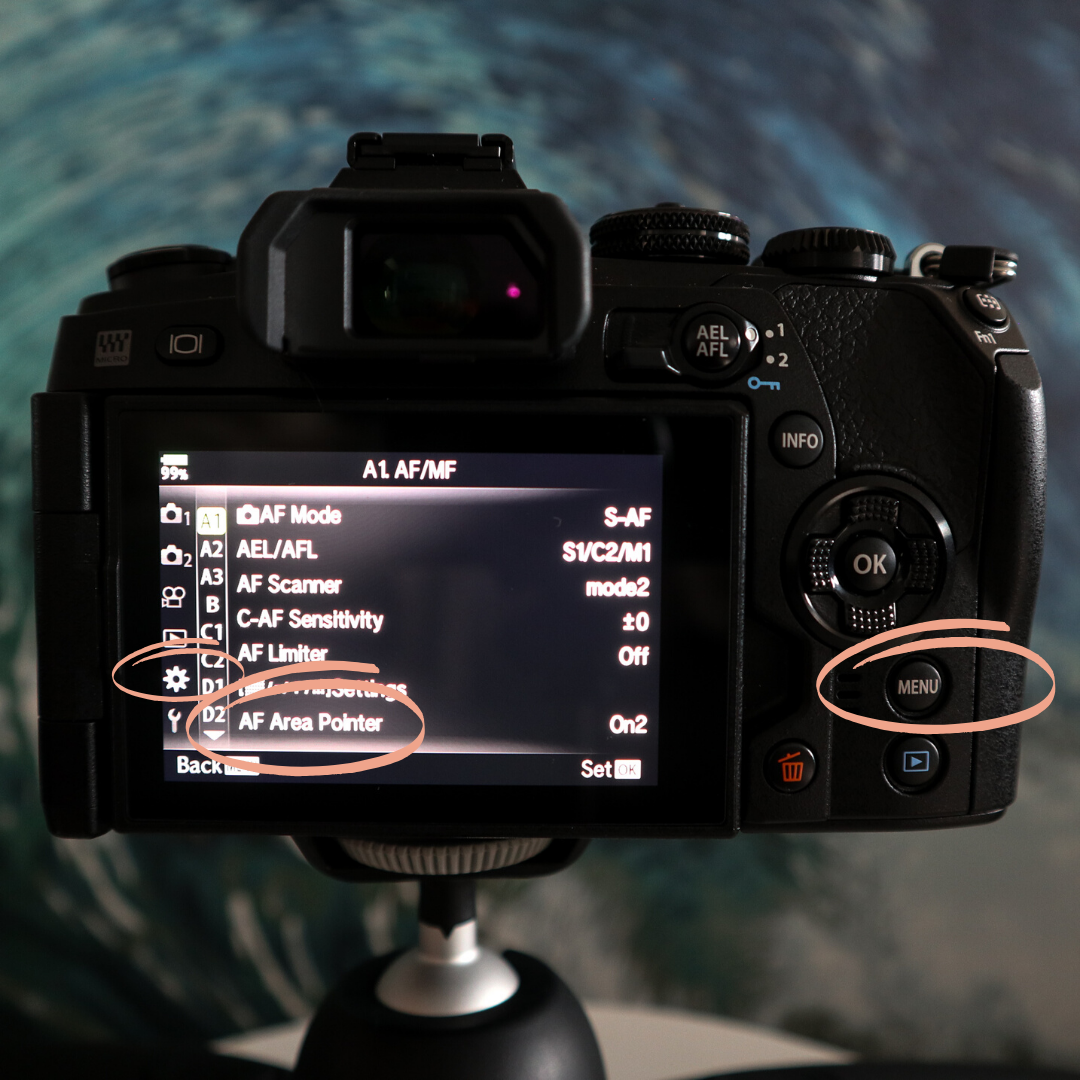
AF AREA POINTER
If you want to display your frame while the shutter button is half pressed :
-Scroll down to CUSTOM MENU (GEAR ICON)
-Toggle over to A1
-Scroll down to AF Area Pointer
-Change it to On2
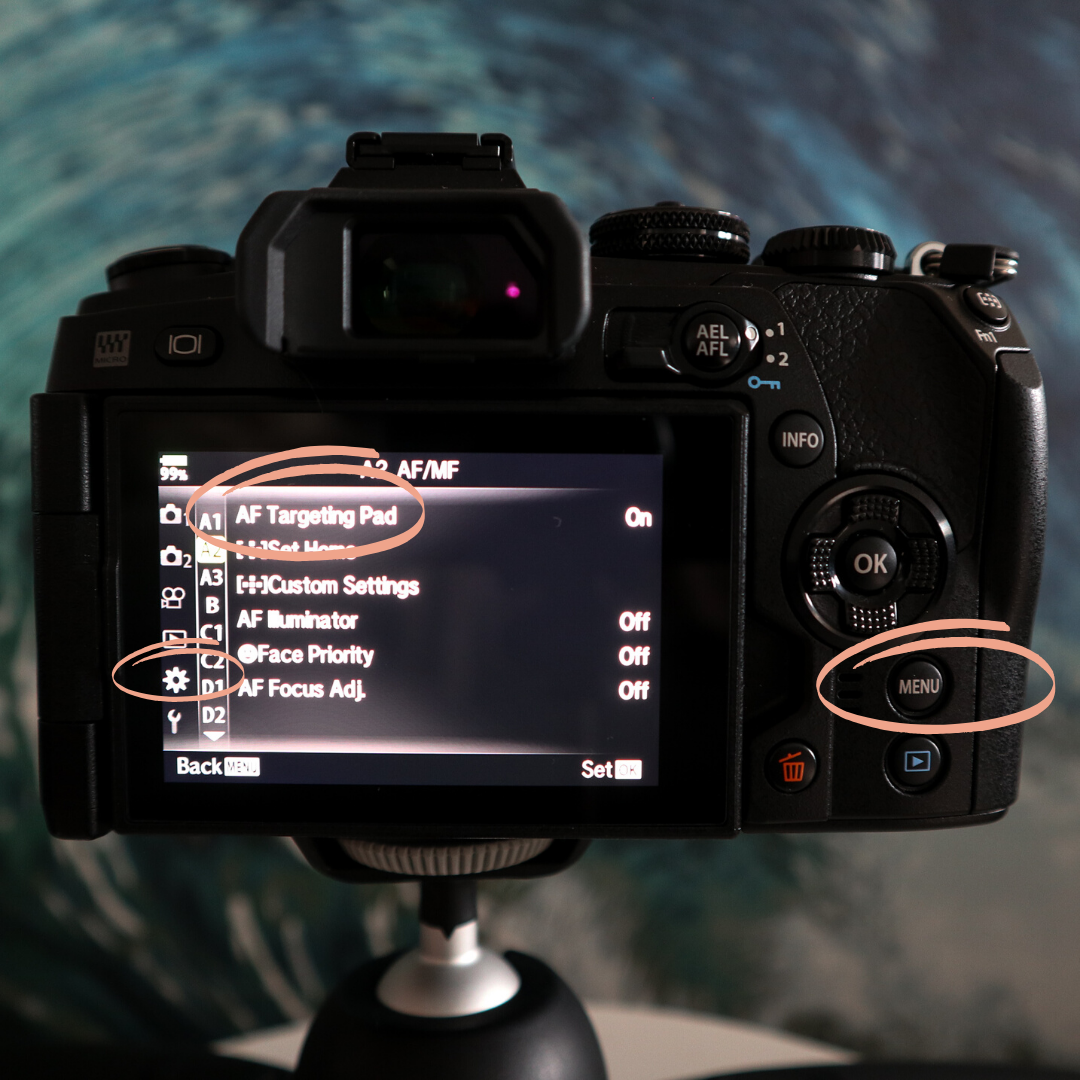
AF TARGETING PAD
By enabling the AF Targeting Pad you can use the viewfinder and use your fingers on the screen to change where you’re focusing, to do this in the CUSTOM MENU:
-Toggle over to A2
-Scroll to the AF Targeting Pad
-Switch to ON
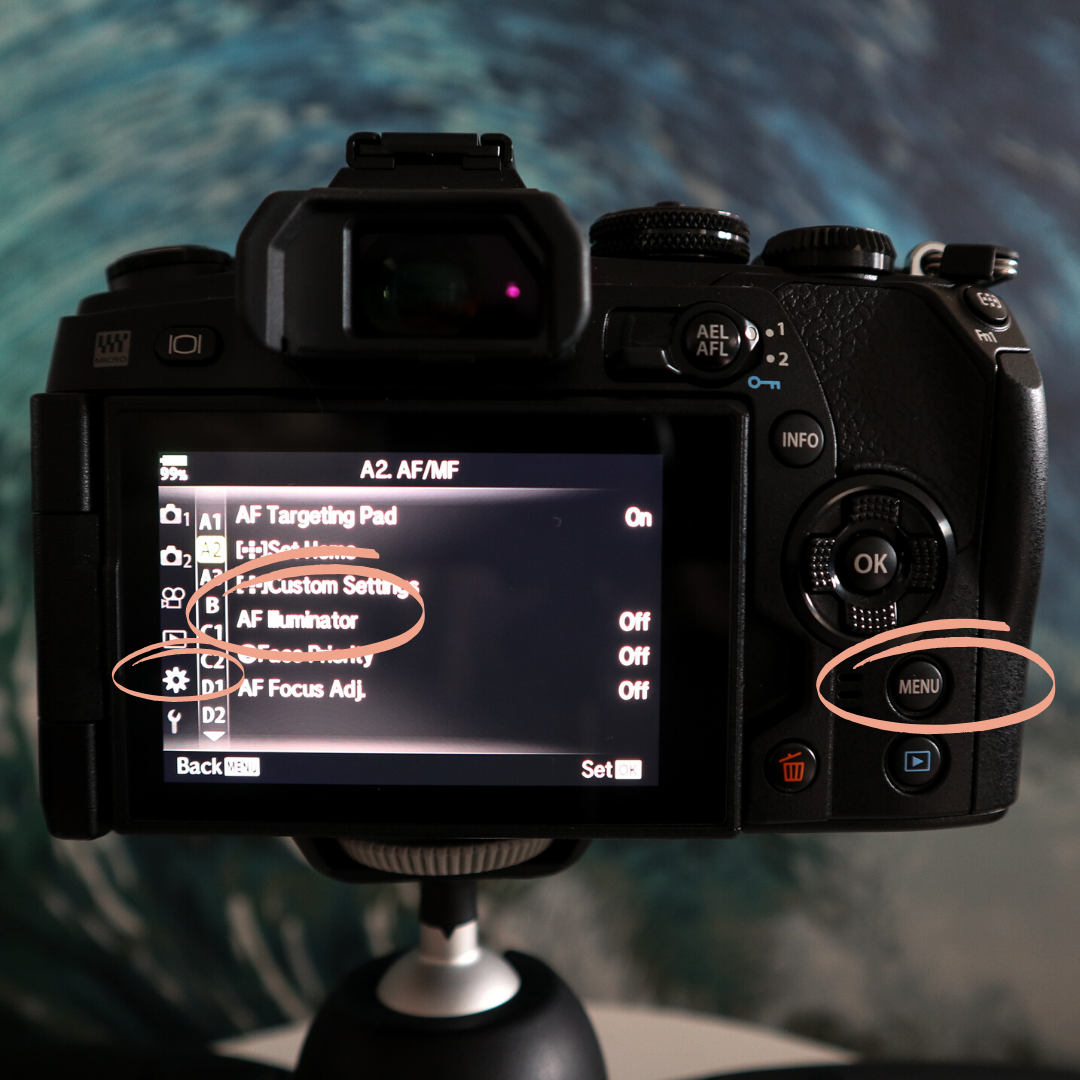
AF ILLUMINATOR
To turn off the AF Illuminator:
-Scroll down to the AF Illuminator
-Switch to OFF
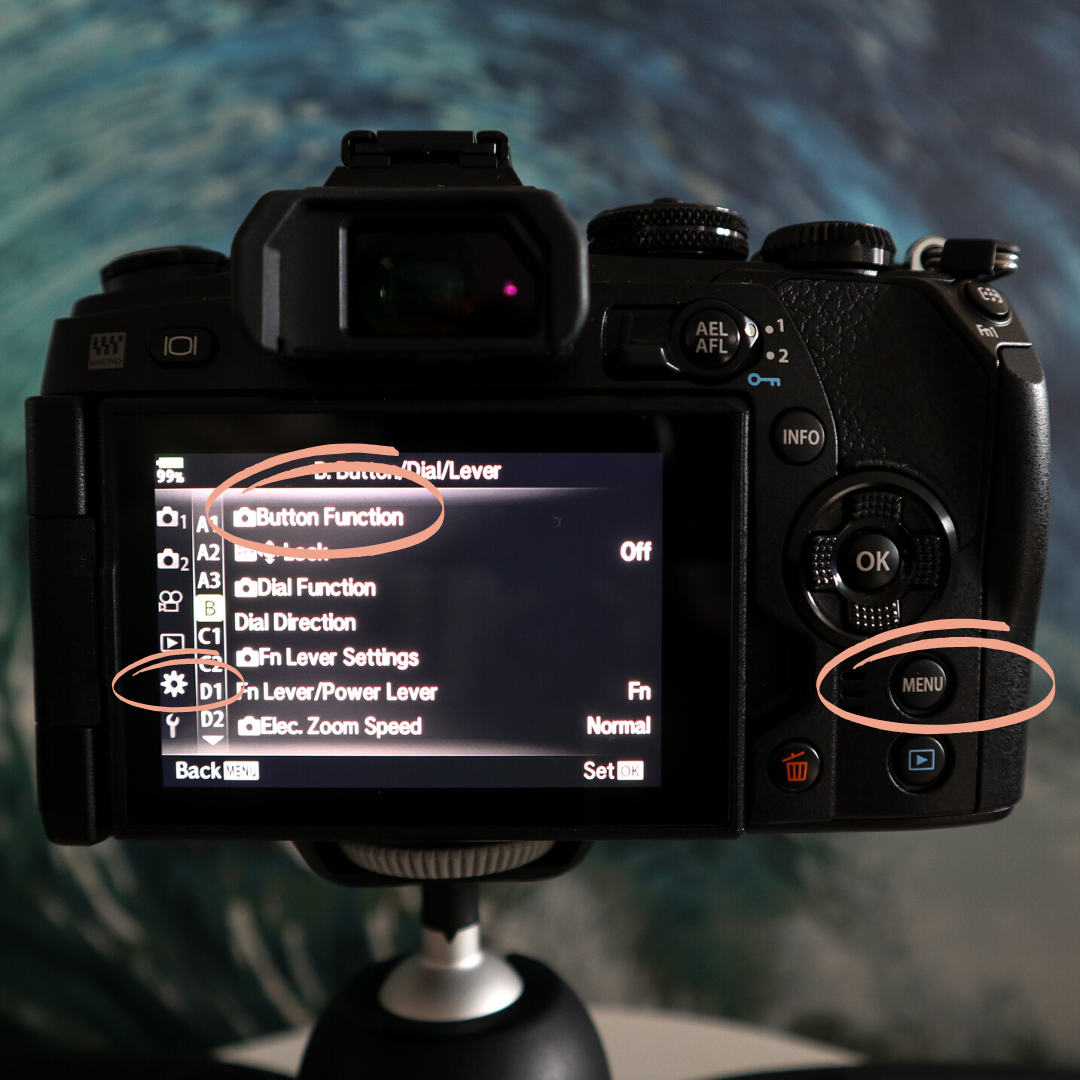
BUTTON FUNCTIONS
You can change a lot of the buttons on the Olympus and make it perfect for you!
Scroll down to B
-Toggle over to BUTTON FUNCTION
-From here you can go in and really change and map your buttons (I changed the AEL/AFL Button on the back of the camera to change my ISO and White Balance)
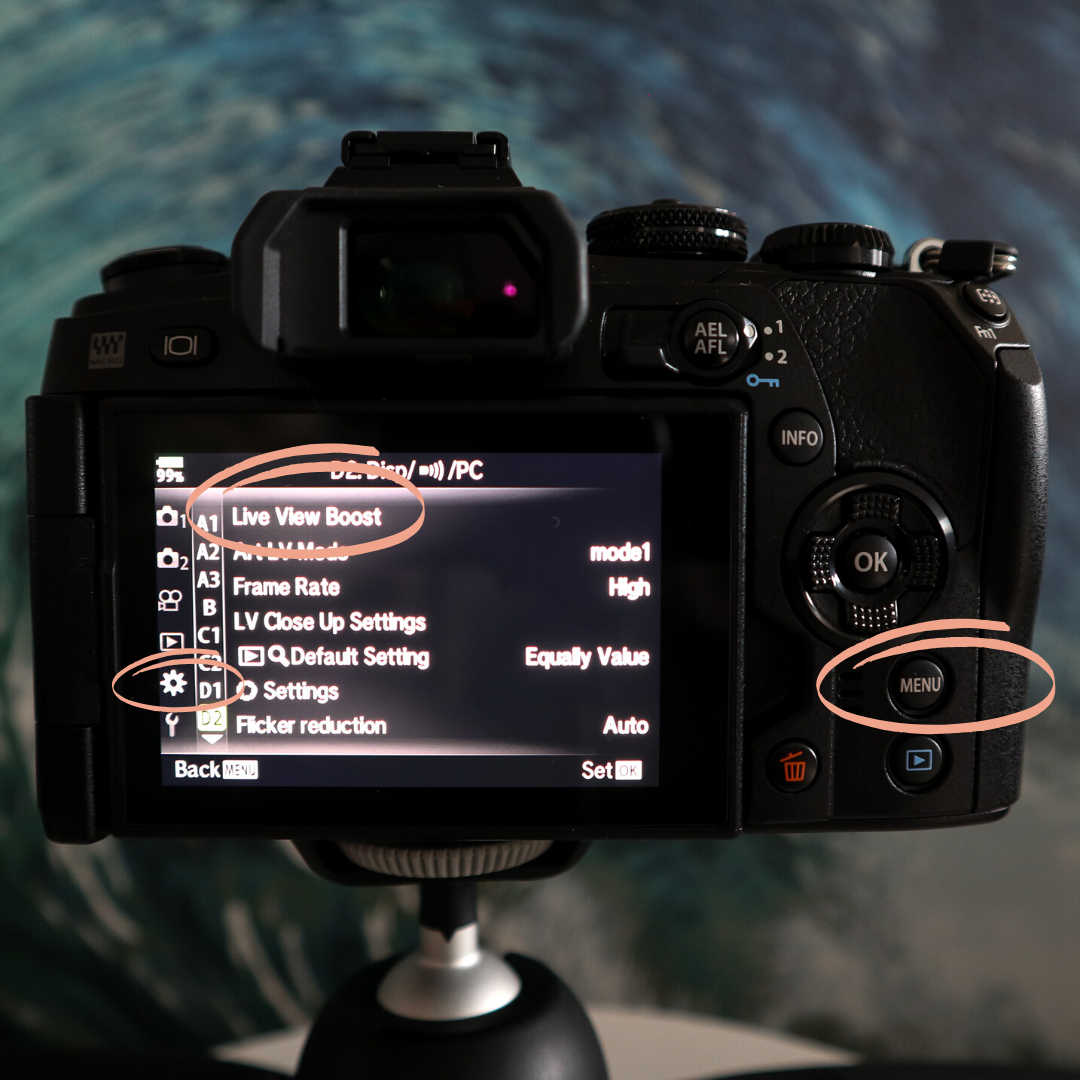
LIVE BOOST MODE
By turning off Live Boost Mode you can see the exposure settings and the image you see is the same as that of the final product, to do this:
-Scroll down to D2 in the CUSTOM MENU
-Turn the Live Boost Mode OFF
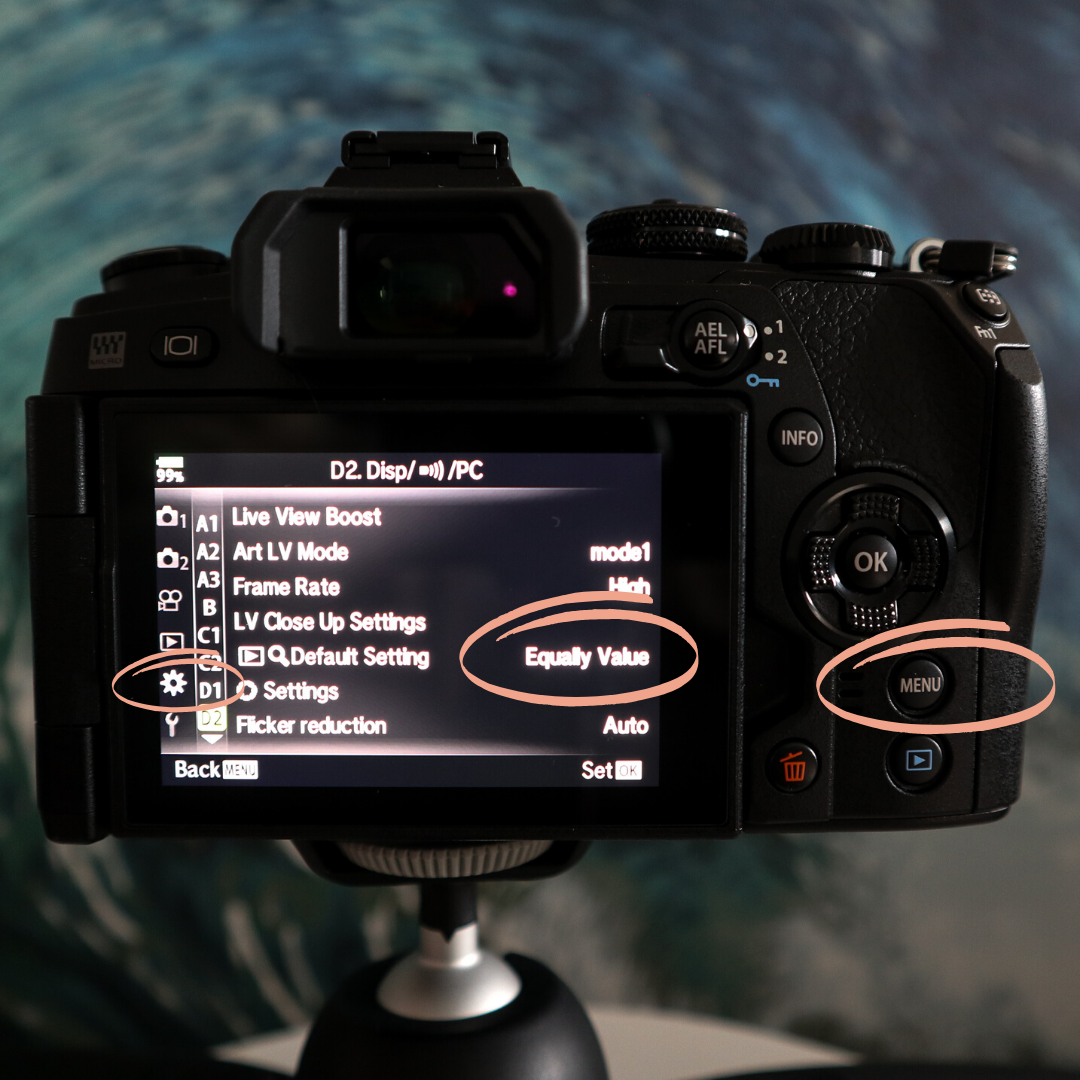
EQUALLY VALUE
I set my Default Setting to Equally Value so when I preview my image and zoom in it directly goes to 1:1 ratio, to do this:
-Scroll down to Default Setting
-Set it to Equally Value
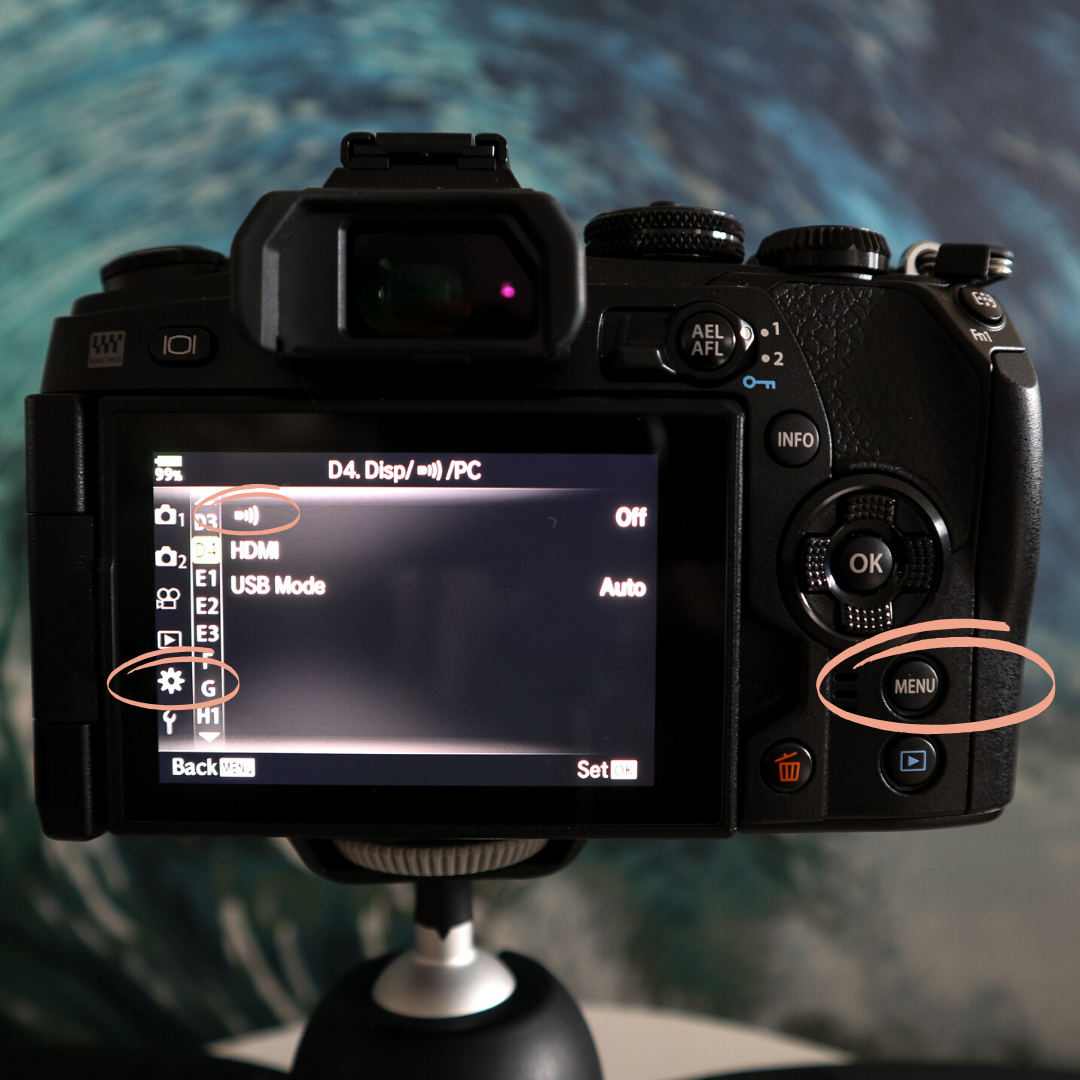
AF CONFIRMATION BEEP
When you are shooting and your autofocus is confirmed it will by default beep, to turn it off:
-Scroll down to D4 in the CUSTOM MENU (GEAR ICON)
-Toggle over to the first selection (AF CONFIRMATION BEEP)
-Turn it OFF

NOISE REDUCTION
You can change the amount of noise reduction performed at high ISO sensitivity by changing the Noise Filter - I don’t shoot a lot right now in high ISO so I’ve turned mine off:
-Scroll down to E1 in the CUSTOM MENU (GEAR ICON)
-Toggle down to NOISE FILTER
-Turn it OFF

JPEG IMAGE QUALITY MODE
I’ve switched my JPEG Image Quality Mode to superfine by:
-Scrolling down to G in the CUSTOM MENU (GEAR ICON)
-Toggle down to JPEG Image Quality Mode
-Set the first image (second box) to SF (superfine)
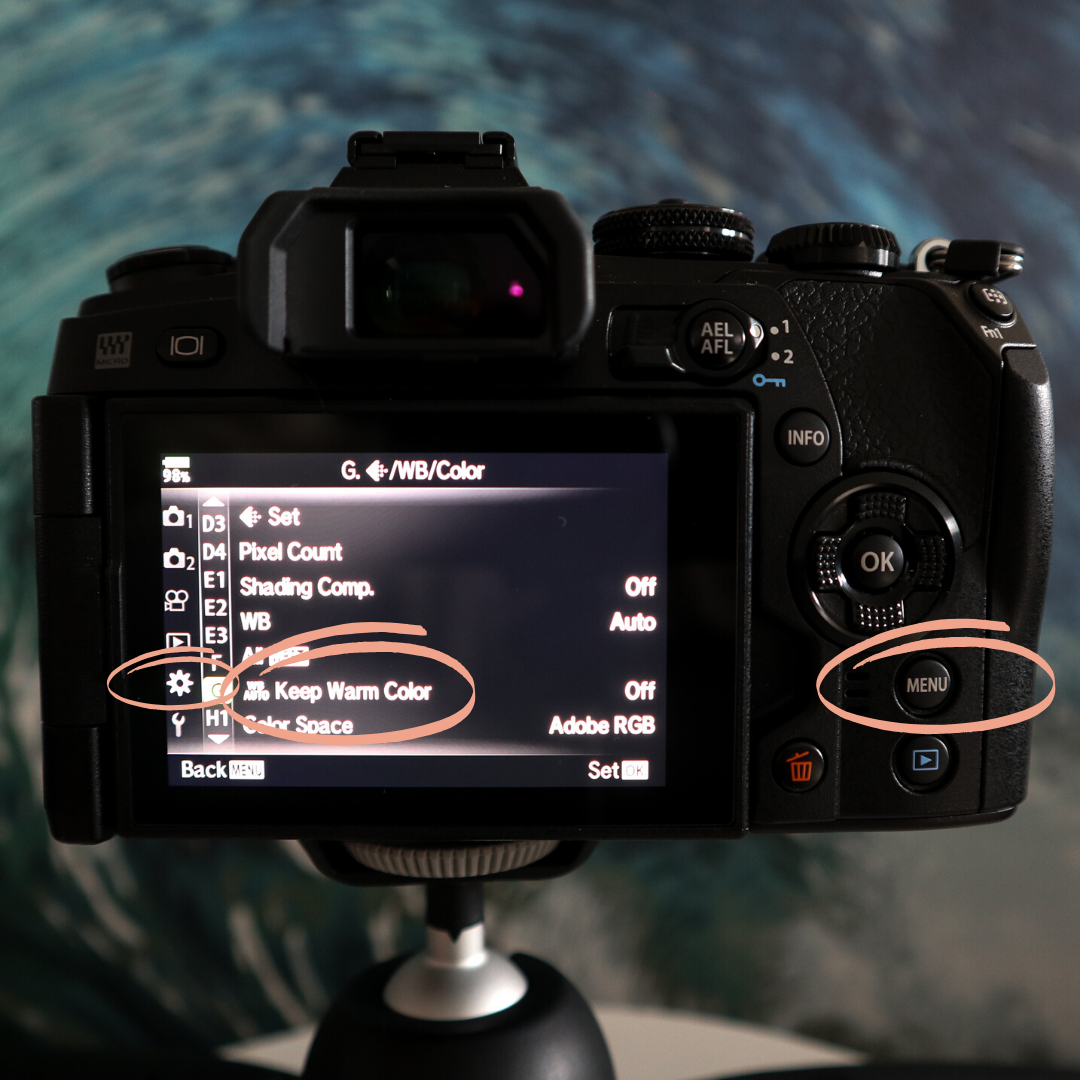
KEEP WARM COLOR
I also turn my Keep Warm Color Off and change the color space to Adobe RGB by:
-Scrolling down KEEP WARM COLOR
-Switching it OFF
-Scrolling down to COLOR SPACE
-Switching it to ADOBE RGB
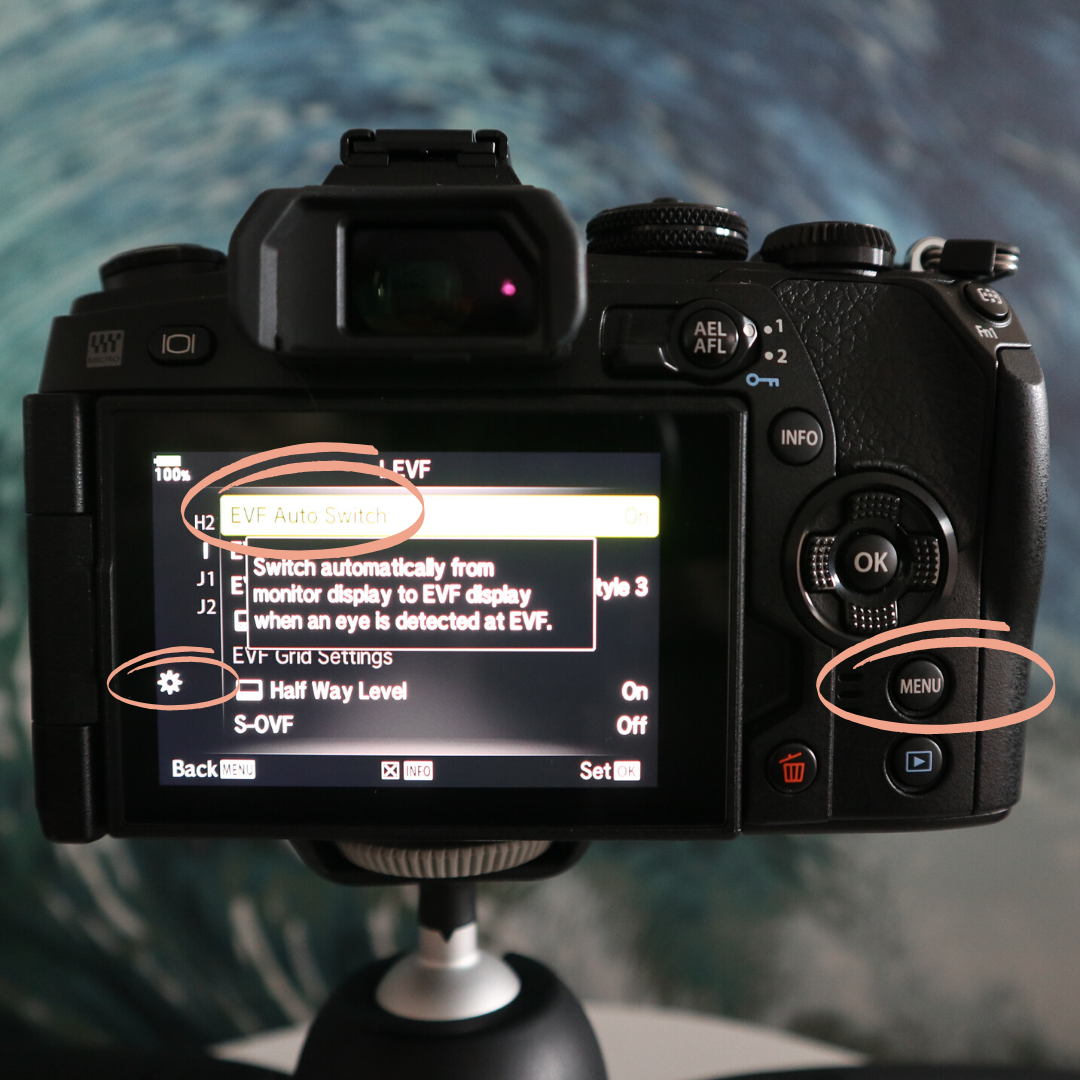
EVF AUTOSWITCH
When you are using the Olympus camera you have a viewfinder and a screen that you can see what you are capturing, by default it is set to automatically switch when you put your eye to the viewfinder and when you bring it down it will switch to the screen, to turn this off:
-Scroll down to I
-Toggle over to EVF AUTOSWITCH
-Turn it OFF (I like this feature so I leave mine ON)
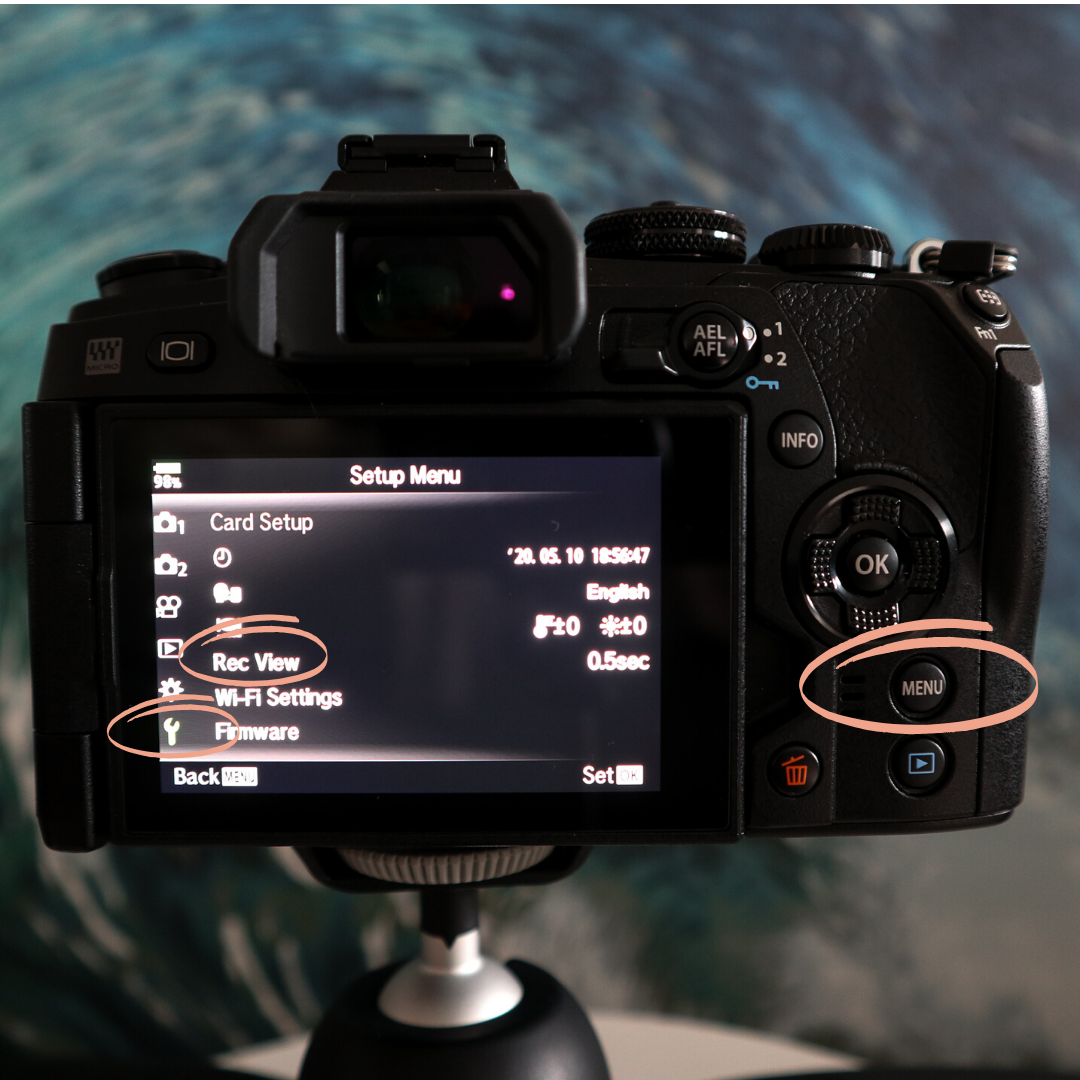
PICTURE VIEWING
To save battery I have heard that you can turn the image viewer off - I do this when I am travelling and its important to conserve battery, to do this:
-Scroll down to the SETUP MENU on the left hand side (TOOL ICON)
-Scroll down to REC VIEW
-Scroll and choose what you would prefer - 0.5 seconds, 0.3 seconds, OFF, etc.,
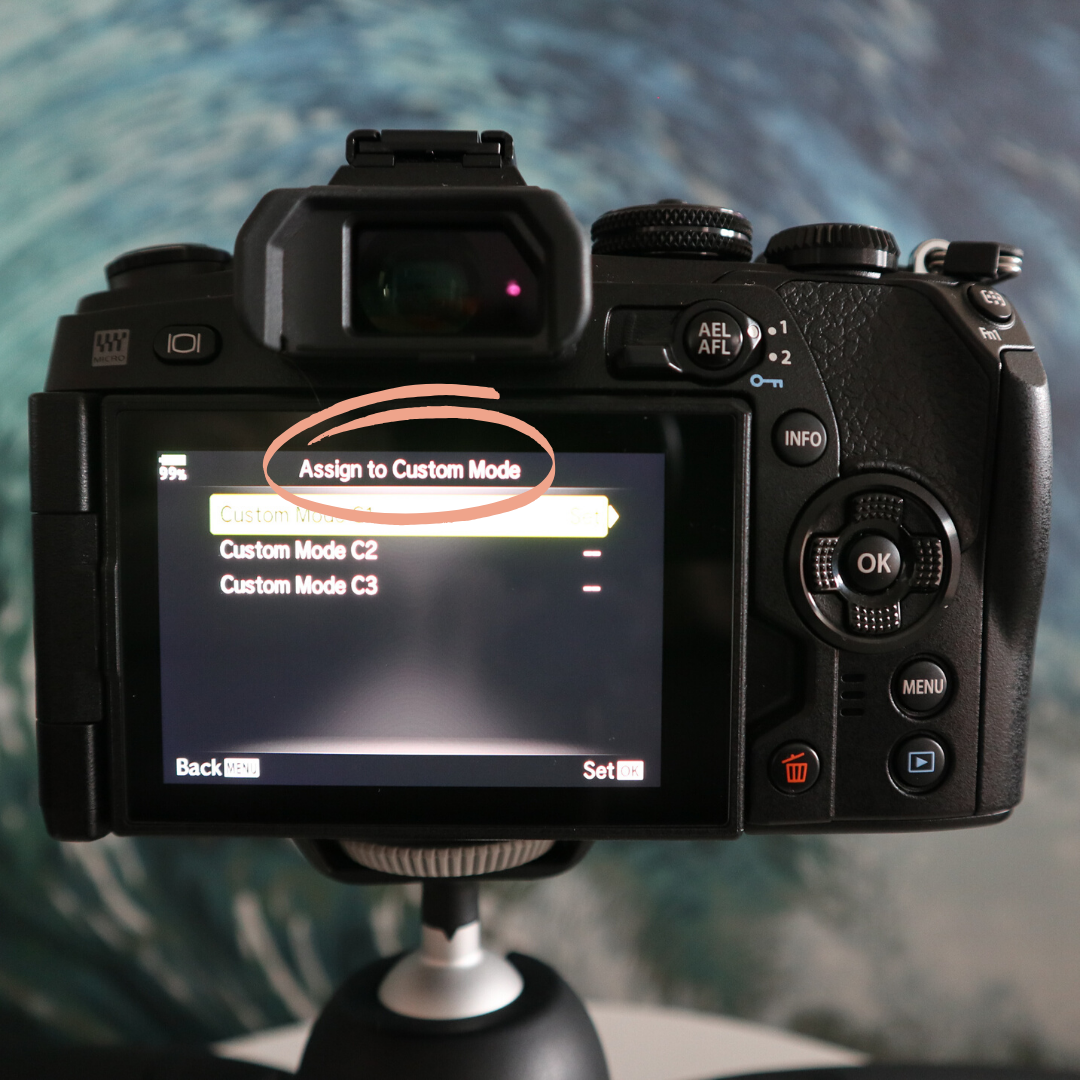
SAVE CUSTOMIZATIONS
To save any of your customizations that you make on the camera for next time:
-Click on the SHOOTING MENU 1
-Toggle over to RESET/CUSTOM MODES
-Scroll down to ASSIGN TO CUSTOM MODE
-Select which CUSTOM MODE you want to set it to C1, C2 or C3 on the top dial (I’ve set mine to C1)
Follow along!
Feel free to follow along with my video on how I setup my camera!